Missed Team ’24? Catch up on announcements here.
×Community resources
Community resources
Community resources
Moving Issues: How to make a shortcut list of destination projects and types?
Background
We have a Support project that's used as a generic intake location for all sorts of issues. Very often, the reporter submits the wrong ticket type, and we need to Move the issue into the correct place. (75% of the time or more)
Problem
We have 20+ projects and 30+ issue types in our system. However there's only ~7 commonly used combinations for these situations. We would like to present the Support staff with a short list of options. Once selected, kick off the normal Move process (to handle complexities like changes to fields, workflows, etc.)
Example
- User creates ticket as SUP: Support Request
- Support team opens ticket, determines that it needs to be moved. Options presented:
- SUP: Account Request
- SUP: Content Help
- DEV: Feature Request
- DEV: Bug Report
1 answer
Hi Marc,
Thanks for the background on your goals with the workflow, and this lines up with something I have been working on in a test site recently trying to figure out a native option as a workaround to this. It still needs some polishing but is a good starting point to get you going.
A little background, historically this is something that has been blocked by a few different long running feature request, but an option opened up recently specifically for service desk projects where you could do this with the native Service desk automation rules, and you can now create an issue based on action in the service desk project, Noting the Service desk automation rules will get very complex very fast to do the necessary update operations notes on this below. But while you are checking this out Let me know if you have any Questions on this as I know its a huge wall of text, and a lot of steps, and there is a lot of room for improvement based on individual use cases, but it’s a good basic approach.
First, as an initial reference point and background on the feature, details on configuring Automation rules can be seen here:
Beyond Automation rules there are third party apps to extend the functionality further, and have options to do this as well with scripted actions to accomplish this, and my have more simplified methods for this particular task and I would recommend looking at a fe of the apps to see if they would work for your process.
For the add-on apps you could use something like Automation for Jira, or Add Issue on Transition for Jira Cloud, or ScriptRunner for Jira, as an exe of some apps that would give you additional options for this, but check out the Marketplace apps I linked and the related apps section as there are a lot of options if you go this route, and you can check the documentation for each to see if it fits your needs better than the native options.
Back to the native functionality a big point I want to stress is that the logic can get pretty complex on simple actions when trying to trigger automation in two projects that are reliant on cross project actions because of the order in which the action is completed to when the issue is created/updated and then indexed. Because of this there is a lot of potential for logic conflicts with automated tasks as you will need them to fire in very specific orders so that action one in project 1 triggers the follow up action in project 2 which in turn triggers another follow up action in project 1 etc.... . As an exe if you have two two automation rules on the issues creation where one created an issue in project 2 and the other transitions the issue in project 1, and tried to have an "on linked issues transition" in project 2 that triggered a follow up action there would be a conflict as the transition portion could not be seen by issue 2 as it is in the process of being created when issue one is transitioning and the automation action will be missed.
So the following example is an ultra simplified version of how to set this up, but still gets complex fast so I recommend setting up some test projects to play around with, per your specific requirements before applying any changes to the production projects.
So my simplified outline of the approach using the native automation functionality would be as follows:
Project setup:
- I am using only two projects in my example
- a Collection Project
- DeskTato” DESTATO
- a Destination project
- “Potato Desk” PD
- but this can easily be extended to multiple destination projects if desired with additional logic In the automation
The Collection Project “DeskTato” creates and maps issues in the Destination Project “Potato Desk” using a unique identifier in the form of a type “Select list (single choice)” custom field value to create the desired issuetype/request type in the destination project.
At this point, you can get as complex as you would like, adding in several fields to work out the necessary logic for the 20+ projects and 30+ issue types you noted, I am sure there will be some necessary trial and error to work out the logic, like which destination project, differences in issue types in the projects, needed field types for required fields on the various projects, etc... noting the more fields or projects given as an option the more complex the automation rules will become, and I am looking to expand Multilevel cascading fields into this process for version 2 as described here “Jira Service Desk: How do I create a conditional field?“ but I’m still working out some of the logic there, but I think this is worth investigating on your end as well because it would be really useful for the 20/30 issuetype/projects that your trying to combine to help narrow the scope of the input options.
Again In my example automation rules I am using one field for the choice to route to one new project and splitting the issue in the Unique identifier into alternate request types on the destination project:
- Set up one collection project that will be used as the data collection point
- Set it up with a simple workflow with the statuses of "Open" and "Done" only.
- Set a post function on the mark as done transition to set a resolution
- and do not set screen for the mark as done transition
- On the Done status add an issue property of jira.issue.editable = false
- This prevents a duplicate comment form one of the automation rules later on
- In the Destination projects Edit the workflow to have a looping transition from the first status back to itself through a secondary Status exe: Create > Open > Automate > Open > rest of the workflow Like this
- In the Data Collection project Create a "Select List Single Choice" custom field that will be used to route the issue to the appropriate project.
- Add one option for each project or request type that you want to create the new issue in.
- In the EXE I have options S1, S2, and S3
- Add the custom field you created to the request type's customer visible fields and set it to required = YES
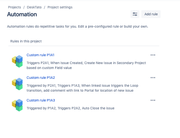
- In the collection project Create 3 Custom Rules In the Following Screenshot I used the naming convention of P#A# pr project and Automation rule number to explaing the mappings so P1A1 is project 1 Automation Rule 1:
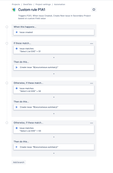
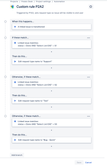
- P1A1 the First custom automation rule P1A1 Triggers P2A1, When the Issue in project 1 is Created, it will Create New issue in the Secondary Project based on custom Field value using the automation rule:
- When This Happens...
- Issue created
- Then do this...
- Create Issue
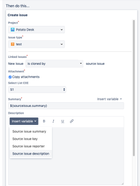
- Then using the onscreen dialogue to configure the desired field values and insert variables such as setting the Issue type or wether to copy over the summary and description, and what project this will be created in, Noting: a request type cannot be set at this step more on that below.
- Save the Do action option and
- Then using the onscreen dialogue to configure the desired field values and insert variables such as setting the Issue type or wether to copy over the summary and description, and what project this will be created in, Noting: a request type cannot be set at this step more on that below.
- Create Issue
- Choose the Add Condition Option to enable the If statement selection set this to:
- If These Match....
- Select “Switch to JQL”
- Add the statement "Select List EXE" = S1
- If These Match....
- Choose the Add Branch option to add a "Otherwise Do this.." section and Repeat steps 1-3 above for each JQL combination of field options you want to be routed to an alternate project, and save the automation rule and you’ll have something like this:
- When This Happens...
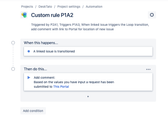
- P1A2 the Second Automation Rule Triggered by P2A1, Triggers P1A3, When linked issue triggers the Loop transition, add comment with link to Portal for location of new issue, with the settings
- When this happens...
- A Linked issue is transitioned
- If these match...
- Issue matches: status in (open)
- Then Do this...
- Add comment
- Write up a custom comment to add to the issue noting the base portal URL for the customers open requests something like
- "Based on the values you have input a request has been submitted to [This Portal | https://<BASE_URL>.atlassian.net/servicedesk/customer/user/requests?status=open]"
- Add comment
- When this happens...
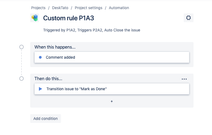
- P1A3 the Third Automation Rule in project 1, Triggered by P1A2, Triggers P2A2, Auto Close the issue
- When this happens...
- Comment is added
- Then Do This...
- Transition Issue to "Mark as Done"
- Transition Issue to "Mark as Done"
- When this happens...
- P1A1 the First custom automation rule P1A1 Triggers P2A1, When the Issue in project 1 is Created, it will Create New issue in the Secondary Project based on custom Field value using the automation rule:
- On the Destination Project create Three Automation Rules:
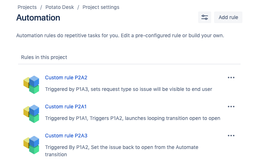
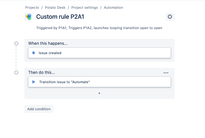
- P2A1 Triggered by P1A1, Triggers P1A2, launches looping transition open to open
- When This Happens…
- Issue Created
- Then Do this…
- Transition issue to :”Automate”
- Transition issue to :”Automate”
- When This Happens…
- 2A2 Triggered by P1A3, sets request type so issue will be visible to end user, Per the note above on the issue create in P1A1 where the request type could not be set at that location:
- When This Happens...
- A linked issue is transitioned
- Then Do this...
- Edit Request type
- Select the desired request type (This is necessary to make the issue visible to the user that submitted the initial request)
- Edit Request type
- Add a condition to Add the "If these match.." section
- Linked Issue Matches,
- Switch to JQL, and you have two input options:
- If you have one project for each of the options just add in
- status = Done
- Repeat for each project with a custom rule per project
- If you have multiple request types in one destination project add in
- status = Done AND "Select List EXE" = <the Field option that is tied to desired Request type>
- Add Branch in the same rule
- Repeat this for each request type
- If you have one project for each of the options just add in
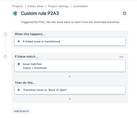
- When This Happens...
- P2A3 Triggered By P1A2, Set the issue back to open from the Automate transition so you can start working on the issue like it was created there initially
- When This Happens…
- A Linked issue is transitioned
- If matches
- Status = Automate
- Then Do this…
- Transition issue to “Back to Open”
- This is where the jira.issue.editable = false step comes into play as an additional notification and comment would be triggered here if the workflow property is not in place:
- When This Happens…
- P2A1 Triggered by P1A1, Triggers P1A2, launches looping transition open to open
Now if you Create an issue in the data collection portal, a new issue is created in the Working Project with the different request type per the Custom Field selection in the first portal.
Regards,
Earl

Was this helpful?
Thanks!
TAGS
Community showcase
Atlassian Community Events
- FAQ
- Community Guidelines
- About
- Privacy policy
- Notice at Collection
- Terms of use
- © 2024 Atlassian


You must be a registered user to add a comment. If you've already registered, sign in. Otherwise, register and sign in.