Community resources
Community resources
Community resources
JIRA Tutorial for NGOs. Part 2 – How to acquire free software for your organization?
Atlassian software is great software if you want to change the way you approach the topic of project management and make you work more efficient and professional. If non-profit organizations want to promote their mission the best way possible, they should use the same tools in their operations, as the biggest corporations. Because they are also your competition for the attention of people. Fortunately, you don’t have to invest the same amount of money for software as them. You can get your project management tools for free.
Here is a quick tutorial, how to acquire free project management tools from Atlassian.
Step One – Check if you are eligible:

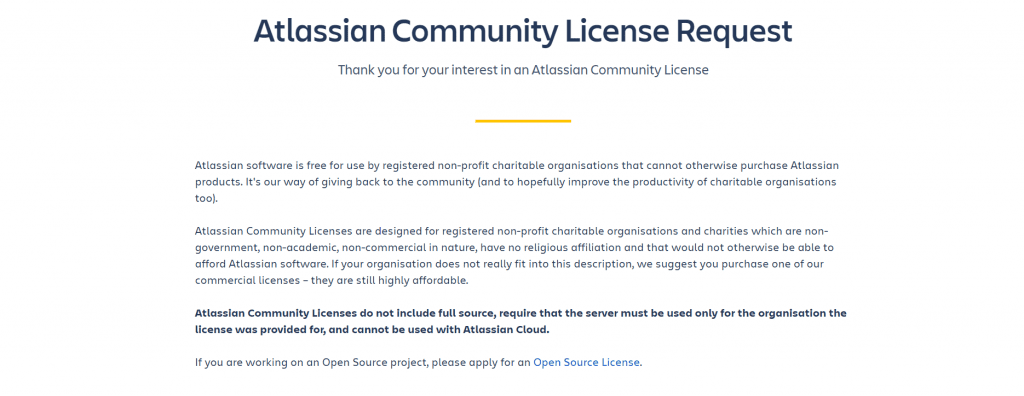
Go to this website:
https://pl.atlassian.com/software/views/community-license-request
To get Jira, Confluence or any other software from Atlassian, you have to send to them a request for Community Licence. This is a way for this company to help these organizations that are dedicated to helping others. It’s a very popular way for creators of applications to give something from themselves to others – for example, Google has a similar program, as well as Canva.
Of course, there are some requirements you have to fulfil to be eligible for this program:
- You have to be a registered non-profit charitable organization.
- Your profile has to be:
- Non-religious;
- Non-academic;
- Non-government;
- Non-commercial.
Remember that your Community Licence can’t be shared with anyone. It also can’t be used with Atlassian Cloud.
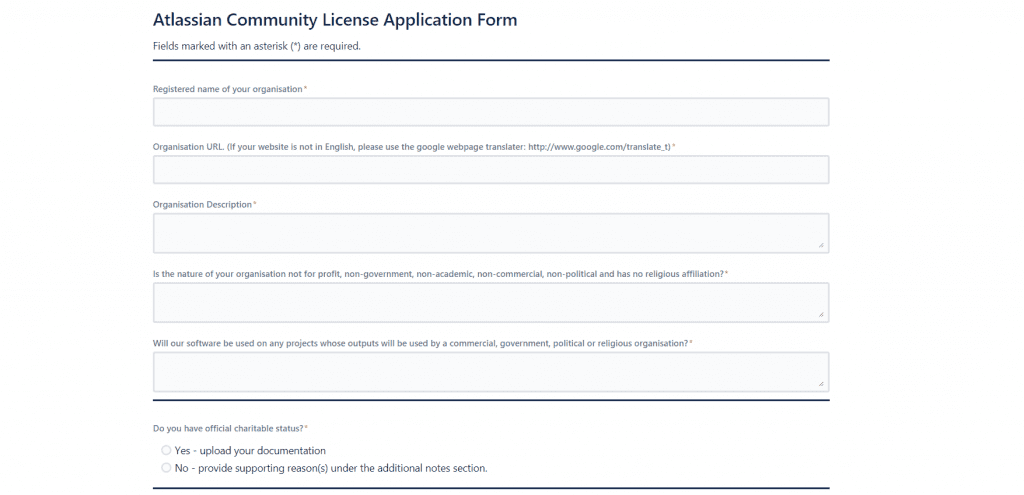
Step Two – Fill the register form:
It’s pretty self-explanatory, but we will help you with every step of this task.

- Remember to write the name of your company, as it is registered by your local court/government.
- You have to send a link to your organization website. If it isn’t in English, don’t worry – you can use a Google Translate version here.
- Describe your NGO in a couple of sentences – write about your mission, what do you do and who do you help. It doesn’t have to be an essay, just get to the point.
- If you are eligible for this program, you will answer “YES” for the question about nature of your organization and “NO” about if an output of your projects will be used commercially, by the government or a church.
- Click “YES”, if you are a charitable organization and can prove this:

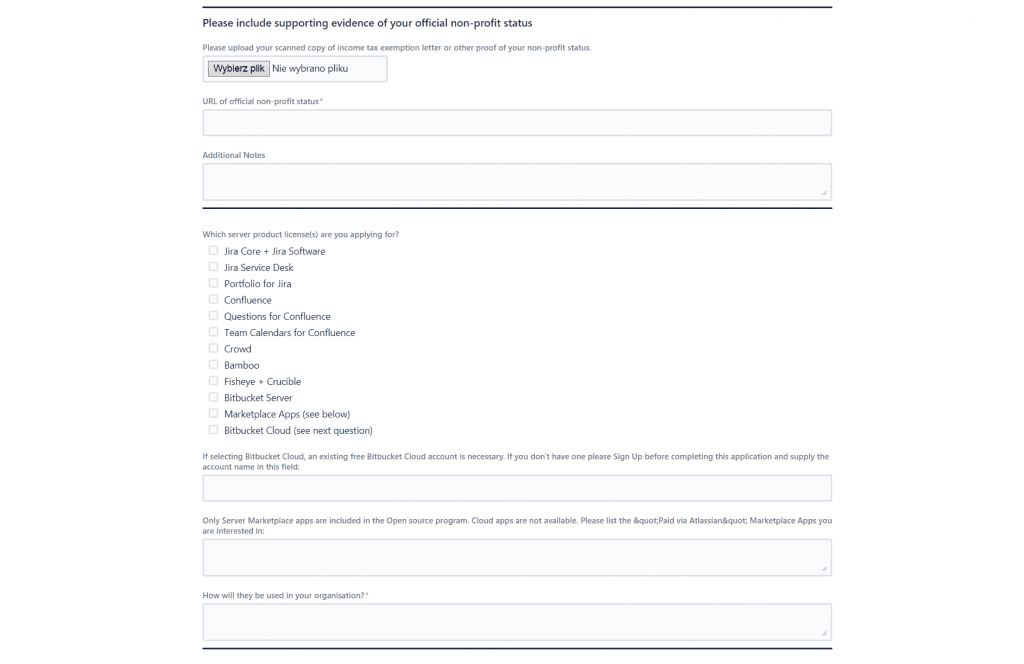
- Upload documents that show, that you are officially registered in your country as a charitable, non-profit organization. In our case, we’ve used the National Court Registry documents – different countries can have different ways of registering NGOs.
- Post a link to the government website, that can show your non-profit status.
- If you want to, you can add notes about these documents. In our case, we’ve described how you can check the status of the non-profit organization in Poland.
- Choose the software you are interested in. In the first part of our tutorial, we’ve described every tool available for non-profits. Think carefully and check all the software, that you think can help your organization in managing projects.
- Most of the NGOs don’t have a use for Bitbucket Cloud – so you can leave this field empty.
- Write in every app from the marketplace, that you are interested in:
- There are many different applications that are available for Atlassian products. Thanks to them, you can personalize your software for your needs and preferences. Browse through the Marketplace, read reviews and descriptions for the apps and choose what you think, that will suit you best. Thanks to the Nonprofit License you can get them for free - so don't be afraid to experiment a little bit.
- Write down a couple of sentences description of how do you want to use Atlassian software in your work. Describe how this software will help you in project management and how it will allow you to fulfil your organization mission:

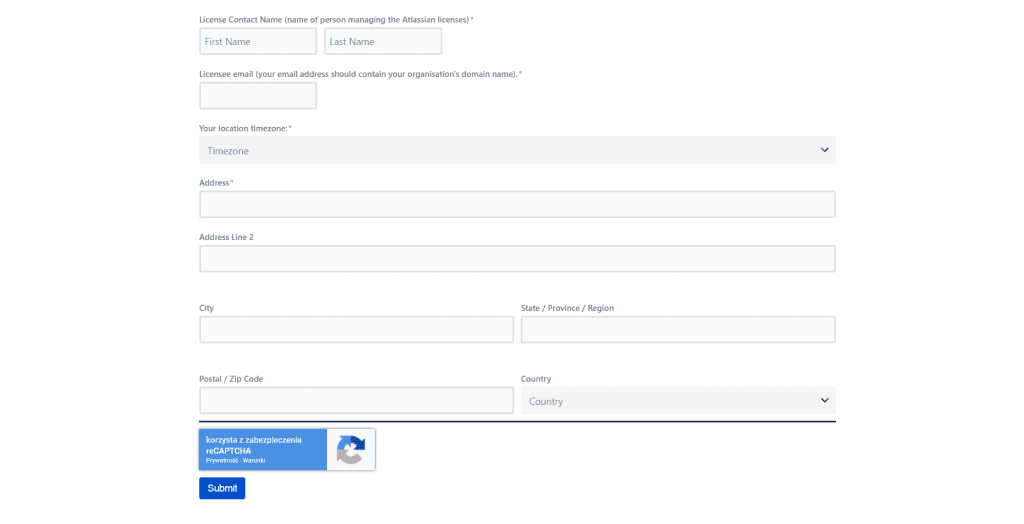
- Fill in your (or another person who will manage this account) First and Last name, as well as e-mail. Remember, that your e-mail address should contain the name of your organization.
- Choose your timezone, fill-in address with postal code and country.
- Click Submit and you are done here!

Step 3 – Get confirmation e-mail and wait
A minute or two after you fill your register form, you should get a similar message on your e-mail:

If you click the attached link, you will be send to the Atlassian website. You can see there, what status has your application.
After a day or two (usually, the Atlassian support is pretty quick), you’ll get a message with a link to the licence key and download links for the software you’ve chosen in the register form.

Step 4 – Installation of Jira, Confluence and any other tools you need
Here is a manual from Atlassian, about each step of the installation process:
When prompts will ask you to enter the licence, enter the information from the link of the e-mail. Remember, for Jira Core/Jira Server and Confluence you’ll have to write down your Server ID first before you’ll get the licence key.
To get it for Jira, you need to:
- Log in as a JIRA administrator;
- Click on the Settings icon and choose System;
- Click on the System info link;
- Your Server ID will be listed in the JIRA info section.
For Confluence the process is similar:
- Log in as a Confluence administrator;
- Click on the Settings icon and choose General configuration;
- Click on the License Details link (under ‘Administration’);
- Your Server ID will be listed in the Server ID field.
For other products, the licence key will be just write down in the link from the mail. Just copy and paste it, during the installation process, when they are needed.
And that is it, your Atlassian software should be up and running! Bring your projects to another level and manage your team as never before!
Was this helpful?
Thanks!
Urszula Kaczorek
2 comments