Create
Turn on suggestions
Auto-suggest helps you quickly narrow down your search results by suggesting possible matches as you type.
Showing results for
Community resources
Community resources
Community resources
How to bulk create Users in Jira
June 2, 2022 edited
This article discusses how you can leverage Create user (/rest/user) Rest API endpoint to create bulk users in Jira. This approach is targeted for all the Jira versions, where the /rest/api/2/user endpoint is supported.
Prior to the script execution, the CSV file with the user information or supported payload(emailAddress, displayName, name, password) is to be prepared.
Option 1: Using Bash command line
Prepare and create the script as below(by replacing Jira base URL, API username, password and path to CSV file):
|
Now, create the CSV file with user information:
# cat test.csvtest1,Test User 1,test1@sample.com,Passw0rd1test2,Test User 2,test2@sample.com,Passw0rd2test3,Test User 3,test3@sample.com,Passw0rd3test4,Test User 4,test4@sample.com,Passw0rd4test5,Test User 5,test5@sample.com,Passw0rd5
Then, execute the bash script (sh
bulkuser.sh) to create users in bulk.Option 2 Using Python script
Prepare the script as in the following example:
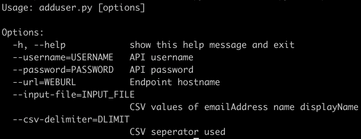
importsysimportcsvimportosfrom optparseimportOptionParserimportrequestsfrom requests.authimportHTTPBasicAuthimportjsonparser = OptionParser()parser.add_option("--username", dest="username", help="API username")parser.add_option("--password", dest="password", help="API password")parser.add_option("--url", dest="weburl", help="Endpoint hostname")parser.add_option("--input-file", dest="INPUT_FILE", help="CSV values of emailAddress name displayName")parser.add_option("--csv-delimiter", dest="dlimit", help="CSV seperator used")(options, args) = parser.parse_args()ifnot options.INPUT_FILE:parser.error("INPUT_FILE must be specified")ifnot options.username or not options.weburl or not options.password or not options.dlimit :parser.error("--username <username> --password <password> --url <endpoint uri> --input-file <input csv file with header emailAddress name displayName> --csv-delimiter <; or ,>")url ="https://"+options.weburl+"/rest/api/2/user"auth = HTTPBasicAuth(options.username, options.password)headers = {"Accept":"application/json","Content-Type":"application/json"}withopen(options.INPUT_FILE) as csvfile:reader = csv.DictReader(csvfile, delimiter=options.dlimit)forrowinreader:emailAddress = row['emailAddress']displayName = row['displayName']name = row['name']password = row['password']payload = json.dumps( {"emailAddress": emailAddress,"displayName": displayName,"name": name,"password": password } )response = requests.request("POST", url, data=payload, headers=headers, auth=auth)print(json.dumps(json.loads(response.text), sort_keys=True, indent=4, separators=(",",": ")))
Now,Create a CSV file as in the following example, separated with ",":
# cat bulkuser.pyname,displayName,emailAddress,passwordtest31,Test User 31,123@sample.com,Passw0rd1test32,Test User 32,123@sample.com,Passw0rd2test33,Test User 33,123@sample.com,Passw0rd3test34,Test User 34,123@sample.com,Passw0rd4test35,Test User 35,123@sample.com,Passw0rd5
Then, execute the script as below to create users in bulk(--url should be just hostname and without https):
python bulkuser.py --username admin --password admin --url jira.atlassian.com --input-file ./test.csv --csv-delimiter ,
Was this helpful?
Thanks!
Ranjith Koolath
Atlassian Team

Atlassian Team
Atlassian Team members are employees working across the company in a wide variety of roles.
Community showcase
Atlassian Community Events
Copyright © 2026 Atlassian
1 comment