Community resources
Community resources
Community resources
4 steps to get actual statuses on the Jira board
Jira is a powerful tool that helps teams to plan, manage, and report on their work. We love using Jira, especially for its ability to track issue progress. But how to monitor the task's execution process if the team forgets to transfer tasks to appropriate statuses?
Managers often face the problem of mismatching the status of tasks in Jira because employees do not transfer tickets to the appropriate columns. As a result, managers lose current data about the workflow process. And it leads to ineffective or delayed management decisions.
At this point, a manager can start the uphill battles and force folks to make the right transitions or use the Automation rules to ensure that issue status represents the real situation.
I'm going to cover the 2nd option. We will consider the solution that is best suited for development teams working on the development, releases, and updates of IT products. Only 4 steps and you will forget about this problem.
1. Repository setup
If your team uses BitBucket, no issues at all since Jira and BitBucket are both Atlassian products, so they can easily work together. For other popular repositories, e.g., GitHub, GitLab you would need to install a special Add-on. It's free in most cases.
Make sure your Jira instance is connected to the Repository successfully.
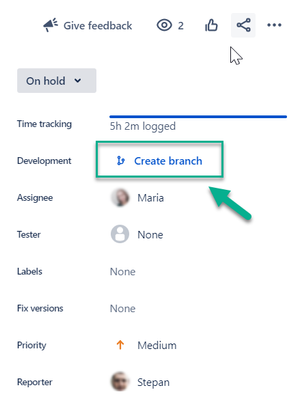
Once it's done, you will be able to see the "Create branch" button on the right bar of the Issue layout.
2. Jira Project setup
The next step is to configure the Automation rules to reflect your Jira workflow.
For that purpose, go to Project setting -> Apps -> Project Automation -> Create rule
3. Starting point
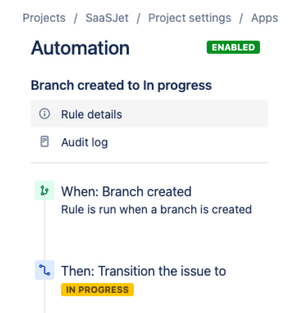
Let's start by setting the rule that helps move the issue to In progress status once the Developer created the Branch in the repository.
So, what we do here is basically logical operation - If (branch created) - THEN (change the status).
4. Adapting to your workflow
Now you have to reflect the Jira workflow by automation.
Let’s consider the next simple workflow:
Within the next Automation config, we need to set up the following situation:
Situation | Example of Automation | |
A | The developer has created the Pull request and wants to have the Code to be reviewed. |  |
B | Code review is successful, so QA team can test it |  |
C | Some issues have been identified during the Code review, so the developer has to put the additional efforts to make it nice |  |
D | QA team validated the changes, and the build is Green, so the feature candidate would be deployed. Make sure you have connected the Building tool. Or ignore it, if only QA should decide whether it can be considered as Done. |  |
F | The tested feature failed during the Test and Deployment, so Developers must take a look again and complete it according to what is expected. Ignore it if only QA should decide whether it can be considered as Done. Also, you can separate these steps into QA review and Deployment health check. |  |
You can consider other additional conditions in Automation Rule Library.
Which opportunities will you get with this data?
In addition to monitoring the current statuses of each issue, you can use additional Jira opportunities fully. Such as:
- Monitor actual data on built-in Jira reports (Control Chart, Cumulative flow diagram, etc.);
- Set up automation rules based on statuses;
- Create SLA conditions based on statuses (for Jira Service Management tickets, for Jira Core and Software issues);
- Track how much time is spent on task execution during each stage.
Our SaaSJet team has developed the Time in Status for Jira Cloud add-on to perform the last one. It allows getting data about both the time in status and status groups automatically. You can download a Gadget with this data on your Jira Dashboard, and you’ll be aware of up-to-date information about the time spent on tasks during different stages.
The described overview is quite simple. However, we believe it will make you more onboarded with Jira Automation and shed light on the magic you can do with actual data about issue status data. Try and let us know if this article helps you to have actual statuses of your team workflow!
Was this helpful?
Thanks!
Zoryana Bohutska _SaaSJet_
About this author
Customer Success Manager at SaaSJet
SaaSJet
51 accepted answers
Community showcase
Atlassian Community Events
- FAQ
- Community Guidelines
- About
- Privacy policy
- Notice at Collection
- Terms of use
- © 2025 Atlassian


10 comments