Community resources
Community resources
Community resources
- Community
- Q&A
- Jira Service Management
- Opsgenie
- Articles
- How to set up Escalation Rules and notifications in Opsgenie
How to set up Escalation Rules and notifications in Opsgenie
Server downtime in your company: No need to panic, because you have chosen Opsgenie as a reliable alerting system and have already set up Incident Rules. So relevant incidents are directly identified and forwarded by Opsgenie to a responsible person. But what if that standby person is prevented from responding? Should a second SMS be sent? Or a phone call? Or should another person be contacted right away?
These questions are clarified with the help of Escalation Rules in Opsgenie. In this article, we will show you what exactly escalations and their guidelines are and how you can set up trustworthy rule chains with a few simple steps to ensure the fast resolution of an incident in every possible scenario.
Escalations in Opsgenie
In conflict management, the word “escalation” describes the forwarding of a problem to the next higher level. In Opsgenie, escalations are used to notify specific people at a predefined time and in a predetermined order.
Escalation policies in Opsgenie ensure that an incident is definitely taken care of, and important issues receive the appropriate attention. Because if the first person in the notification chain does not respond to the notification after a certain period of time, the incident is escalated to the next higher level. Another action configured by you is consequently triggered. This can be, for example, the repeated notification or the addressing of another person or the entire team.
And how do notifications look like?
In Opsgenie there are 4 types of notifications:
-
SMS
-
Phone calls
-
Push notifications
-
Email
Notification settings give users the flexibility to specify what their preferred method of notification is and what, if any, time constraints or other limitations exist for them. The default notification method is to send an email. However, you can always customize the contact methods to your own preferences.
Configure Escalation Rules
Use Escalation Rules to ensure that users are notified of an incident until the alert is acknowledged or closed. In addition, you can also trigger escalations manually, for example, when you receive a notification about an issue that you can’t resolve. Then it makes sense to directly elevate the problem to the next escalation level without wasting valuable time to fix the problem.
Who is notified and in what way is up to you. We will show you how to configure Escalation Rules.
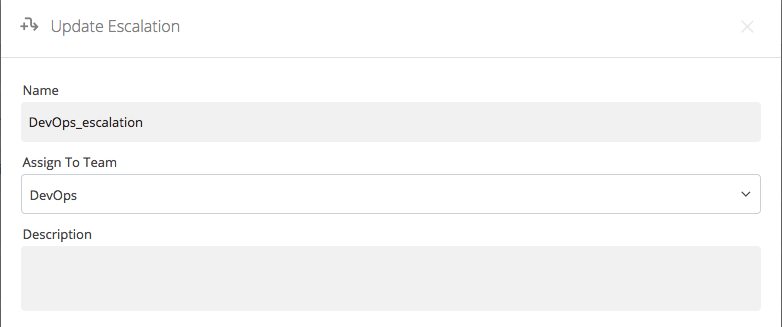
1. Name the rule and assign it to a team. Here it is beneficial to also add a description of the rule so that all team members and also other colleagues can see at a glance what the notification is about.
2. Define conditions for escalation. In the next step, scroll to “Escalation Rules” and select when the next stage should take effect:
-
-
As soon as the warning is not confirmed or
-
the notification has not been closed.
-
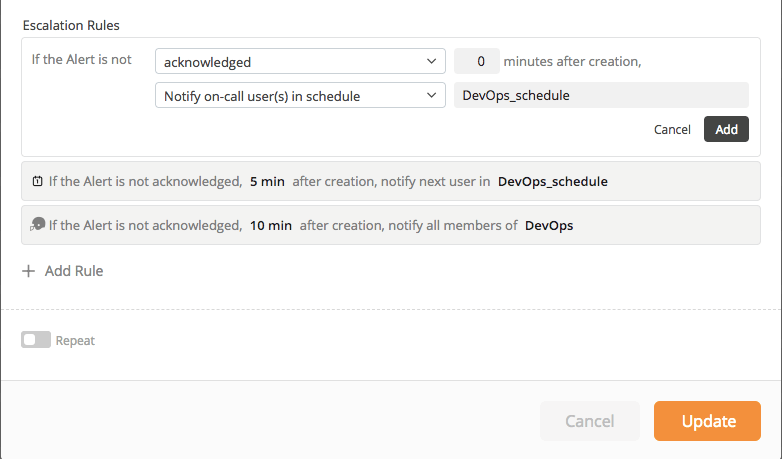
You can then specify the recipient of the notification. For example, select individual users, an entire team, a group, or the next standby member of your schedule.
In the example, you can see that the next escalation level is triggered if the first alert is not acknowledged after 5 minutes of creation. In this case, the next user defined in the team DevOps_schedule will be notified.
In the third stage, if the first alert remains unanswered after 10 minutes, all team members are notified.
You can set as many Escalation Rules as you want.
3. Define repetitions. An escalation can be set up to repeat a maximum of 20 times for a warning message.
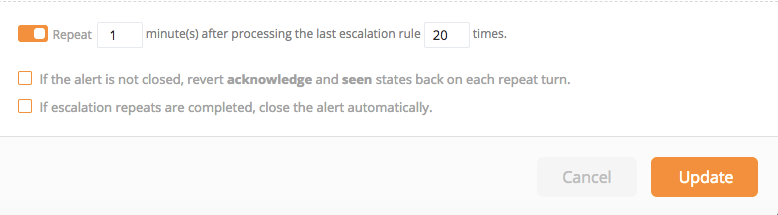
In this step, you can specify the importance of the repetition. For example, all recipients of an alert will be contacted on the next repeat turn, even if the alert is acknowledged. For this option, click: “If the alert is not closed, revert acknowledge and seen states back on each repeat turn.”
There may be different rules for each team. When you add a team to an alert, the team’s Escalation Rules apply automatically.
Here is an example of a team’s escalation process:
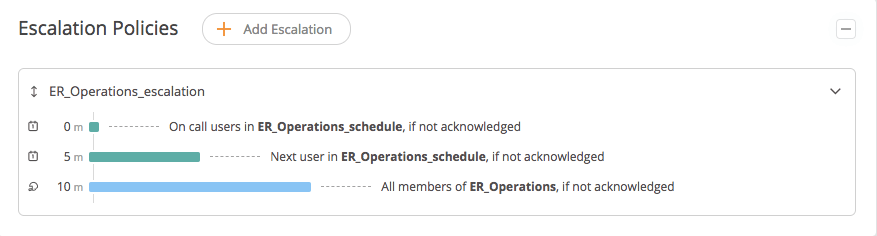
The graphic shows that the people on standby are notified first. If the alert is not closed after 5 minutes, the next user receives a message. If the alert is still not acknowledged or closed after 10 minutes, the next escalation step will be performed and all members of the team will be notified.
The benefits of Escalation Rules in Opsgenie
Normally in your company you know exactly who is the ideal contact person for which problem cases, but the more complex the technical environment or the larger your company, the more detailed incident management should be planned.
For this reason, it is worth using Opsgenie for your incident management and setting up Escalation Rules individually.
Some advantages at a glance:
-
Incidents are guaranteed to be handled quickly
-
Minimization of downtime
-
The right people are always notified
-
Crisis protection for every emergency
-
Total flexibility in configuring Escalation Rules
-
Individual selection of notification types
Was this helpful?
Thanks!
Andreas Springer _Actonic_
0 comments