Create Sign up Log in
Turn on suggestions
Auto-suggest helps you quickly narrow down your search results by suggesting possible matches as you type.
Showing results for
Community resources
Community resources
Community resources
AWS 環境に Jira Server を構築してみる #2
November 5, 2020 edited
AWS 環境に Jira Server を構築してみる で、検証目的として立ち上げたサーバーを ALB を利用して SSL で接続してみます。
事前準備
Amazon Route 53 でホストゾーンの作成
カスタムドメインに Jira に接続するために事前に Route 53 でホストゾーンを作成します。
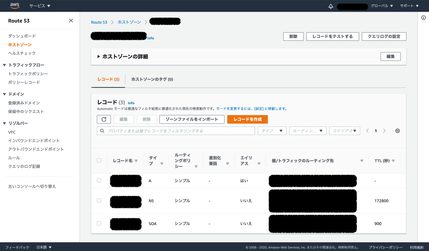
- Route 53 > ホストゾーン > ホストゾーンの作成
- ドメイン名 にすでに取得済みのドメインを入力
- NSレコード と SOAレコード が生成されます
- NSレコード と SOAレコード が生成されます
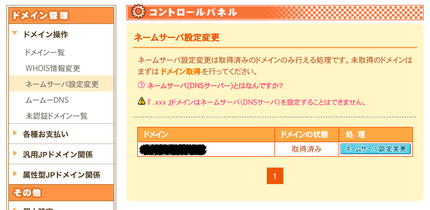
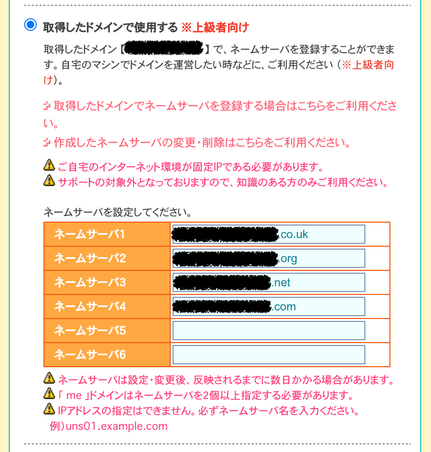
- 生成された NSレコード をドメインを取得したネームサーバに登録
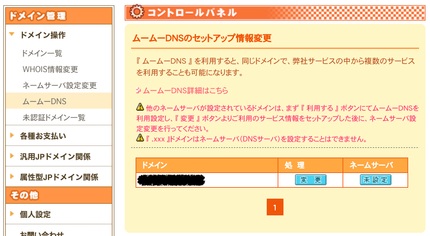
- ムームードメインに登録する場合
- ムームードメインに登録する場合
Certificate Manager で証明書を発行
- AWS > Certificate Manager > 証明書のリクエスト > パブリック証明書のリクエスト
- 既に証明書発行済の場合は 証明書のインポートを選択
- 取得済みドメインの登録
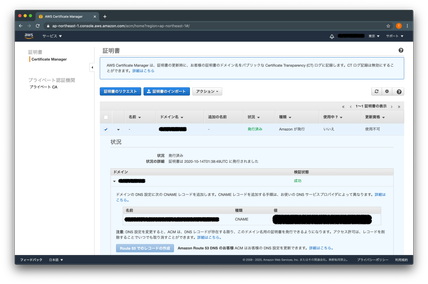
- ドメインの DNS 設定に発行された CNAME レコードを各ドメイン管理ツールに従い登録
- CNAME 登録前は検証未完了、検証保留中といったステータスになります
- ムームードメインに登録する場合
- AWS での出力内容をそのままコピーせず、 CNAME を以下のように変更して登録:
- サブドメイン: _1234567890asdfghjkl
- 内容: _1234567890asdfghjkl.acm-validations.aws
- AWS での出力内容をそのままコピーせず、 CNAME を以下のように変更して登録:
- CNAME 登録前は検証未完了、検証保留中といったステータスになります
ロードバランサーの作成
ALB のターゲットグループを作成
以下のドキュメントを参考にターゲットグループを作成
ALB の作成
- AWS > EC2 > ロードバランサー
- ロードバランサーの作成 > Application Load Balancer を選択
- アベイラビリティゾーンを2つ以上選択
- すでに EC2 インスタンスを特定のアベイラビリティゾーンで起動している場合はターゲットに追加できるよう同様のアベイラビリティゾーンを選択
- ロードバランサーのプロトコルに HTTPS を追加
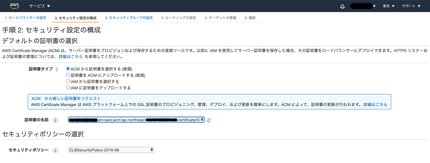
- 先程作成した ACM の証明書を選択
- ターゲットグループで事前に作成したターゲットグループを選択
カスタムドメインとロードバランサーの紐付け
-
AWS > Route 53 にて先程作成したホストゾーンを選択
-
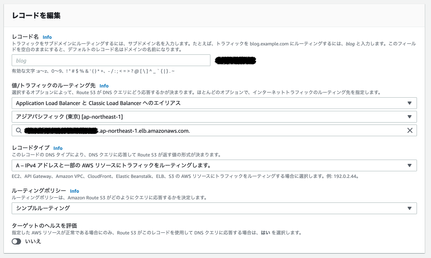
レコードを作成
-
シンプルルーティング
-
シンプルなレコードを定義
-
ルーティング先に「Application Load balancer と Classic Load Balancer へのエイリアス」を選択し、先程作成した ALB を選ぶ
-
これが完了したら、カスタムドメイン経由で HTTPS で Jira にアクセスできるようになり、リクエストが https://ec2-hostname:8081 に転送されます。
Was this helpful?
Thanks!
Tomoko Suzuki
Atlassian Team

Atlassian Team
Atlassian Team members are employees working across the company in a wide variety of roles.
About this author
Customer Success Manager
Atlassian
Yokohama
42 accepted answers
Community showcase
Atlassian Community Events
- FAQ
- Community Guidelines
- About
- Privacy policy
- Notice at Collection
- Terms of use
- © 2025 Atlassian




0 comments