Automation can do some great things, including sending messages to Slack. But what if you want to get someone’s attention in Slack? This used to be quite simple. However, when GDPR came along, both Slack and Jira Cloud removed usernames & user keys which made customer data safer than ever BUT individual Slack pings impossible… until now!
I should start off with the caveat that this unfortunately isn’t as simple as clicking a button. However, using the steps below, you’ll be able dynamically @mention in a message or even dynamically send a direct message to a relevant user.

Why is this helpful?
Consider rules where you might want to:
-
Send a ping to John when his issue is about to breach SLA
-
Send an individual Slack message to the boss when a high priority issue is raised
-
Send a congratulations message to a teammate on their work anniversary (article on this in the future!)
-
Notify the project owner when a new issue is added to the sprint
-
Alert senior Help Desk staff when the CEO raises an issue
What you need is to dynamically mention someone in Slack based on user properties in Jira. In this article, we’ll make sure Automation has access to the data it needs to @mention someone in Slack on the fly.
We’re going to break this down into a few short sections:
-
Configuring Slack to allow API access
-
Configuring Jira to allow API access
-
Running a sync script
-
Calling the @mention in Automation
Slack setup
Our sync script will require a Slack token with users:read permission to get user properties. You can get one by creating a new app in your workspace:
-
Visit the Your Apps page in Slack’s administration and click “Create New App”
-
Name your app (“Jira Automation Sync” might be a good name) and select the workspace you’d like to sync with Jira
-
Click the Permissions tab to go to the OAuth & Permissions page in the app settings
-
In the Scopes section, scroll down to User Token Scopes and click “Add an OAuth Scope”
-
Type/select users:read.email in the searcher box. A message should appear telling you it will also add users:read - click “Add Scopes” on this prompt.
-
At the top of this page, click “Install App to Workspace”.
-
Copy down the OAuth Access Token that’s now present (or leave this tab open). We’ll make use of this later!
Jira setup
-
Ensure that you / the account you’re using has Jira Administrator permissions on the site you’re configuring.
-
Visit the API Tokens section in your Atlassian Account to generate a new API token.
Note: This is an API token tied to your Atlassian user account. Treat this like a password; do not store this API token in code repositories, document it in Confluence, or share it in Slack.
-
Click the “Create API Token” button to create the token, using a descriptive name. Copy the token and store it locally (at the very least, don’t close this window yet) as the token will only be presented once.
Sync Script setup
-
Download the sync script (sync.py) from Bitbucket
-
Use pip to install the requisite slackclient library:
pip3 install slackclient
-
Prepare to call the script:
python3 sync.py --slack_token $SLACK_TOKEN --jira_url $JIRA_URL --username $USERNAME --apikey $APIKEY
A guide for the values:
$SLACK_TOKEN = the OAuth Access token from the Slack setup section. Starts with “xoxp-”
$JIRA_URL = the URL of the Jira instance you’re connecting to, e.g. “https://something.atlassian.net”
$USERNAME = the email address of the account you used to generate the Atlassian API token
$APIKEY = the Atlassian API key from the Jira setup section
-
Run the script. This should take some time to complete, scaling with the amount of users you have in Slack/Jira

Using the mentions
Once the script completes its work, every user in Jira that had a matching account in that Slack workspace (based on their email address) will now have two additional properties on their user in Jira:
-
metadata.slack_id (the raw UID Slack uses for mentions / DMs done via API - this is what we'll use in Automation)
-
metadata.slack_username (the @handle you see as a person in Slack; can help you de-code the Slack UID if you need)
To call these values in Automation, you use a smart value, specifically one for the user you’d like to mention.
Let’s get the Slack mention ID for the reporter of a Jira issue:
{{issue.reporter.properties.metadata.slack_id}}
Formatted to work in Slack (the value must be surrounded by “<@>”), this is:
<@{{issue.reporter.properties.metadata.slack_id}}>
Here’s an example issue summary that dynamically Slack mentions the reporter:
<{{issue.toUrl}}|*{{issue.key}}*  {{issue.summary}}>
{{issue.description}}
Reporter: <@{{issue.reporter.properties.metadata.slack_id}}>

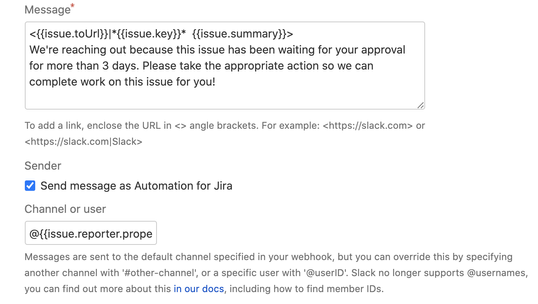
You can also use the smart values to send messages directly to any user you can call by smart value! Just add the smart value (plus the @ in front – no angle brackets here) to the "Channel or user" field.

Keeping values up to date
The great thing about Slack IDs is that they follow the user’s handle changes. It’s possible for the handle in Jira to become stale (metadata.slack_username), but since you’re using metadata.slack_id for the actual mention, there’s no problem with this.
You may want to run this script occasionally to catch up with new users in Jira/Slack. Just remember to treat the API tokens with care and not to store them publicly or in code repositories.


100 comments