Most Atlassian articles assume everyone working with Jira is also working inside Jira. But that's rarely true at larger organizations.
Your legal team is in SharePoint. Finance runs approvals through Power Automate. Half the company communicates exclusively in Teams. They don't have Jira licenses, they don't want Jira licenses, and no one's going to convince them to change tools.
Here's how teams are bridging Microsoft 365 and Jira using Smart Forms for Jira — without requiring anyone outside your Jira instance to touch it.
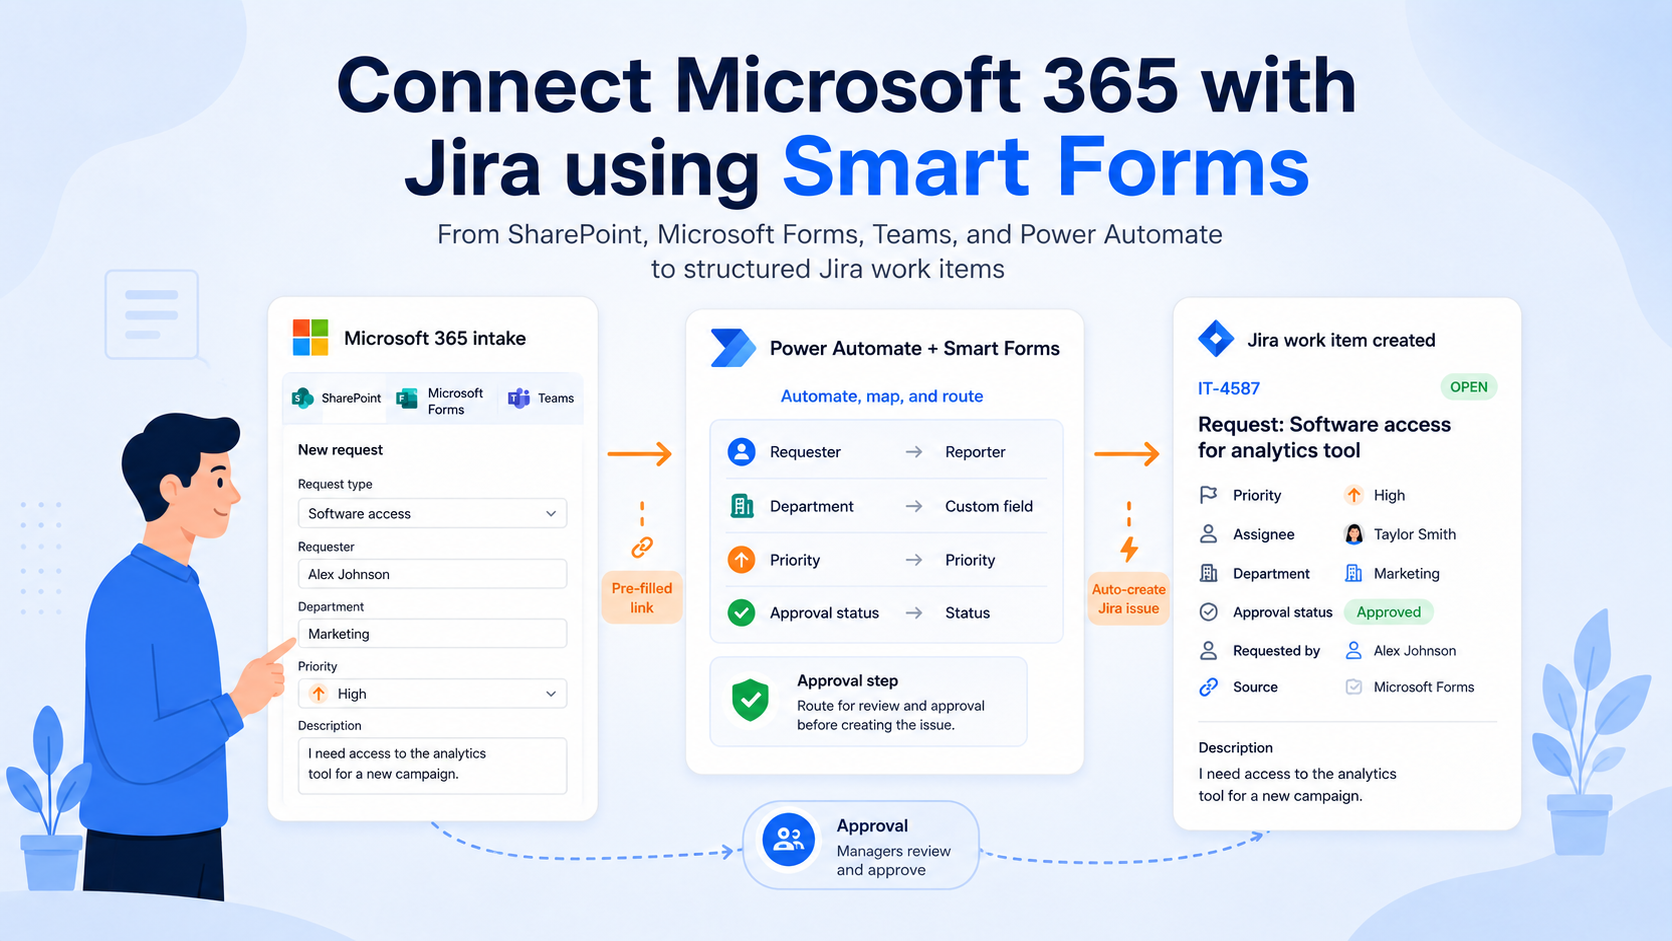
Update: Microsoft switched off Office 365 connectors in Teams, including the classic Incoming Webhook, in May 2026. Use Case 5 now uses a Workflows webhook instead. This update also adds three new patterns — a Teams channel as a front door, reporting back to Excel and Power BI, and Rovo search across Microsoft and Jira — plus URL-encoding tips that keep pre-filled links from breaking.
Microsoft 365 and Jira Integration Patterns at a Glance
Pattern | Direction | Microsoft tool | Smart Forms feature |
|---|
1. Request form in SharePoint | Microsoft → Jira | SharePoint | Public link, embed, hidden fields |
2. Approval → Jira work item | Microsoft → Jira | Power Automate Approvals, Outlook, Teams | URL pre-fill, hidden fields |
3. Jira work item → approval → transition | Jira → Microsoft → Jira | Outlook, Teams | Attach form, update fields, auto-transition |
4. Jira inside Power Automate | Both ways | Power Automate Jira connector | Work item creation, auto-attach |
5. Form link to Teams | Jira → Microsoft | Teams Workflows webhook | Shared URL Smart Value |
6. Microsoft Forms funnel | Microsoft → Jira | Microsoft Forms, Power Automate | URL pre-fill, conditional logic |
7. SharePoint List trigger | Microsoft → Jira | SharePoint Lists, Power Automate | URL pre-fill |
8. Teams channel as a front door (new) | Microsoft → Jira | Teams | Public link, hidden source field |
9. Reporting in Excel and Power BI (new) | Jira → Microsoft | Excel, Power BI, SharePoint Lists | Response export, field mapping |
10. Rovo across Microsoft and Jira (new) | Both ways | SharePoint, Teams (via Rovo connectors) | Teamwork Graph integration |
The Setup That Makes This Work
Smart Forms for Jira generates public form links. Anyone can open them in a browser, fill them out, and submit — no Jira account required. Each submission can be configured to create a new Jira work item or update an existing one, with form fields mapped directly to issue fields you define.
A form can reach a Jira work item in three ways, and the patterns below use all of them:
- Auto-attach — the form is added automatically when a work item of a selected type is created in a selected project.
- Manual attach — someone adds the form to an existing work item.
- Jira Automation actions — "Attach Smart Form" (blank) and "Attach Smart Form with values" (pre-filled from work item data) attach the form on any trigger, such as a status transition.
See NEW Jira Automation for Forms: Attach the Right Form at the Right Moment.
That’s the foundation. Everything below builds on it.
Use Case 1: A Request Form Embedded in SharePoint
Your SharePoint intranet is already where employees go for policies, templates, and company resources. It's a natural home for intake forms — IT requests, procurement, HR, change requests — anything that needs to go somewhere structured.
The setup
- Create your form in Smart Forms for Jira. Configure it to create a new Jira work item on submission, with fields mapped to whatever your team needs: request type, priority, description, affected system, department.
- Go to Settings → Share form and generate a public URL with the access level you want (anyone with the link, or verified Jira users only).
- In SharePoint, add either a Quick Links web part that opens the Smart Form in a new tab, or an Embed web part (iframe) that renders the Smart Form directly inside the intranet page (Smart Forms Cloud, plus tenant settings that allow external embeds).
Embedding note: SharePoint embedding may depend on your Microsoft 365 tenant settings. If your organization restricts external domains in the SharePoint Embed web part, a SharePoint admin can add the form's domain to the allowed list in the site's HTML Field Security settings, or you can use a Quick Link or button instead. The experience is still simple: employees start from SharePoint and open the Smart Form without ever touching Jira.
What the employee sees: a clean form on the intranet they already use. No redirect to Jira, no login prompt (for public access),
What Jira gets: a fully structured work item with all fields populated, tagged with the source via a hidden field (for example, source=sharepoint-intranet), ready for triage.
Good for: IT helpdesk intake, procurement requests, onboarding checklists, internal change requests — anywhere the submitter is internal but not necessarily a Jira user. Ready-made examples: Jira change request form, asset request forms, travel requests.

The same embed approach works on public websites — see how to build a public Jira portal with request forms on your website.
Use Case 2: Power Automate Approval in Microsoft 365 → Jira Work Item Creation
This is the first half of a bidirectional approval pattern. Approval happens entirely inside Microsoft 365 — Outlook, Teams, or the Power Automate Approvals center. Once approved, the downstream work needs to land in Jira with all the approval context intact.
The typical gap: by the time the approval resolves, someone manually creates a Jira ticket from the email notification.
Smart Forms URL parameter pre‑filling closes this gap.
Best practice: push all existing context into the form
Smart Forms supports pre‑filling form fields by passing values as URL query parameters. You set a {variableName} placeholder in a field’s Default Response, then append &variableName=value to the form URL. When the link is opened, those fields are already populated. More on this in default responses in Jira forms.
URL pre‑fill works with text‑based fields that support a Default Response (single‑line text, multi‑line text, URL, numeric). It does not apply to dropdowns, checkboxes, radio buttons, or date pickers, so pre‑filled context should go into text fields or hidden text fields.
Best practice: Use URL pre‑fill for context that already exists in Microsoft 365, such as requester name, department, approval ID, approval status, business justification, SharePoint item ID, or Power Automate run ID. Use hidden fields for anything that should not be visible to the approver but must stay in the Jira audit trail.
Always URL-encode the values. Names, comments, and descriptions contain spaces, commas, and ampersands. Unencoded, a single "&" in a business justification cuts the value short and breaks the parameters after it. In Power Automate, wrap each value in encodeUriComponent().
Power Automate flow structure
Trigger
An MS‑side event that needs approval before becoming Jira work, for example:
- a SharePoint List entry
- a Microsoft Forms submission
- a flagged Outlook email
- a Teams message in a specific channel.
Approval action
Use Start and wait for an approval. The approver responds in Outlook, Teams, or the Approvals app.
Condition branch: Approved
In the Approved branch, build the Smart Forms URL dynamically using a Compose action. Start from the base external URL for your form, for example:
https://smart-forms.saasjet.com/external?token=YOUR_TOKEN
Append query parameters using values from the trigger and the approval step:
&requestor=@{encodeUriComponent(triggerBody()?['requesterName'])}
&department=@{encodeUriComponent(triggerBody()?['department'])}
&requestDetails=@{encodeUriComponent(triggerBody()?['details'])}
&approvedBy=@{encodeUriComponent(first(body('Start_and_wait_for_an_approval')?['responses'])?['responder']?['displayName'])}
&approvalComments=@{encodeUriComponent(first(body('Start_and_wait_for_an_approval')?['responses'])?['comments'])}
&approvalDate=@{utcNow()}
&runId=@{workflow()?['run']?['name']}
&source=power-automate-approval

In Smart Forms, configure matching text and hidden fields with Default Response set to {requestor}, {department}, {requestDetails}, {approvedBy}, {approvalComments}, {approvalDate}, {runId}, {source}.
Delivery
Send the constructed URL via:
- Send an email (V2) — to the Jira project owner, or
- Post message in a chat or channel (Teams) — to the team that will review and submit the form.
Submit → Jira issue creation
The recipient opens the Smart Form. All the context from the original request and approval is already filled in. They review, add any missing details, and submit.
Smart Forms creates the Jira work item with all that context captured, mapped to appropriate Jira fields (including hidden metadata).
What this solves:
- MS‑side approvals (purchase requests, vendor onboarding, marketing campaign sign‑off, access requests) that need to become Jira work with the approval trail visible on the ticket.
- No more manual re‑typing from approval emails into Jira.
- A reliable audit trail: who approved, when, under which request, and from which Microsoft workflow it came.
Use Case 3: Jira Work Item → MS‑Side Approval → Jira Status Transition
This is the reverse direction. Work originates in Jira, but the approver is outside Jira — finance, legal, or an executive who lives in Outlook and Teams. They need to approve something, and based on their decision, the Jira work item should transition forward (or backward).
The typical gap: the approver gets a Jira notification email they can’t act on without logging in. They reply to the email instead. The Jira owner manually transitions the issue. The approval decision exists only as an email thread.
Smart Forms + Jira Automation closes that loop.
The setup
1. Create an “Approval Decision” Smart Form
- Fields: Decision (single-choice: Approved / Rejected), Comments, Approver name.
- Map Decision to a single-select Jira custom field such as approvalDecision, and Comments to a text field such as approvalNotes. A fixed choice is safer than free text: "approved", "Approved " and "OK" won't all match one automation condition.
- Configure the form to Update existing issue fields on submission.
2. Attach the form to the work item
- Option A: use Smart Forms Auto‑attach so each new work item of a given type automatically gets this form attached.
- Option B (new): attach it only when approval is actually needed, with the "Attach Smart Form" action in the rule below. Work items that never need approval don't carry an empty form.
3. Auto‑share the form URL when the issue needs approval
Create a Jira Automation rule:
- Trigger: Work item transitioned to Pending Approval.
- Action (Option B only): Attach Smart Form → "Approval Decision", then Re-fetch work item data.
- Action: Send web request (POST) to a Microsoft Teams Workflows webhook (see Use Case 5), or Send email to the approver.
In the payload, use the Smart Forms smart value to inject the form URL and pre‑fill context. Encode values with .urlEncode so spaces and symbols in summaries don't break the link:
{{#issue.properties."saasjet.forms.formsSharedUrls"}}{{#if(equals(formName, "Approval Decision"))}}{{url}}&issueKey={{issue.key}}&requestor={{issue.reporter.displayName.urlEncode}}&summary={{issue.summary.urlEncode}}{{/}}{{/}}
In the Smart Form, Default Response fields {issueKey}, {requestor}, {summary} will pull this context in via URL pre‑fill.
Tip: if you attach the form with the "Attach Smart Form with values" action, you can pre-fill it straight from work item fields instead of passing them in the URL.
4. Auto‑transition Jira based on the decision
You can set up Smart Forms to auto-transition the work item after form submission, or create a second Jira Automation rule:
- Trigger: Field value changed → approvalDecision.
- If {{issue.approvalDecision.value}} equals Approved → transition to “In Progress”.
- Else → transition to “Rejected” or back to the requestor.

If the approver depends on the request (amount, region, department), the form can pick them — see Dynamic Approvers: Let the Form Pick the Approver.
What this solves:
- Approval loops where the decision‑maker lives entirely in Microsoft.
- Every approval is documented, timestamped, and attached to the work item.
- No one outside Jira needs a Jira account to give approval — the Smart Form is the structured handoff.
Use Case 4: Use Jira as a Trigger or Action Inside Power Automate
You can also build the integration primarily from the Power Automate side. Microsoft provides a Jira connector that exposes Jira as both a trigger source and an action target.
What the Jira connector offers
Common capabilities include:
Triggers, such as:
- When a new issue is created
- JQL‑based triggers
- (Depending on connector version) other event triggers like issue closed or updated.
Actions, such as:
- Create a new issue
- Get issue
- Edit / update issue
- Add comment
- Transition issue
- Assign issue.
Attachments are usually handled via HTTP actions to Jira’s REST API rather than a dedicated “Add attachment” action in the connector. The connector still uses the term "issue" — it's the same thing as a Jira work item.
How this combines with Smart Forms
Pattern A — Smart Forms submission notifies an MS workflow
- A Smart Form is submitted externally → Smart Forms creates a Jira work item in your chosen project.
- Power Automate’s Jira trigger (“When a new issue is created” or JQL‑based) fires. Filter on the hidden source label so the flow only reacts to form-created work items.
- The flow then posts a structured Adaptive Card to a Teams channel, logs a row in a SharePoint List for reporting, and emails the account manager with key details.
Pattern B — MS workflow creates a Jira issue, then sends a Smart Form for additional input
- A Power Automate flow runs (triggered by a SharePoint List update, an email, a schedule, etc.).
- The flow uses Create issue to create a Jira ticket with basic fields.
- Smart Forms Auto‑attach adds a detailed form to that issue (for example, “Vendor Information” or “Technical Brief”). To pre-fill that form with the fields the flow just created, use the "Attach Smart Form with values" action in a Jira Automation rule instead.
- Jira Automation or another flow sends the form link to the appropriate person for detailed input (via email or Teams).
Pattern C — Jira issue transition triggers MS‑side actions
- A Smart Form response updates a Jira issue field and triggers a status change via Jira Automation.
- Power Automate’s Jira trigger picks up this updated issue and runs MS‑side actions: create a calendar event in Outlook, update a SharePoint List status, notify a Teams channel.

Setup notes:
- The Jira connector requires a Jira account with appropriate project permissions and OAuth‑based authentication.
- Jira Cloud and Jira Server/Data Center have different connector variants — choose the one matching your environment.
- Triggers run on a polling interval (typically around a minute and up, depending on your plan), so there may be a small delay — usually acceptable for cross‑system workflows.
- Use a dedicated integration account rather than a personal one, so flows don't stop when someone leaves the team.
Use Case 5: Auto‑Share the Smart Form Link to Microsoft Teams via Jira Automation
Sometimes the flow starts in Jira, but the next step — usually an approval or extra input — has to happen in Teams.
This pattern uses Jira Automation’s Send web request action pointed at a Workflows webhook in Microsoft Teams.
Important (May 2026): Microsoft has retired Office 365 connectors in Teams, including the classic "Incoming Webhook" connector. Old connector URLs no longer deliver messages. If you set this up earlier, create a Workflows webhook as described below and replace the URL in your Jira Automation rule.
Example: Approval request from Jira into Teams
A work item is created (for example, a software purchase request submitted via Smart Forms). It needs manager sign‑off before the team proceeds. Instead of the manager logging into Jira, they get a Teams message with a button that opens the Smart Form.
Setup:
- In Microsoft Teams, open the approvals channel menu (•••) → Workflows, choose the "Send webhook alerts to a channel" template (or build a flow with the "When a Teams webhook request is received" trigger), and copy the webhook URL.
- In Smart Forms, create an “Approval Decision” form with fields: Approved (yes/no), Notes, Approver name. Map responses to Jira custom fields and set Update existing issue fields.
- Auto‑attach this form to your Purchase Request issue type, or attach it in the rule with the "Attach Smart Form" action.
- In Jira Automation:
- Trigger: Work item created (with a condition: Creator = Smart Forms for Jira, or Issue type = Purchase Request).
- Action: Send web request → POST to your Teams Workflows webhook URL, header Content-Type: application/json.

Workflows webhooks expect an Adaptive Card. Payload (simplified):
{"type": "message", "attachments": [{"contentType": "application/vnd.microsoft.card.adaptive", "content": {"type": "AdaptiveCard", "version": "1.4", "body": [{"type": "TextBlock", "weight": "Bolder", "text": "New approval needed: {{issue.summary.jsonEncode}}", "wrap": true}, {"type": "TextBlock", "text": "Requested by: {{issue.requestor.jsonEncode}} | Amount: {{issue.budgetAmount}}", "wrap": true}], "actions": [{"type": "Action.OpenUrl", "title": "Approve or reject", "url": "{{#issue.properties.\"saasjet.forms.formsSharedUrls\"}}{{#if(equals(formName, \"Approval Decision\"))}}{{url}}{{/}}{{/}}"}]}}]}
Use .jsonEncode on text fields so quotes or line breaks in a summary don't produce invalid JSON.
The manager receives a Teams message, opens the form, selects approved/rejected, adds notes, and submits. Smart Forms updates the Jira fields, and Jira Automation can move the issue to the next status accordingly.
Variations:
- Send an NPS or CSAT Smart Form link to Teams after a ticket is resolved.
- Notify a Teams channel when a high‑priority Smart Form is submitted.
- Send an escalation detail form to an on‑call engineer via Teams DM when an issue transitions to Critical.
For more on sharing form links from automation, see From Form to Action: Jira Automation with Smart Values from Dynamic Forms and How to Automatically Send Jira Forms to Anyone.
Use Case 6: Microsoft Forms at the Top of the Funnel, Smart Forms as the Jira Bridge
In many Microsoft‑heavy organizations, Microsoft Forms is already everywhere. It’s familiar, license‑free for submitters, and non‑technical teams use it for surveys, requests, and feedback — but Microsoft Forms doesn’t speak Jira.
The integration pattern here is not “replace Microsoft Forms with Smart Forms.” It’s a two‑stage funnel:
- Microsoft Forms collects broadly.
- Smart Forms converts the submissions that actually need to become Jira work.
Pattern A: Broad MS Forms intake → filtered Jira work via Smart Forms
Everyone submits through Microsoft Forms. Only the submissions that meet specific criteria continue into Jira.
- Microsoft Forms hosts the “Product Change Request” or “Service Issue Report” form.
- Power Automate: Trigger: When a new response is submitted → Get response details → apply conditions (for example, requestType = Incident AND priority = High).
- If matched: build a Smart Forms URL with requestor, summary, details, priority as URL-encoded parameters, and pass a unique msFormsResponseId as both a URL parameter and the default value of a hidden field in Smart Forms.
- The pre‑filled Smart Form link goes to the responsible Jira owner in Teams or email, or is opened by a technical owner who enriches it and submits.
Result:
- Frontline staff stay in Microsoft Forms.
- Only “real work” reaches Jira, already pre‑structured.
- Hidden fields source=ms-forms and msFormsResponseId preserve the link between the Jira issue and the original Microsoft Forms response.
Pattern B: Two‑stage onboarding — short MS Form, detailed Smart Form
HR or hiring managers don’t need Jira. They submit a short request; the actual onboarding execution happens in Jira.
- Microsoft Forms collects: employee name, role, department, start date.
- Power Automate: Trigger: When a new response is submitted → builds a Smart Forms URL for an “Onboarding Request” form with these values pre‑filled via URL parameters.
- Smart Form: uses conditional logic to show different sections based on role (Sales, Developer, Operations, etc.). On submission, uses Create new issue to create an Onboarding issue plus subtasks for HR, IT, Security, Facilities (with help of Jira Automation).
Result:
- HR uses a simple Microsoft Form.
- Execution teams get a complete, role‑aware Jira package.
- Smart Forms acts as the bridge between a “business‑friendly” intake and an “engineering‑friendly” Jira workflow.
Related: employee onboarding in Jira and HR self-service with JSM, Rovo, and Smart Forms.
Pattern C: Cross‑team handoffs — marketing/finance in MS Forms, execution in Jira
Marketing requests a campaign in Microsoft Forms; development and design execute in Jira.
- Microsoft Forms collects campaign goal, budget, deadline, audience (or for finance: vendor, amount, justification, approver).
- Power Automate uses the Jira connector’s Create issue to create a preliminary Jira issue with basic fields.
- Smart Forms Auto‑attach adds a detailed “Tech Brief” or “Design Brief” form to that issue.
- Jira Automation posts a Teams message to the execution team with a link to the attached Smart Form, pre‑filled with the campaign name, dates, and owner from Microsoft Forms.
Why this works:
- Marketing/finance never open Jira.
- Execution teams see a consistent Smart Form brief, regardless of whether the source was Microsoft Forms, SharePoint, or something else.
See also: marketing request workflows from idea to work in Jira.
Alternative no‑form path: You can create Jira issues directly from Microsoft Forms via the Jira connector’s Create issue action — no Smart Forms in the middle. This is faster but sacrifices conditional logic, hidden metadata, validation, and the chance for a technical owner to enrich the request before it becomes Jira work.
Use Case 7: SharePoint List as a Trigger for a Pre‑filled Form
SharePoint Lists are the lightweight databases of Microsoft 365: vendor rosters, project registers, asset inventories, contract trackers. When a record hits a certain status — a contract expires, a vendor needs review, an asset is flagged — work should move into Jira.
Power Automate + Smart Forms URL pre‑fill makes this seamless:
- Trigger: When an item is created or modified in a SharePoint List, with a condition such as Status = "Needs Review". Add a trigger condition so the flow doesn't fire again on every later edit of the same item.
- Flow: Extracts fields like vendor name, contract ID, owner, review type.
- Construct URL:
https://smart-forms.saasjet.com/external?token=YOUR_TOKEN
&vendorName=@{encodeUriComponent(triggerBody()?['VendorName'])}
&contractID=@{encodeUriComponent(triggerBody()?['ContractID'])}
&reviewType=@{encodeUriComponent(triggerBody()?['ReviewType'])}
&owner=@{encodeUriComponent(triggerBody()?['Owner/Email'])}
&source=sharepoint-list
[Image: keep existing Screenshot 2026-05-14 at 19.20.33.png]
- Delivery: Sends the pre‑filled link to the contract owner via Outlook or Teams.
[Image: keep existing Screenshot 2026-05-14 at 19.20.40.png]
The owner opens the form, verifies/adds details, submits → Smart Forms creates a structured Jira work item for the review task.
This same pattern works for:
- Asset lifecycle requests (flag an asset in SharePoint → pre‑filled IT request).
- Employee offboarding (HR updates a SharePoint record → pre‑filled offboarding checklist form creates subtasks).
- Vendor assessment scheduling (contract date triggers a pre‑filled vendor review form).
Use Case 8 : A Teams Channel as the Front Door for Requests
Many requests start as a message in Teams: "Can someone give me access to…", "The printer on floor 3…". These messages get lost in the thread, and someone has to retype them into Jira.
The setup:
- Share the Smart Form with a public link and add hidden field source=teams-channel.
- Pin the link in the channel, or add it as a Website tab where your tenant allows it, so the form sits next to the conversation.
- Optional: a Power Automate flow on "When a new channel message is added" can reply to messages that contain keywords (for example, "access" or "broken") with the form link, pre-filled with the sender's name and the message text.
Result: people keep asking where they already ask, and Jira receives a structured work item instead of a screenshot of a chat. For other chat and work tools, see how to share Jira's issue creation experience in Slack, Microsoft suite, ClickUp, or Asana.
Use Case 9: Report on Form Data in Excel and Power BI
Business stakeholders who submit through Microsoft tools usually want the results back in Microsoft tools too.
- Ad-hoc: export Smart Forms responses to XLSX and open them in Excel.
- Live list: Power Automate's Jira trigger (Use Case 4, Pattern A) adds a row to a SharePoint List or an Excel table in OneDrive each time a form-created work item appears.
- Dashboards: connect Power BI to mapped Jira fields, so the hidden source field shows which Microsoft channel brings the most requests. Step-by-step: Turn Your Jira Forms Data into Power BI Insights.
Use Case 10: Ask Rovo Across Microsoft and Jira
If your organization uses Rovo and your admin has connected Microsoft sources such as SharePoint or Teams to it, Rovo can already search that content. Smart Forms for Jira integrates with Atlassian Teamwork Graph, so form responses become searchable in Rovo Search and Rovo Chat as well.
That means a question like "Which vendor reviews were requested this quarter and what did the contract owners say?" can draw on both the SharePoint vendor list and the Smart Form responses in Jira. Read more in Agent-Ready Intake in Jira: From Forms to Rovo Agents.
A Note on Hidden Fields for Source Tracking
Across all of these scenarios, one small addition pays off significantly: hidden fields with source metadata.
In Smart Forms, any form element can be made invisible to the submitter while still mapping to Jira fields. Set hidden text fields such as:
- source = sharepoint-intranet, power-automate-approval, ms-forms-intake, teams-channel, etc.
- originId = SharePoint List item ID, MS Forms response ID, Power Automate run ID.
Map them to Jira labels or custom fields.
Every work item created through these Microsoft integrations will be tagged automatically. Your Jira filters, dashboards, and reports can immediately distinguish SharePoint‑originated requests from Teams‑forwarded approvals from direct submissions — without anyone manually labeling them.
Putting It All Together
If your organization runs on Microsoft 365 and tracks work in Jira, these aren’t edge cases — they’re how work actually moves.
Smart Forms for Jira closes the gap without forcing Microsoft users into Jira and without requiring Jira admins to maintain parallel intake systems. The form becomes the handoff:
- Microsoft tools stay the “home base” for business stakeholders.
- Smart Forms provides structured, validated intake.
- Jira remains the system of record for work.
The patterns above — SharePoint embedding, bidirectional approvals, Jira as a trigger/action in Power Automate, Teams webhook delivery, Microsoft Forms funnels, SharePoint List triggers, Teams channel intake, Excel and Power BI reporting, and Rovo search — each solve a different version of the same problem: getting complete, structured data flowing both ways between where people work and where you track the work.
Want to try these patterns in your own instance? → Try Smart Forms for Jira
Related Reading
FAQ
Can people without a Jira license submit requests from Microsoft 365?
Yes. Smart Forms public links open in any browser, so SharePoint, Teams, Outlook, or Microsoft Forms users can submit without a Jira account. Each submission creates or updates a Jira work item.
Can I embed a Jira form in SharePoint?
Yes, with the SharePoint Embed web part, if your tenant allows the form's domain. Otherwise, use a Quick Links web part or a button that opens the form in a new tab.
Which fields can be pre-filled from Power Automate?
Text-based fields with a Default Response: single-line text, multi-line text, URL, and numeric fields, including hidden ones. Dropdowns, checkboxes, radio buttons, and date pickers can't be pre-filled via URL. URL-encode every value with encodeUriComponent().
Do Teams Incoming Webhooks still work with Jira Automation?
No. Microsoft retired Office 365 connectors in Teams, including Incoming Webhooks, in May 2026. Create a Workflows webhook in Teams and send an Adaptive Card payload from Jira Automation's Send web request action.
How do I know which Microsoft tool a Jira request came from?
Add a hidden source field to each form (sharepoint-intranet, ms-forms-intake, teams-channel) and map it to a Jira label or custom field. Filters and dashboards can then group work items by origin.
