Community resources
Community resources
Community resources
📓 Editing Active Jira Workflows - CliffsNotes Edition...
|
Remember those book reports you had to write in high school English, usually based on some really long, ancient novel? (Wuthering Heights comes to mind for me! 😢) How did you power through, did you:
(It’s OK, you don’t have to tell me…) |
 |
🎥 Watch the movie:
Watch the video ↗️
🗒️ Read the CliffNotes:
Here's a quick summary of the process:
- In the Jira admin settings, create a copy of your workflow
- Associate your project with the workflow copy, which makes the original workflow inactive
|
💡 Important note: Check to see if your workflow is being used by multiple Jira projects. If that’s the case, you will need to associate ALL the projects that use this workflow with the copy and then associate them all back to the original once your edits are done. |
- Make all edits to the original workflow as needed
- Associate the project back with the original workflow
- Delete the workflow copy
- ✅ Done!
📚 Read the book:
For those that want all the details, here are the steps you'll need to edit an active Jira workflow for a company-managed project:
- Go to your Jira project and note the workflow name
- Open a new browser tab. You'll be switching back and forth between Jira admin settings and your project settings, so multiple tabs just makes things easier!
- Go to Settings - upper right (⚙️) and then Work Items
- Click on Workflows, on the left
- Search for the workflow for your company-managed project.
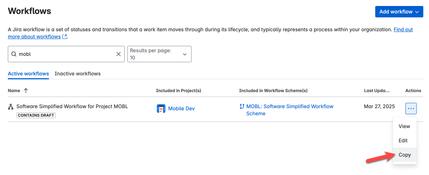
- Click the <...> to copy the workflow. Pro tip: Put a 1 in front of the copied workflow name.
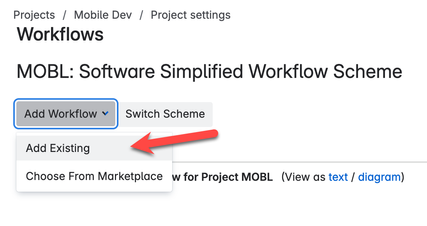
- Next, we need to configure your project to use the new copy of your workflow. That will make the original inactive so that you can edit it. To do that, go back to your Jira project (in your original browser tab) go to project settings → Workflow → Add workflow → Add existing:
- DON'T FORGET TO PUBLISH the change to the new workflow!
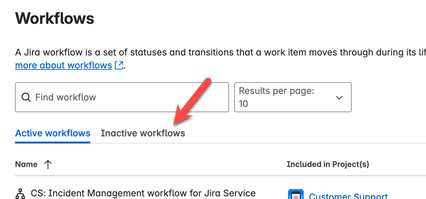
- Switch back to your Jira admin console browser tab and now you can edit the workflow, you'll need to switch to the Inactive workflows tab first:
- You can now edit your workflow to your heart's content! When you're done, just switch your project back to the original workflow, using the same steps as above. As before, don’t forget to publish!
- One final step to keep Jira clean - delete the now inactive workflow copy.
🍎 Extra Credit:
For those who want extra credit, here’s where you can learn more:
- How do company and team-managed workflows differ?
- Add, edit, and delete a work item workflow scheme
- Configurations overview: Understanding Jira schemes
🎓 Final grade:
So, how’d do you? Let us know in the comments if you got a passing grade!
Was this helpful?
Thanks!
Peggy Graham


2 comments