Hi all,
Recently one of the product managers in Atlassian shared a Loom video showing how he and his team (BitBucket) have been using Jira Product Discovery.
Every team has a different way of working. However, many have been curious to see how other teams use Jira Product Discovery so I thought it might be useful to share this externally.
Part 1: Ideation & Triage

Watch the video here: https://www.youtube.com/watch?v=o8R0cc3jzBU
This is the first in a series of practical videos (prioritisation next) and it focuses on the initial ideation and triage stages of the overall product management process including:
-
How product and feature ideas get proposed by Bitbucket
-
How ideas are triaged every fortnight
-
How Edmund and his team use automation to make sure good ideas are never lost and everyone feels heard
-
And ultimately what his team does when they are ready to work on something right away.
The goal, as ever, is to ensure Edmund’s team is building the right features that customers will actually use and hopefully love. This video is the first in a series that will take you through how product discovery is done in real life, the benefits gained, and some tips on how you could get started too.
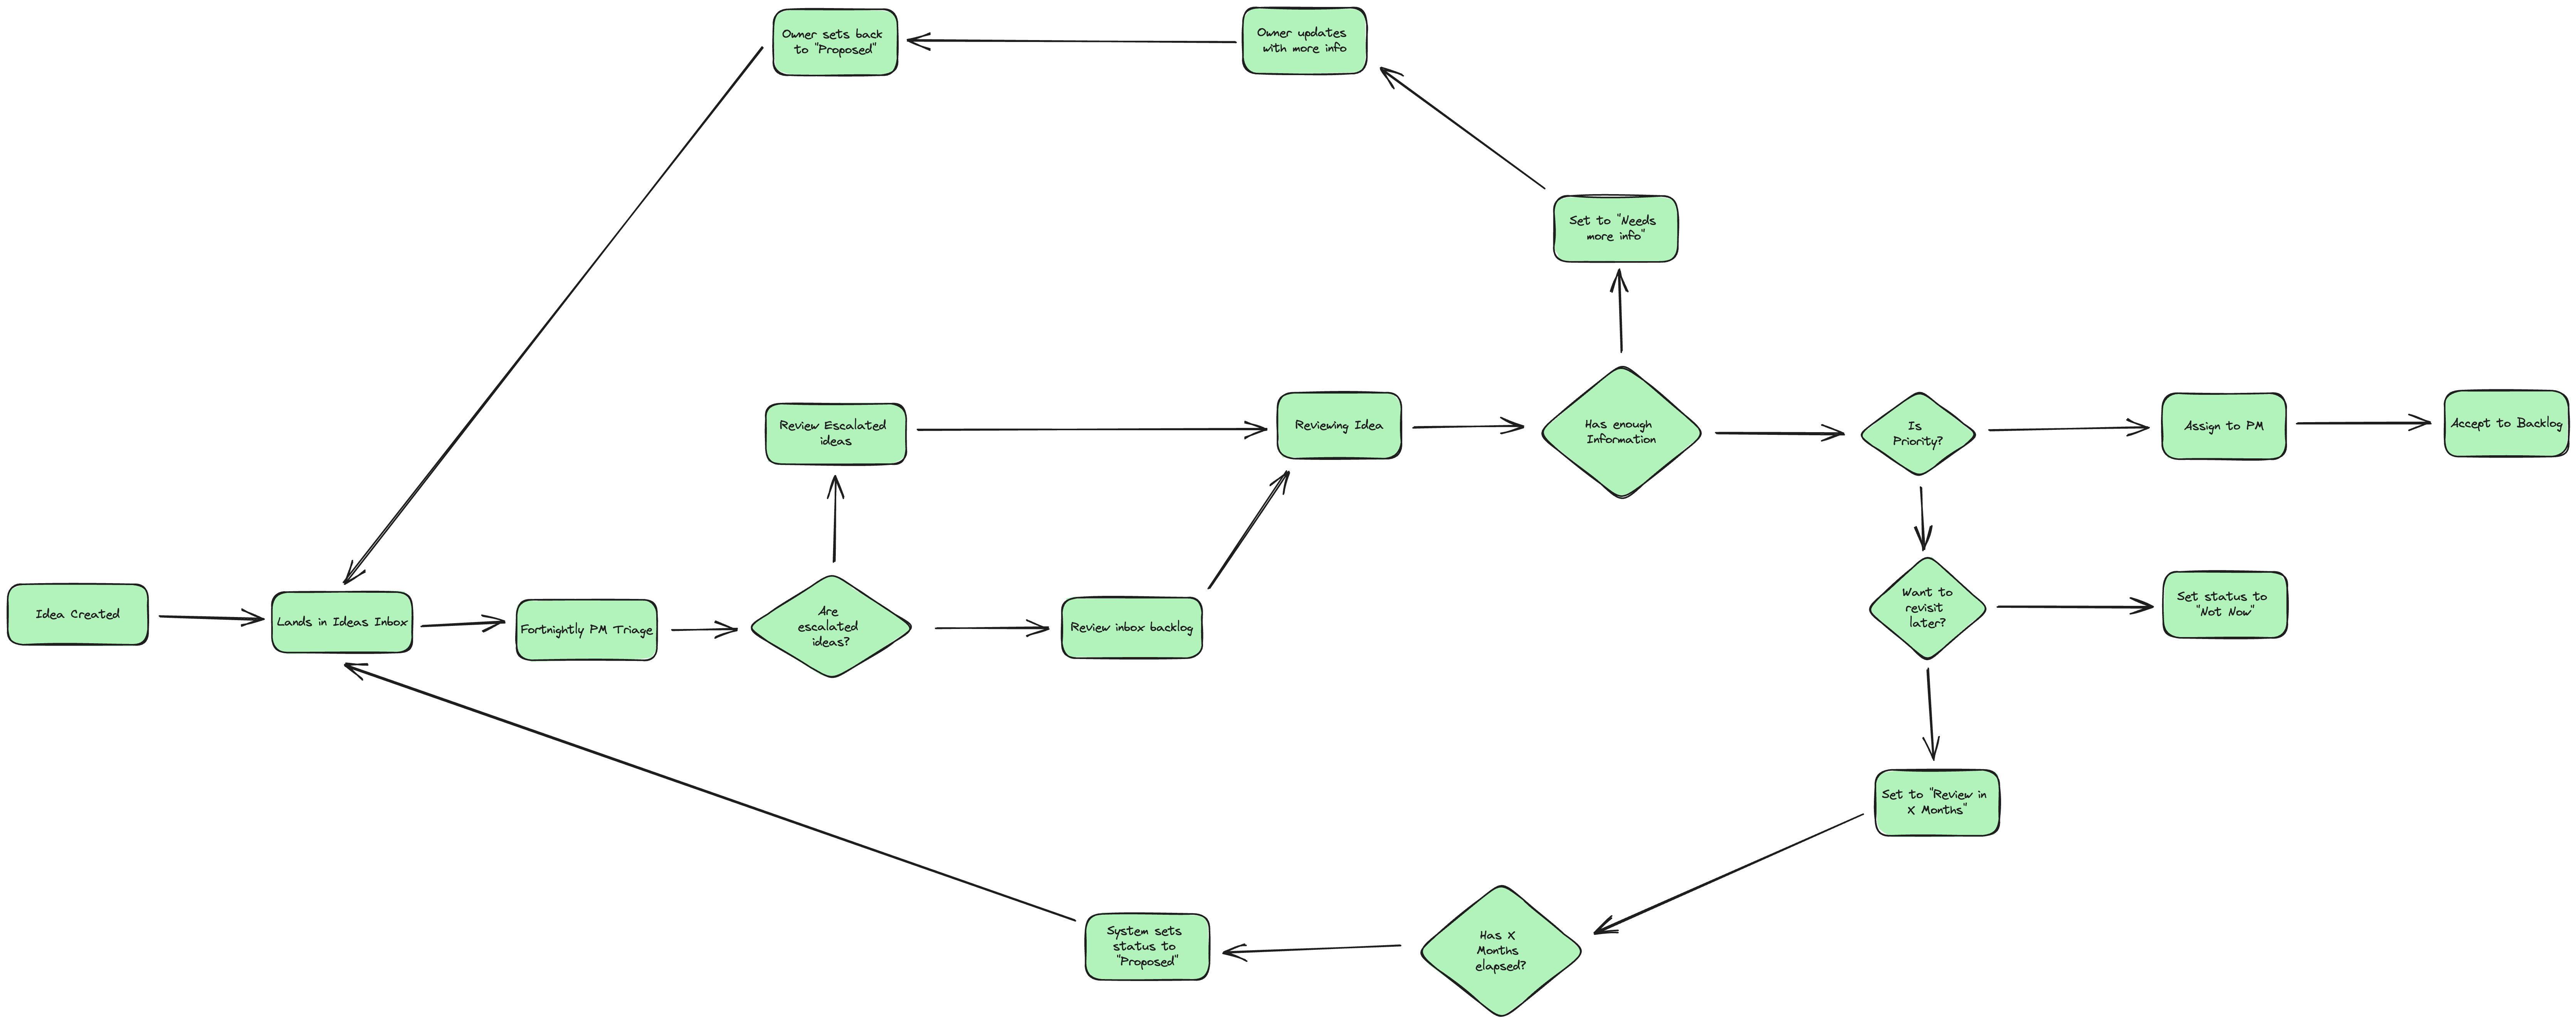
Also in the video, you will see Edmund showing a visual of the workflow they use. I have included a screenshot below as it helps orientate.
Part 2: Prioritisation

Watch video #2 here: https://www.youtube.com/watch?v=yW3B0VU8sxE
In this video, Edmund walks through how the BitBucket team prioritise all of the potential ideas and features to build and how JPD:
- Provides a single source of truth for each project, at all stages of the product development cycle.
- Helps to find the perfect balance between accuracy and efficiency when scoring potential work in terms of things like effort, value, reach, etc.
- Enables you to combine multiple simple, easy-to-understand, easy-to-score metrics together to create powerful and sophisticated measurements of relative value between different potential projects that your team has to prioritize.
- How doing all of this in JPD allows you to instantly compare these numbers for all of your potential projects in a true "apples to apples" way, allowing you to make well-informed prioritization trade-offs.
Edmund gets deep into the weeds here showing in great detail how his team prioritises what to build next for customers. It’s a great video for those who are already familiar with Jira Product Discovery and looking to improve their tool usage and practices.
Part 3: Automation

Watch video #3 here: https://www.youtube.com/watch?v=wDQAWfv5_j8
In this video, Edmund answers your most asked question on how his team uses automation to manage ideas throughout the discovery process. More specifically how you can use automation for idea deferment, when you want to work on an idea at a later point in time but don’t want it to crowd your roadmap until your ready to tackle it. He’ll walk through:
- The process his team takes when they want to defer an idea to 3, 6, or 12 months later
- A no-code way to build your automation rules using automation scripts in Jira.
Edmund dives deep into the entire process, step by step, on how to setup your automation using custom fields and JQL. You can view the written automation rules below. This video is best suited for those who are already familiar with automation rules, JQL queries, and Jira Product Discovery and are looking to level-up their product management rituals.
Pre-steps:
-
Create a set of statuses to track how long you want your resurfacing to take.
-
Record the Status names for each.
-
For this example, the statuses will be "Reviewing Next Quarter", "Reviewing Next Year", "Reviewing Six Months"
-
Create a “Short Text” field to hold the date for when you want to resurface each item back into view.
-
JPD Fields are created as custom fields, so you’ll need to go and get the Custom Field ID for the field you just created.
-
Follow the “Using the Advanced JQL view” guide on this page to get the Custom Field ID:  How to find any custom field's IDs | Jira | Atlassian Documentation
-
For this example, the custom field is 13088
Automation 1 - Set resurface date.
-
When an issue is set to one of your deferment statuses, populate the field you created with {{now.plusDays(<days>).jiraDate}}
-
now gets today's date
-
.plusDays(90) adds 90 days to today's date (for a 1 quarter deferment).
-
.jiraDate converts that new date into a simple date format of yyyy-mm-dd which is easy to compare as a string.
-
So if today is the 28th of August, 2023; {{now.plusDays(2).jiraDate}} would inject “2023-08-30” into the field.
-
This would be the day we want the issue to be resurfaced for review.
Step 2 - Daily check for Bubble up.
-
On Daily, run JQL that searches for project = <your project key> AND status in (<your first status>, <your second status>, <etc>)
-
So for our example, we have a Project key of “BBCPM“ and the statuses mentioned before. Our JQL is t project = BBCPM AND status in ("Reviewing Next Quarter", "Reviewing Next Year", "Reviewing Six Months")
-
This JQL query fetches all the issues in your JPD project with the statuses set to one of those deferment statuses.
-
Add a condition action to check that the custom field you put the date into matches the current date as a jira date.
-
To lookup the resurface date field on the JPD Issue use {{issue.fields.customfield_<custom field id>}}
-
Which would be {{issue.fields.customfield_13088}}
-
Then compare it to {{now.jiraDate}}
-
If it does, update the status back to whatever your status is for triaging issues.
If you find these videos useful, please throw a like or a comment on this post to ensure you get notified when we add more videos to this page.
All comments and feedback are appreciated as always.
Cheers,
John


