Community resources
Community resources
Community resources
Step-by-Step Guide: Setting Up Team Rates and Getting Accurate Cost Reports in Jira
Managing teams is already a challenge. Keeping everyone aligned on goals, budgets, and performance is even harder.
As teams grow and projects multiply, managers face the same recurring challenges. Hours get logged, but no one knows what they actually cost. Budgets are approved at the start of the quarter, yet by the time reports are compiled, the numbers are already outdated. Finance teams demand clarity, while project managers are stuck consolidating data from scattered spreadsheets and disconnected tools. Leadership wants quick answers: Are we still on track? Did we overspend? How much profit did this project bring?
Too often, these questions result in long nights of manual calculations, delayed decisions, and frustration across the organization.
Why Do You Need a Time & Cost Tracker in Jira?
Organizing teamwork is only half the challenge. The other half is understanding the real cost of that work. In many companies, data lives across multiple systems:
- Jira for tasks and workflows
- Spreadsheets for budgets
- External time trackers for worklogs
- Separate tools for reports and analytics
The result? Project managers spend hours consolidating numbers, overspending goes unnoticed, and leadership has no real-time visibility into costs.
Common challenges teams face
- Scattered data makes it hard to understand total costs.
- Manual calculations in spreadsheets are error-prone and time-consuming.
- Lack of transparency slows down decisions and accountability.
- Budget risks increase without a clear comparison of planned vs. actual costs.
What Time & Cost Tracker Gives Your Team
With Time & Cost Tracker for Jira Cloud, all your time, expenses, and budgets are consolidated in one place:
- Automatic cost calculation — every Jira worklog instantly converts into cost data.
- One source of truth — no more switching between apps; everything is in Jira.
- Clear reports — ready-to-use for finance, leadership, and clients without Excel.
- Forecasting & planning — track actuals and predict future costs.
Less admin work — invoices, budget control, and reporting are generated automatically. automatically.
Instead of juggling multiple tools, you get an all-in-one solution that turns worklogs into meaningful financial insights.
Let’s break it down step by step.
Step 1. Set Up Team Rates
The first step is assigning hourly rates:
- Open the Team tab in Time & Cost Tracker.
- Click Add rate (or Edit next to a user) for every user whose worklogs will be considered in cost reports.
In the Set rate window:
- Enter the Hourly rate (and optionally the Billing hourly rate for invoicing).
- Set the Effective date (this defines from which date the rate applies; useful for historical accuracy).
From now on, every hour logged in Jira will instantly convert into cost.
Step 2. Add Expenses
Projects involve not only people’s time but also external costs. The Expenses tab helps you capture that:
- One-time expenses — hardware purchases, one-off contractor fees, purchase of equipment
- Recurring expenses — monthly Jira, AWS, and SaaS subscriptions.
For recurring expenses set:
- Amount of months (how many months it repeats; e.g., 3 = every quarter),
- When to end the recurring
- Cycle of occurrences
Link the expense to Project / Issue / Team member if applicable.
Save. These expenses will be included in cost reports for the selected period.
Step 3. Prepare Jira Filters for Reporting
For precise and repeatable reports, set up Jira filters (JQL) in advance. Examples:
- Issues with worklogs this month:
("worklogDate" >= startOfMonth(-1)) AND ("worklogDate" <= endOfMonth(-1)) AND project = <projectKey> - Worklogs for a specific assignee last month:
assignee = "<user>" AND worklogDate >= startOfMonth(-1m) AND worklogDate <= endOfMonth(-1m) - Bugs closed in the last two weeks:
issuetype = "Bug" AND status = "Done" AND updated >= startOfWeek(-2w) AND updated <= endOfWeek(-2w)
Saved filters let you quickly slice data when generating time and cost reports.
Step 4. Generate Time & Cost Reports
Time & Cost Tracker provides two main report types:
⏱ Time Reports
- Total logged time by project, team, or assignee
- Detailed breakdown showing tasks and individual worklogs
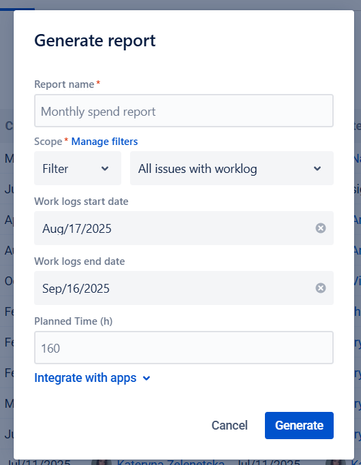
Open Time Reports → click Generate report.
Core settings dialog:
- Report name.
- Filter: select saved JQL (defines issues scope).
- Worklog start/end date: the date range to collect worklogs.
- Planned Time: set if you want a planned vs actual comparison.
Click Generate.
Time Report views (tabs):
- Scope — list of issues with worklogs in the selected period and the amount of time logged per issue.
- Team — the team tab demonstrates the list of all users who reported time to the selected scope (selected Filter) in the specified period.
- Totals — summarizes the Work log for the period.
💡You can customize your Time Report by adding your own Jira fields.
To do this:
- Click the Columns button.
- From the list of available options, select the custom fields you want to display in the report.
💸 Cost Reports
- Labor + expenses combined into a full financial view
- Compare planned vs. actual costs
- Enable revenue tracking to cross-check invoices and profit margins
- Export to CSV or PDF for finance, stakeholders, or clients
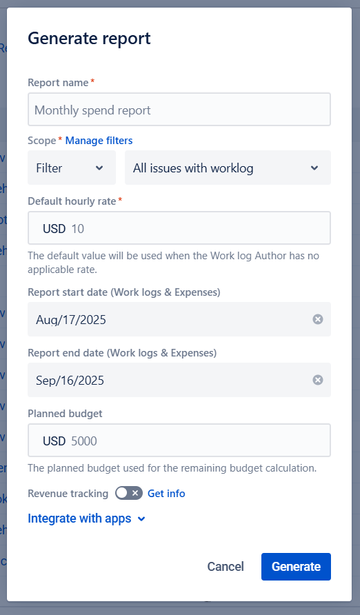
Open Cost Reports → click Generate report.
Core settings dialog:
- Report name.
- Filter: select the JQL to define issue scope.
- Default hourly rate: a fallback rate used when a user doesn’t have a rate with an applicable effective date.
- Report start/end date: used to collect worklogs and related direct expenses.
- Planned Budget: set if you want a planned vs actual comparison.
- Enable Revenue tracking (optional) — if you want the report to include invoices/revenue and calculate profit.
Cost Report tabs (views):
- Overview — charts and summary of labor costs, expenses, and planned budget at a glance.
- Scope — list of issues with worklogs in the period; each issue shows logged time and calculated cost (worklog × user rate).
- Team — breakdown of costs by assignee (who logged time and at what cost).
- Expenses — all direct expenses linked to the selected period/scope.
- Totals — aggregated numbers (labor + expenses + revenue if enabled).
Export to CSV / PDF for finance, stakeholders, or client invoices.
Takeaway
Managing budgets in Jira doesn’t have to mean toggling between spreadsheets and external tools. By setting up team rates, logging expenses, and generating structured reports within Jira, you transform it into a single source of financial truth for your projects.
👉 Try Time & Cost Tracker for Jira Cloud today — 30-day free trial, and free for teams up to 10 users.
Was this helpful?
Thanks!
Anastasiia Maliei SaaSJet


3 comments