Community resources
Community resources
Community resources
Jira Checklist 2026: What changed? / What's New?
Jira now offers two ways to handle checklists inside work items. The native Action Items feature (introduced in 2025) provides basic checkbox functionality directly in description and comment fields. For structured, recurring, or team-wide processes, checklist apps like Smart Checklist add templates, automation, permissions, and progress tracking that Action Items do not support.
Since the original version of this guide, Smart Checklist has shipped several updates that change how teams automate checklists in Jira. Built-in advanced conditions let you auto-import checklist templates based on issue transitions and field values - without building Jira Automation rules. Workflow validators now block transitions until checklist items are completed. And the Forge migration has changed how checklist data is stored and accessed.
This article covers everything you need to know about checklists in Jira in 2026: what's available natively, what advanced checklist tools add, and how to set up automation, templates, and workflows that keep your team consistent.
We'll cover:
- What Jira checklists are and how they work
- How to set up and manage checklists in your Jira instance
- Smart Checklist's built-in automation and advanced conditions (new)
- Workflow validators for enforcing checklist completion (new)
- Best practices for automation, templates, and team workflows
- Advanced use cases for Agile, ITSM, and compliance teams
- How Smart Templates extends checklist automation for recurring issue creation
What Is a Jira Checklist?
A Jira checklist is a lightweight to-do list embedded inside a Jira work item. It allows you to break down work into smaller, trackable steps without creating separate work items. These checklist items help teams stay on top of quick tasks or validate work before an issue is closed.
Jira introduced a native checklist feature called Action Items in late 2024. With this feature, users can add checkbox-style to-dos directly inside rich text fields like the Description or Comments. It’s a fast way to capture informal tasks, reminders, or collaborative notes—right where the work happens.
However, Action Items come with limitations. You can’t assign them to teammates, automate them through Jira Automation, or filter them using JQL. That’s why they’re better suited for quick notes rather than formal workflows.
For structured, recurring work or advanced tracking, many teams still rely on checklist apps or subtasks.
Why Compare Action Items to Jira Subtasks?
Both Action Items and subtasks are ways to break down work inside a work item. But they serve different use cases.
Action Items are quick and informal. They help capture checklists on the go, inside a work item’s description or comment field. They’re great for lightweight collaboration or one-off reminders.
Subtasks, on the other hand, are full-fledged work items. They support workflows, assignees, automation, and reporting. They’re better suited for structured tasks that require ownership and progress tracking.
If you’re deciding between them, here’s a comparison to help you choose:
|
Feature |
Jira Action Items |
Jira Subtasks |
|
Location |
Inside issue fields |
Separate work item |
|
Assign to user |
❌ Not supported |
✅ Supported |
|
Workflow status |
❌ None |
✅ Has own status |
|
Supports automation |
❌ No |
✅ Yes |
|
Searchable in JQL |
❌ No |
✅ Yes |
|
Use for recurring work |
❌ No |
✅ Yes |
|
Good for small task lists |
✅ Yes |
❌ Too heavy |
Use Action Items for small, internal checklists that don’t require status or ownership.
Use subtasks when you need structure, tracking, or workflow control.
For Agile teams, apps like Smart Checklist offer a middle ground. They provide templates, automation, and progress tracking - ideal for things like Definition of Done, QA steps, or release prep. These checklist apps let you manage recurring task lists without overloading your Jira project with subtasks.
How to Add a Checklist in Jira
There are two main ways to add checklists in Jira:
-
Using native Action Items
-
Using a checklist plugin like Smart Checklist
Let’s look at both.
Using Jira Native Action Items (Basic Functionality)
Jira Action Items are built into the platform. You don’t need to install anything.
They live inside rich text fields like Description, Comments, and custom paragraph fields.
To add an Action Item:
-
Type [ ] to start a new item
-
Use the /action item command
-
Click the checkbox icon in the toolbar
Once created, you’ll see a list of checkboxes that you can mark complete.

When to Use Jira Action Items
Action Items are a great tool for capturing quick thoughts or steps without adding overhead to your project. They’re ideal for:
-
Listing key points or next steps inside an Epic’s description
-
Capturing follow-ups from meetings directly in comments
-
Keeping track of informal tasks in a collaborative thread
While they’re handy for fast-moving work, Action Items have functional limits.
You can’t assign them to individual users—so they won’t show up in anyone’s personal task list. They also don’t trigger Jira Automation, and their completion state isn’t searchable. This makes them less suitable for structured workflows, reporting, or cross-issue tracking.
You also can’t reuse Action Items across different issues or enforce them with validators. So while they’re perfect for quick checklists, they’re not meant to replace more formal work item structures
These are helpful for quick task lists, but limited when you need structure or repeatability.
Using Smart Checklist for Jira (Advanced Functionality)
Smart Checklist is a powerful add-on available on the Atlassian Marketplace. It’s designed for teams that need more from their checklists—especially when those checklists are part of recurring processes or formal workflows.
Once installed, Smart Checklist adds a dedicated checklist panel to every work item. You can use it to build structured lists, assign items, and track completion status without relying on subtasks.
You can also format checklist items using Markdown, assign tasks to specific team members, and set due dates for each checklist item individually. This gives teams much more control over task ownership and deadlines, right from within the work item.

Need to standardize your team’s Definition of Done or onboarding steps? You can save checklist templates and apply them automatically using Jira Automation.
Another benefit is visibility. Smart Checklist supports JQL-based reporting, so you can filter issues based on checklist progress or status. This is especially helpful when you want to track whether critical steps were completed before a work item moved forward.
Smart Checklist is ideal if:
-
Your team uses repeatable checklists in sprint planning, QA, or compliance.
-
You want to reduce subtasks but still track detailed steps.
-
You need to monitor checklist completion across projects.
-
You want to assign checklist items without assigning the full issue.
You can also set permissions separately from the work item itself. For example, some users may be allowed to update checklist items without editing the rest of the work item.
Installation & Licensing Tips
-
Smart Checklist supports Jira Cloud and Data Center environments.
-
A free version is available for teams with up to 10 users.
-
Advanced features like automation, templates, and permission settings require a paid plan.
-
You can start with a free trial directly from the Atlassian Marketplace.
We’ll go deeper into how Smart Checklist templates and automation work in later sections.
Jira Action Items vs. Smart Checklists: When to Use What?
|
Feature |
Jira Action Items |
Smart Checklists by TitanApps |
|
Where It Works |
Rich text fields (description, comments) |
Dedicated checklist panel in work items |
|
Use Case |
Quick, ad-hoc tasks |
Structured, recurring checklists |
|
Assign Items |
❌ No assignees |
✅ Assign checklist items |
|
Due Dates |
❌ Not available |
✅ Set due dates per checklist item |
|
Automation |
❌ Not supported |
✅ Jira Automation & API support |
|
Templates |
❌ Manual entry |
✅ Save & reuse checklist templates |
|
JQL Search |
❌ Not available |
✅ Search checklist progress with JQL |
Why Use Jira Checklists?
Checklists help teams stay organized inside a work item. They bring order to steps that often get skipped or forgotten.
Instead of relying on memory, you can follow a clear, repeatable process. This is useful for things like Agile workflows, testing, onboarding, and approval steps.
Templates are especially helpful for recurring work. They let teams apply a consistent checklist every time—no need to build the list from scratch.
When you assign items and set due dates, checklists become collaborative. Everyone knows who’s responsible for what and when it’s due.
Advanced checklist apps like Smart Checklist go further. You can:
-
Trigger checklists automatically using Jira Automation
-
Filter and report on checklist status using JQL
-
Limit checklist editing based on user roles
-
Maintain a history of changes for audits and compliance
Checklists work across teams:
Engineering can manage release steps and QA criteria. Marketing can track content approvals. HR can run hiring processes. IT can document incident response.
No matter the use case, checklists are one of the simplest ways to stay consistent, reduce error, and keep tasks visible until they’re done.
How to Create a Jira Checklist
Creating a checklist in Jira depends on the method you choose - either using Jira’s built-in Action Items, or a more advanced checklist app like Smart Checklist.
If you’re using native Action Items, just type [ ] into the description or comment field. Jira will turn it into a checkbox. You can also use the slash command /action item. This works well for short, one-time task lists.
But for structured work, like recurring workflows or team-wide processes, a checklist app gives you more control.
You can:
-
Add a dedicated checklist panel to your issues
-
Use Markdown to format checklist items
-
Assign tasks to specific people
-
Set due dates
-
Track progress over time
-
Create and reuse checklist templates
Here’s a quick example: Let’s say your team runs a weekly QA cycle. With a checklist plugin, you can create a detailed QA checklist once, save it as a template, and reuse it every week. No need to copy-paste or start from scratch.
You can also manage multiple checklists in one work item. For example, a bug report might have one checklist for triage and another for testing. Each one can have different owners and due dates.
Formatting also matters. With Markdown, you can add headers, bold text, and links to documentation. That makes long checklists easier to read and follow.
If your work depends on consistency and collaboration, a structured checklist will help your team stay on track without overcomplicating your Jira workflow.
Checklist Templates in Jira
Most teams repeat the same types of tasks every week. It could be onboarding new hires, preparing a release, or publishing a blog post.
Instead of writing out the same checklist every time, you can save it as a template.
Templates make checklists consistent. They save time and reduce errors. You set them up once, and then apply them to any iwork item - whenever needed.

This is especially helpful for recurring workflows like:
-
Setting up Definition of Done for all stories
-
QA testing for each release
-
Weekly marketing content tasks
-
Employee onboarding flows
With Smart Checklist, you can turn any checklist into a reusable template. Then you can apply it manually or automatically with Jira Automation.
How to Create and Save a Checklist Template in Jira
There are two ways to create a checklist template using Smart Checklist:
Option 1: Save an existing checklist as a template
If you’ve already written a checklist in a work item, you can turn it into a template right from that issue.
-
Open the work item and click the Smart Checklist icon.
-
Click the three-dot menu.

-
Select “Save as Template”.
-
Give your template a name and click Save.

This works well when you’ve already fine-tuned a checklist and want to reuse it.
Option 2: Create a template from scratch
-
Go to a work item with Smart Checklist enabled.
-
Open the Smart Checklist panel.
-
Click the Templates button.
-
Select “Manage Templates”.
-
Create a new template using the input box or full-screen editor.

You can also manage templates globally (especially useful for Data Center and Server versions).
Once a template is saved, you can apply it manually or automate it using Jira rules. You can also limit access to templates using permission settings.
Popular Checklist Templates for Jira
Some checklists show up in almost every Jira instance. These are the templates that teams use again and again because they work.
Here are a few common ones that you can build into Smart Checklist and apply across your projects:
1. Definition of Done (DoD)
This checklist helps Agile teams know when a task is truly complete. It often includes code review, tests, documentation, and product sign-off.
# Definition of Done
– **Code produced** (_all `to do` items in code completed_)
> Code commented, checked in and run against current version in source control
– **Code reviewed**
> * @peer reviewed (or produced with pair programming)
> * meeting development standards
– **Builds** without errors
– **Unit tests** written and passing
– **Deployed** to system `test environment` and passed system tests
– **Acceptance criteria** met
> * Passed UAT (User Acceptance Testing)
> * signed off as meeting requirements by @productowner
– Any build/deployment/**configuration changes** implemented/documented/communicated
– Relevant **documentation/diagrams** **produced** and/or **updated**

2. Acceptance Criteria
Use this template to capture what a feature should do. It’s often written in the Given/When/Then format.
# Acceptance criteria
– **Given** my bank account is in credit, and I made no withdrawals recently,
> **When** I attempt to withdraw an amount less than my card’s limit,
> **Then** the withdrawal should complete without errors or warnings

3. Onboarding Checklist
Make sure new hires have access to tools, documents, and accounts from day one. The onboarding Smart Checklist for the new employee should outline tasks for the trial period, along with links to onboarding materials.
See the example below:
Company onboarding for Maria Smith | Developer
# During the 1st week
- Use your *full name* in your Slack profile
- Add your picture to _all company profiles_
> List of company profiles: Slack, Google account, Jira/Confluence, etc.
- Fill out [the form](http://rw.rw/vimeo.com) to get company merch
> Please state your current address
- Install required software
>VPN setup
>Antivirus installation
- Complete Orientation day
- Complete Product Training - Day 3
- Complete Compliance Workshop - Day 5
- Join team introduction meeting
# During the 1st month
- Read [company-wide policies](https://vimeo.com)
- Watch [Slack usage video](https://vimeo.com)
- Learn [working with sensitive information](https://www.atlassian.com/software/confluence)
- Prepare for the first feedback session
>Purpose: Assess your training progress and role adaptation.
- Schedule Bi-weekly meetings with your coordinator
>Purpose: Review progress on tasks, ask questions
4. QA / Testing Checklist
Standardize how features are tested and reviewed before release.
- Open all major browsers
- Run functional tests
- Log test results in Jira
- Tag bugs and assign
- Confirm fixes in latest build
5. Content Publishing Checklist
Keep marketing and editorial tasks on track.
– Research SEO and demand
– Research the topic @username
– Interview the knowledge holder within the company (@UserName)
– Create a draft for the article
– Review the draft with the knowledge holder
– Request visuals @username
– Request images for WP and Social Media @username
– Approve the article with your lead @username
– Proofreading
– Publication

These templates are editable and reusable. You can format them with Markdown, include links, or assign items to team members.
How to Automate Templates with Jira Automation
You don’t have to apply checklist templates manually every time. With Jira Automation, you can set rules to add templates based on conditions.
Here’s how it works:
-
Go to Project Settings > Automation
-
Click Create Rule
-
Set your trigger (e.g., work item created, status changed)
-
Add a condition (e.g., issue type = Story)
-
Choose “Smart Checklist: Apply Template” as the action
-
Select the template you want to apply
This way, every time someone creates a Story issue, the DoD checklist appears automatically. No manual work needed.
You can also:
-
Use JQL filters to target specific work items
-
Set up different templates per issue type
-
Trigger templates when an issue transitions from one status to another
Templates + automation = fewer missed steps and a faster setup for recurring work.
Automating Jira Checklists for Efficiency
Checklists are most powerful when they work behind the scenes. With Jira Automation and the Smart Checklist you can add templates, update items, and trigger rules - all without manual work.
Let’s break this into two parts: using automation rules, and using the API for custom setups.
How to Automate Checklists with Jira Automation
Smart Checklist supports Jira’s native automation engine. You can set up rules to automatically add templates or update checklist items based on work item changes.
Common triggers include:
-
Work item created
-
Work item transitioned to a new status
-
Field value updated
-
Comment added
For example, you can apply a Definition of Done checklist every time a task moves from “To Do” to “In Progress.”
You can also trigger checklist templates based on custom field values. This is useful for work item types like “Bug” or “Story,” each with different requirements.
You can even append templates or replace existing checklists depending on your setup.
Smart Checklist API & Advanced Integrations
For deeper use cases, like CI/CD workflows or custom dashboards, Smart Checklist also provides API access.
With the API, you can:
-
Create, update or delete checklist items programmatically
-
Trigger checklist actions from your DevOps pipelines
-
Connect checklists with tools like Confluence or Jira Service Management
Example use cases:
-
In a release pipeline, add a QA checklist once a build passes staging
-
During onboarding, sync checklist progress between Jira and HR tools
-
Link checklist data to Confluence pages for documentation or audits
Checklists are often part of larger systems. The API helps you integrate them without switching tools or losing context.
Smart Checklist built-in automation: checklist templates without Jira Automation rules
Smart Checklist can auto-import checklist templates directly inside Jira, without building rules in the Jira Automation rule builder. This is the fastest setup when teams want the right checklist to appear at the right workflow stage, based on simple conditions.
There are two levels of built-in automation: general conditions and advanced conditions.
General conditions cover the most common use case: apply a checklist template when a work item is created. Teams typically use this to attach a Definition of Done or acceptance criteria checklist to every new Story, Bug, or Task. You configure it once in Smart Checklist's template settings. Every new issue of that type starts with the right checklist. No Jira Automation rule needed.
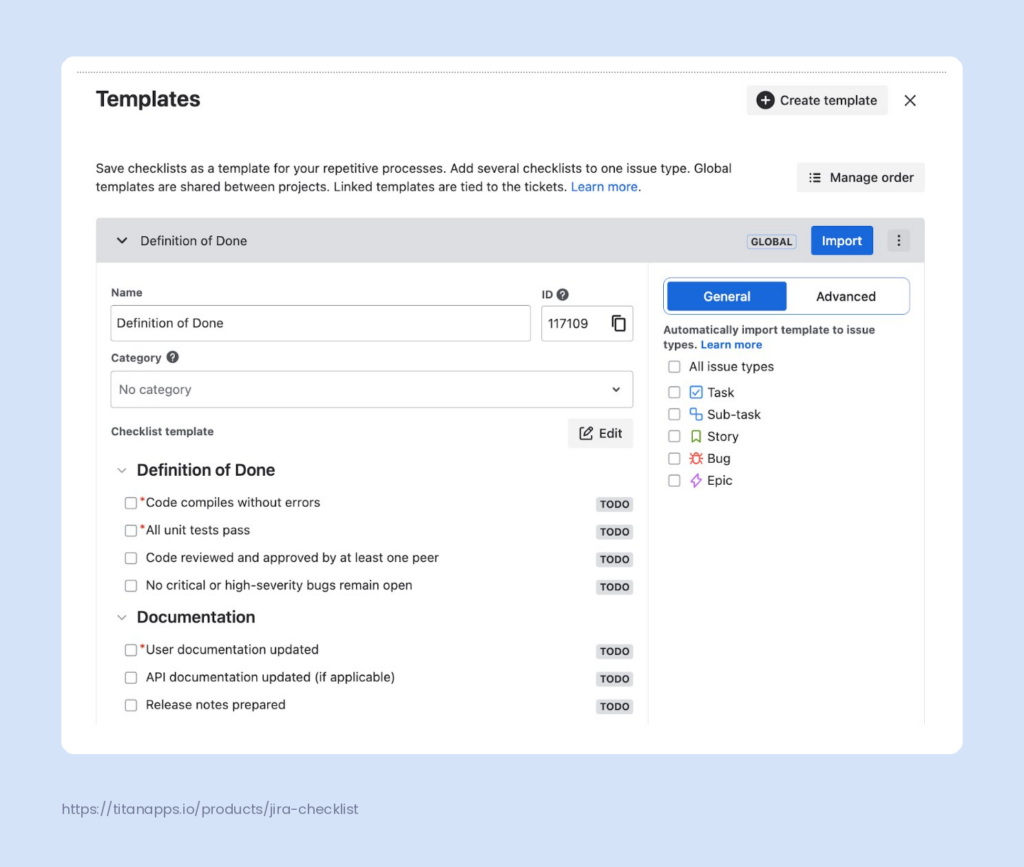
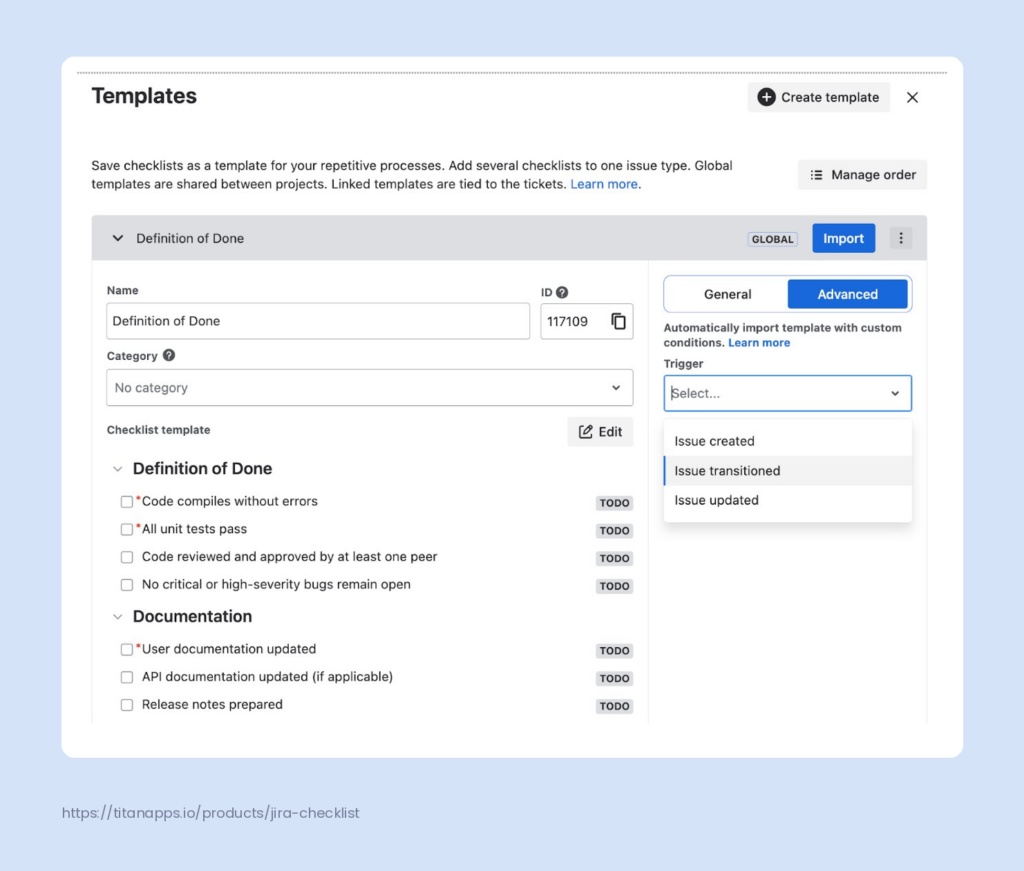
Advanced conditions add two capabilities teams have been asking for.
First, more triggers. You can auto-import a checklist template when a work item is created, transitioned, or updated. That matches how most real workflows operate: the right steps should appear when work moves to the next stage.
Second, field-based filters. Advanced conditions let you filter by issue fields so the template is added only when it is relevant. For example:
- Issue transitioned to "In Testing" and label = Regression → auto-import a regression testing checklist
- Issue updated with label = Security → add a security review checklist without requiring a status change
- Issue created with priority = Critical → apply an expedited triage checklist instead of the standard one
This setup works especially well in large Jira instances with many projects and teams. Each project can have its own template conditions without creating Automation for Jira rules that count against your monthly rule-run quota. The conditions live inside Smart Checklist's template settings, so project admins can manage them without needing global automation permissions.
When to use built-in automation vs Jira Automation rules. Built-in automation is simpler and covers the most common pattern: the right template at the right moment. Use it when your trigger is straightforward (issue created, transitioned, or updated) and your filter is field-based. Use Jira Automation rules when the checklist is part of a larger multi-step workflow - for example, when you need to add a checklist, send a Slack notification, update a custom field, and assign the issue in the same rule.
For a deeper walkthrough of both approaches with real examples, see the guide on Jira automation for recurring work.
Jira Checklist Use Cases for Agile & Project Management
Checklists play a key role in helping Agile teams stay focused, reduce clutter, and follow consistent processes. When used inside Jira, they make sprint tasks easier to manage and review without the overhead of subtasks or scattered documentation.
Here’s how teams use checklists across different stages of the Agile workflow.
How Agile Teams Use Jira Checklists
1. Keep sprint issues clean and organized
Scrum teams often break down work into small steps. But creating a subtask for each step can clutter the board and slow things down.
A checklist inside the Jira issue solves that. You can track progress, assign items, and update statuses without switching views.
Example:
A development task for a new feature might include:
-
Design the UI
-
Implement logic
-
Write unit tests
-
QA testing
-
Update changelog
Each of these steps can be a checklist item. No need for separate subtasks. Progress stays visible inside thework item.
2. Use checklists for Definition of Ready (DoR) and Done (DoD)
Before a story enters a sprint, it should meet clear standards - this is the Definition of Ready.
When it leaves the sprint, it must meet your Definition of Done.
You can create templates for both and reuse them across stories.
DoR might include:
-
Clear user story format
-
Acceptance criteria written
-
UI/UX designs attached
-
Dependencies identified
-
Story estimated
DoD could include:
-
Code reviewed
-
Tests written and passed
-
Documentation updated
-
Story reviewed and approved by Product Owner
Applying these checklists ensures consistent quality and reduces back-and-forth between teams.
3. Standardize sprint and project setup
Starting a new Scrum project involves many small tasks - setting up the board, scheduling meetings, creating workflows.
You can create a checklist template for Scrum setup that includes:
-
Creating the Jira project and board
-
Configuring sprints and filters
-
Scheduling sprint ceremonies
-
Adding reusable DoR and DoD checklists
-
Automating work item transitions
Once saved as a template, this can be applied to any new project saving hours of manual setup.
Managing Checklist Permissions and Custom Fields in Jira
Smart Checklist works across different team setups. Some teams need open editing. Others want to control who can update the checklist.
You can restrict checklist actions based on Jira roles. For example:
-
Let only assignees mark items as done
-
Allow only project leads to edit content
-
Keep checklists read-only for some users
This gives managers control without blocking progress.
Custom Fields vs. Issue Properties: What's the Difference?
Smart Checklist stores checklist data in two ways: Issue Properties and the optional Checklists custom field.
Issue Properties are the default. They power most features right after installation. You don’t need to set up anything manually.
But some advanced features need a custom field.
Here's a quick breakdown:
|
Feature |
Issue Properties |
Checklists Custom Field |
|
Checklist content |
✅ |
✅ |
|
Markdown support |
✅ |
✅ |
|
API access |
✅ |
✅ |
|
Agile board visibility |
✅ |
✅ |
|
Automation triggers |
❌ |
✅ |
|
JQL search & filters |
❌ |
✅ |
|
Progress tracking (custom field view) |
❌ |
✅ |
|
Workflow validators |
❌ |
✅ |
|
Checklist sync to Confluence |
❌ |
✅ |
|
Audit & change tracking |
❌ |
✅ |
If you want to track checklist progress across work items, use automation, or run JQL searches you’ll need set up a custom field.
Forge migration context. Smart Checklist has transitioned from Atlassian Connect to Forge. On Forge, checklist data is stored in both issue properties and the Checklists custom field. The custom field is required for automation triggers, JQL search, workflow validators, and progress tracking on boards. If you recently migrated from Connect to Forge, verify that the Checklists and Smart Checklist Progress custom fields are present and have global context. Teams planning a Data Center to Cloud migration should also check that these fields are created correctly during the migration process. For more on this transition, see the TitanApps guide on Atlassian Forge.
Workflow validators: enforce checklist completion before work moves forward
Checklist templates make sure the right steps are visible. Workflow validators make sure those steps are actually completed before work moves to the next stage.
Smart Checklist now supports workflow validators that you can add to any transition in a company-managed Jira Cloud project. When a team member tries to move a work item to the next status, the validator checks whether checklist items are completed. If they are not, the transition is blocked and the team member sees an error message.
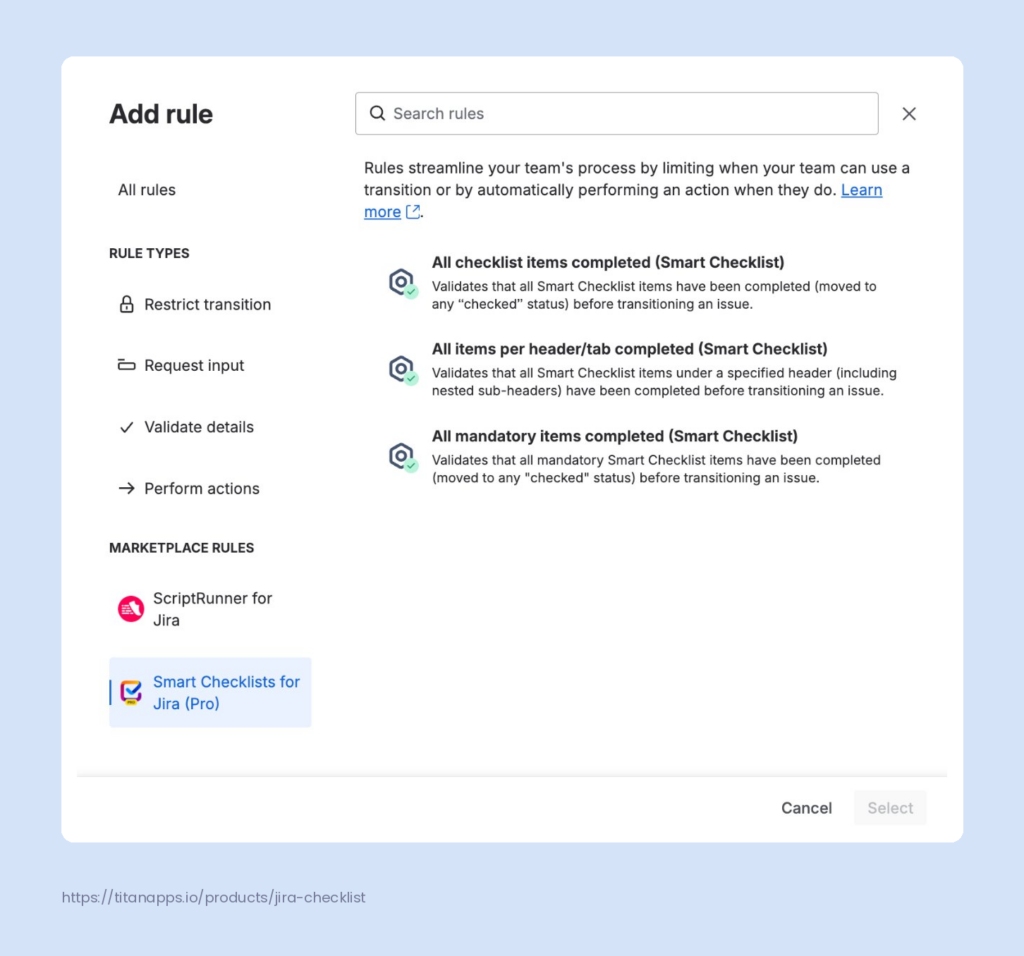
Two validator types are available:
All checklist items completed - blocks the transition unless every checklist item is marked as done. Use this for transitions where the team needs to confirm that all steps were followed, such as moving from "In Review" to "Done."
All mandatory checklist items completed - blocks the transition unless all items marked as mandatory are done. Non-mandatory items can remain open. Use this when some checklist items are required quality gates while others are optional guidance.
Custom error messages. You can configure the message team members see when the transition is blocked. This helps clarify what still needs to be completed. Localization is also supported, so teams working in different languages see the message in their own language.
Where validators work. Workflow validators are available in company-managed Jira Cloud projects. They are not available in team-managed projects. This is a Jira platform limitation, not a Smart Checklist limitation. For Data Center, Smart Checklist provides equivalent validators through its own workflow validator modules.
This feature turns checklists from helpful suggestions into enforceable quality gates. A Definition of Done checklist with mandatory items and a workflow validator means incomplete work cannot move to "Done" - regardless of who tries to transition it. That is a meaningful upgrade for teams that struggle with inconsistent completion standards.
How Smart Templates extends checklist automation for recurring work
Smart Checklist automates what happens inside an issue. Smart Templates automates the creation of the issue itself.
When a team's recurring work involves more than just a checklist - when it needs pre-filled fields, specific assignees, child issues, and a consistent structure - Smart Templates handles that layer. A template can include a Smart Checklist that gets applied to every issue created from it. That means the checklist, the fields, and the structure all arrive together.
Scheduled creation. The Scheduler creates recurring issues on a CRON or interval basis. A weekly QA cycle can become a Task that gets created every Monday with the right checklist, assignee variable, and due date already in place. No manual setup. No forgotten steps.
Webhook-triggered creation. Webhook links let external systems trigger issue creation through a POST request. A CI/CD pipeline that passes staging can trigger a release checklist issue in Jira. An HR system can trigger an onboarding task with the right checklist when a new hire is confirmed.
Variables. Smart Variables like {{now}} and {{reporter}} let templates adapt to context. A due date can be set to 5 business days from creation. An assignee can be pulled from the person who triggered the template. That keeps templates flexible without requiring manual edits after creation.
The combination of Smart Templates and Smart Checklist covers both sides of recurring work: consistent structure when issues are created, and consistent execution when the work gets done. For teams that want to see how this works end to end, the guide on automating Jira processes with Smart Checklists and Smart Templates covers real workflows. And for a detailed walkthrough of the automation patterns - including built-in conditions, Jira Automation rules, and validators - see Jira automation for recurring work.
Reporting and Tracking Jira Checklist Progress
Checklists aren’t just for tracking tasks inside one work item. With the right setup, you can monitor checklist progress across projects using JQL, custom fields, and Jira dashboards.
You can answer questions like:
-
Which tasks are still open?
-
Which work items have incomplete checklists?
-
What’s blocking a release?
Use Custom Fields to Track Checklist Progress
To track checklist completion, set up two custom fields:
-
Checklists (for content search)
-
Smart Checklist Progress (for completion tracking)
Once added, these fields let you:
-
View progress on your Jira board
-
Create automation rules
-
Build reports and filters
Search Work Items Using JQL
Once custom fields are active, you can search for work items based on checklist data.
Here are some simple examples:
|
What you need to find |
JQL Example |
|
Work items with unfinished checklists |
"Smart Checklist Progress" ~ "-Done" |
|
Work items where all items are done |
"Smart Checklist Progress" ~ "Done" |
|
At least one item completed |
issue.property[SmartChecklist].hasClosedChecklistItems = 'true' |
|
All items open |
issue.property[SmartChecklist].hasOpenChecklistItems = 'true' |
|
Checklist contains “login” |
"Checklists" ~ "login" |
You can also filter by:
-
Number of checklist items
-
Due dates
-
Status (Todo, In Progress, Done)
-
Assignees
Advanced Features: Multiple Checklists in One Work Item
Some work items involve many teams or complex workflows. One checklist is not always enough.
With Smart Checklist, you can now split your checklist into separate tabs. Each with its own tasks, progress, and purpose.
This gives you a clean, structured way to manage complex work inside a single work item.
Why Use Multiple Checklist Tabs?
Multiple checklist tabs help you:
-
Keep work organized by team or process step
-
Track progress for each tab separately
-
Assign tabs to different users or departments
-
Automate tabs based on issue type or status
-
Apply templates to each tab individually
Each tab acts like its own checklist. You can switch between them inside the work item, without creating multiple tasks or pages and also review progress of each tab without a need to open it seprarately.
Use Cases for Multiple Checklists
Split checklists by team or department
For example, in a product launch, marketing, sales, and support may all contribute. You can give each team their own checklist tab. Everyone sees the full picture, but without mixing tasks.
Add tabs based on issue type
Automatically apply “Definition of Done” or “Definition of Ready” tabs to specific issue types like Stories. This helps teams stay consistent during sprint planning and execution.
Add tabs during workflow transitions
Some tasks need approvals or checks during the process. Create tabs like “Legal Review” or “Security Audit” that appear when the work item moves to a specific status.
Additional Benefits:
-
Better structure - separate tabs help reduce clutter inside work items. Teams only see the checklist that’s relevant to them.
-
Track progress clearly - each tab shows its own progress bar. You can spot blockers at a glance.
-
Improve collaboration - assign checklist tabs to specific roles or team members. Everyone knows what they’re responsible for.
-
Use templates per tab - attach different checklist templates to each tab. This saves setup time and keeps your processes consistent.
Best Practices for Managing Checklists in Jira
Checklists can make work smoother or harder, depending on how you use them. Here are some tips on how to keep your checklists helpful for the team:
Keep It Simple and Focused: Don’t use a checklist when a subtask is a better fit. Checklists are great for step-by-step tasks within one work item. If each item needs a separate assignee or status, create subtasks instead.
-
Organize for Readability: Use headers, indentation, and spacing if your checklist is long. Break larger checklists into multiple tabs when possible. Use Markdown formatting to highlight important items or link to docs.
-
Assign Owners and Due Dates: If your team shares a checklist, assign specific items to each person. Add due dates so nothing gets delayed. This makes everyone’s responsibility clear from the start.
-
Use Templates for Recurring processes: If you do the same tasks often, save time by using templates. Create standard templates for repeatable processes like onboarding, testing, or publishing. You can apply them manually or set up automation to add them on work item creation or status change.
-
Automate Where It Makes Sense: Use Jira Automation to apply templates, update checklists, or trigger workflows. You can base rules on issue type, transitions, or custom field values. Automation reduces manual setup and keeps your team focused.
-
Avoid Overload: Don’t add every detail to a checklist. Keep it task-based. Add only what someone needs to do or confirm. If your checklist feels too long, consider splitting it into tabs or simplifying it.
-
Set the Right Permissions: Use Smart Checklist permissions to control who can edit or complete checklist items. This helps teams stay aligned and avoids accidental changes.
Checklists work best when they are simple, clear, and built into your team’s workflow. Start small, improve over time, and make sure they actually help people do their work better.
Final thoughts
Jira checklists are a simple way to make work easier, faster, and more consistent. Whether you use native Action Items or the Smart Checklist app, adding clear to-do items helps your team stay aligned and on track. With templates, automation, and multiple checklists, you can build repeatable processes that actually work without overcomplicating your Jira instance.
FAQ – Common Questions About Jira Checklists
Q1: Can you create checklists in Jira natively?
Yes. Jira’s Action Items feature lets you add simple checkboxes inside descriptions or comments. They’re good for quick notes, but don’t support automation, templates, or tracking.
Q2: What is the difference between checklists and subtasks in Jira?
Checklists are lightweight task lists inside a work item. Subtasks are separate work items with their own workflow and assignees. Use checklists for small steps; use subtasks for bigger, standalone work.
Q3: How can I automate checklist creation in Jira?
Use Jira Automation with Smart Checklist. You can apply templates automatically based on issue type, status, or other triggers. Learn more in the automation guide.
Q4:Can checklists be linked to workflows and issue transitions?
Yes, in two ways. First, you can trigger checklist templates when a work item moves between statuses using Smart Checklist's built-in advanced conditions or Jira Automation rules. Second, you can block transitions using Smart Checklist workflow validators. Two validator types are available: "All checklist items completed" and "All mandatory checklist items completed." Validators support custom error messages with localization and work in company-managed Jira Cloud projects. On Data Center, equivalent validators are available through Smart Checklist's workflow validator modules.
Q5: What is the best Jira checklist plugin for project management?
Smart Checklist by TitanApps is one of the top-rated checklist apps on the Atlassian Marketplace. It supports templates, automation, JQL, permissions, and more.
Q6: How do I set due dates and assignees for Jira checklist items?
Use Smart Checklist. You can assign checklist items to users and add due dates directly inside the checklist.
Q7: Can I track checklist progress in Jira reports or dashboards?
Yes. Use the “Smart Checklist Progress” custom field to track completion. Add it to your filters, dashboards, or boards for team-wide visibility.
Q8: How do checklists integrate with Confluence and Jira Service Management?
You can link work items with checklists to Confluence using the Jira macro. In JSM, checklists help agents follow steps, stay consistent, and resolve tickets faster.
Q9: What is the difference between Smart Checklist built-in automation and Automation for Jira?
Smart Checklist built-in automation uses conditions configured inside the app's template settings. You set triggers (issue created, transitioned, updated) and field filters (issue type, label, priority, component) directly in Smart Checklist. No Jira Automation rules needed. This is simpler to set up and does not count against your monthly Jira automation rule-run quota. Automation for Jira gives you more complex logic: multi-step rules, branching, notifications, field updates, and combining checklist actions with other Jira actions in the same rule. Use built-in automation when you just need the right template at the right time. Use Automation for Jira when the checklist is part of a larger automated workflow.
Q10: How do Smart Templates and Smart Checklist work together for recurring work?
Smart Templates creates the issue structure - summary, description, fields, child items, and links. Smart Checklist adds the execution steps inside that issue. A template can include a checklist that gets applied automatically when the issue is created. For recurring work like weekly QA cycles, onboarding, or release processes, Smart Templates handles creation (on a schedule or via webhook) and Smart Checklist handles execution (structured steps, mandatory items, progress tracking). The combination means both the structure and the process arrive together, every time.
💡Learn more about Smart Checklist
Was this helpful?
Thanks!
Viktoriia Golovtseva _TitanApps_
1 comment