A pop-up survey could appear while you're here --curious what it's for? Click here to learn more!
×Community resources
Community resources
Community resources
How to Set Up RAID Project Management in Jira in 5 Steps
Project managers know that uncertainty is the enemy of successful delivery. You’ve got potential risks lurking around every corner, assumptions that might prove wrong, current issues demanding attention and dependencies that could slip at any moment.
This is where RAID comes in (and no, I’m not talking about the data storage kind).
Watch the full setup walkthrough:

See exactly how to configure RAID in Jira with the SoftComply Risk Manager Plus app in just 5 steps.
What RAID Means for Project Managers
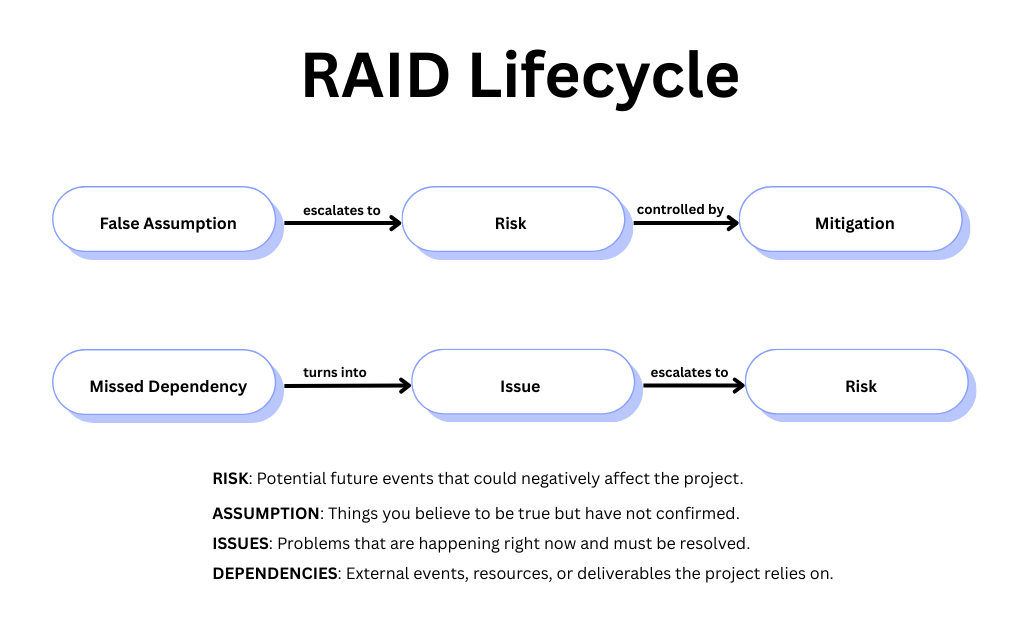
RAID stands for Risks, Assumptions, Issues and Dependencies. It’s a structured approach that gives your team a single view of everything that could impact your project’s scope, budget or timeline.
Here’s what each element covers:
- Risks: Potential events that could negatively affect your project.
- Assumptions: Things you believe to be true but haven’t confirmed yet.
- Issues: Problems happening right now that need immediate resolution.
- Dependencies: External factors, resources or deliverables your project relies on.
The beauty of RAID is in how these elements connect. An invalid assumption often becomes a risk. A slipped dependency creates an issue that can escalate into a bigger risk. Understanding these relationships helps you stay ahead of problems instead of just reacting to them.
When RAID Works Best
RAID shines in specific situations:
Project initiation and planning phases – You can capture all potential problems upfront, giving your team clarity about what might impact delivery.
Cross-functional projects – RAID categories make it easy to assign ownership and track who’s managing which uncertainty across multiple teams.
High-risk and regulated projects – RAID works well alongside formal frameworks like ISO 31000 or NIST, giving project managers a more agile operational tool while the bigger frameworks handle enterprise compliance.
Rapidly changing environments – When requirements or resources shift frequently, RAID helps you validate assumptions continuously and catch escalating issues quickly.
Common RAID Pitfalls (And How to Avoid Them)
Most teams struggle with RAID because they treat it like a static document. They fill out a spreadsheet at the start of the project and then forget about it. That’s not particularly helpful.
In addition to that, the most common challenges of RAID include:
- Confusion between categories – People mix up risks with issues and assumptions with dependencies.
- Lack of project integration – RAID items get buried in spreadsheets separate from actual tasks and milestones.
- Everything marked as critical – Without proper prioritization, you can’t tell what needs attention first.
- No clear ownership – Risks and dependencies need specific people responsible for monitoring them.
Setting Up RAID in Jira: The 5-Step Process
Instead of managing RAID in disconnected spreadsheets, you can integrate it directly into your Jira workflow. Here’s how you can implement RAID in Jira with the SoftComply Risk Manager Plus app.
Step 1: Create Jira Issue Types
First, you’ll need to create two types of Jira issues:
- Risk issues (with full workflows, owners, due dates, and risk scoring),
- Dependency issues (with similar lifecycle management).

This lets you apply different fields, workflows, and screens to each issue type.
Step 2: Build Your Risk Model
For risks, you’ll next want to create a risk matrix.
In this example, we use a simple 4×4 matrix with impact and likelihood on different axes.
You can define your risk appetite and scoring right in the heat map:
-
Risk parameters (Likelihood × Impact)
-
Risk levels (High, Medium, Low)
-
The 4×4 risk matrix
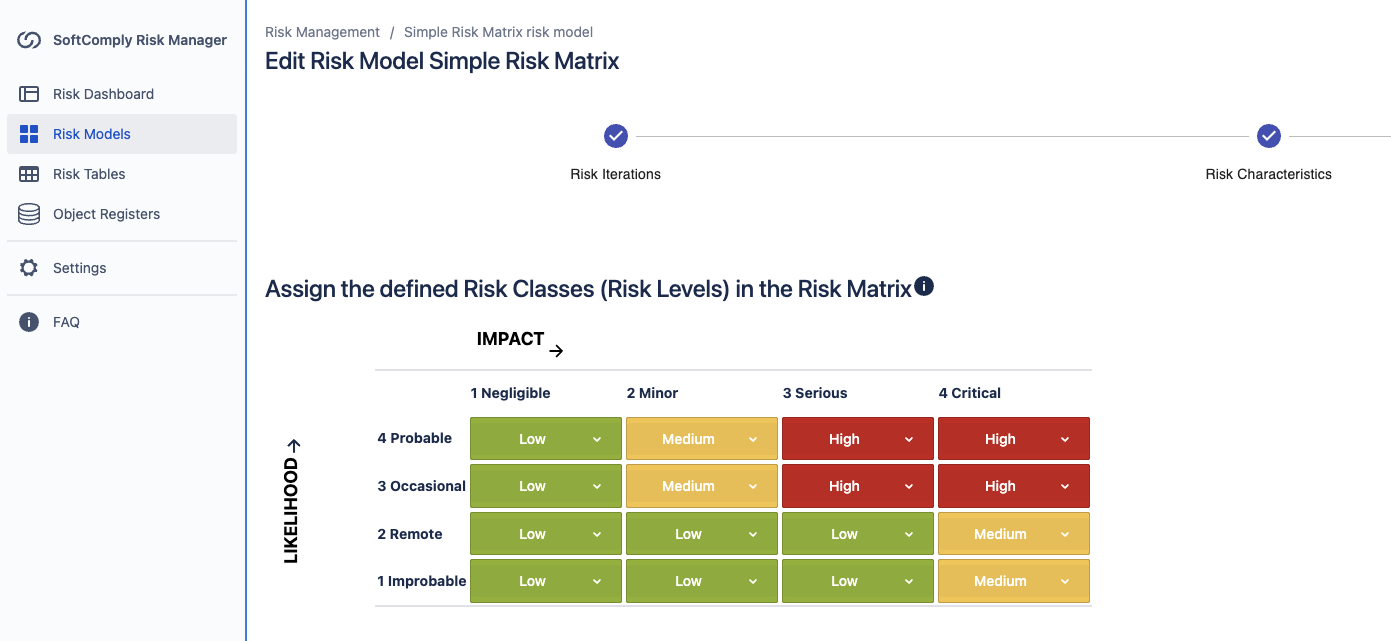
The risk model will apply only to the ‘Risk’ items (i.e. the risk Jira issue type) in your RAID register.
Step 3: Set Up Object Registers
Since assumptions and issues don’t need full workflows of their own, they can be defined in the Risk Manager Plus’ object registers, which are essentially data libraries within the app.
For assumptions, you can track:
- Title and description
- Validation plan
- Owner
- Status (unvalidated, validated and invalid)
- Validation due date

For issues, you can track:
- Title and description
- Priority
- Resolution plan
- Owner
- Status (open, in progress, resolved and closed)
- Target resolution date

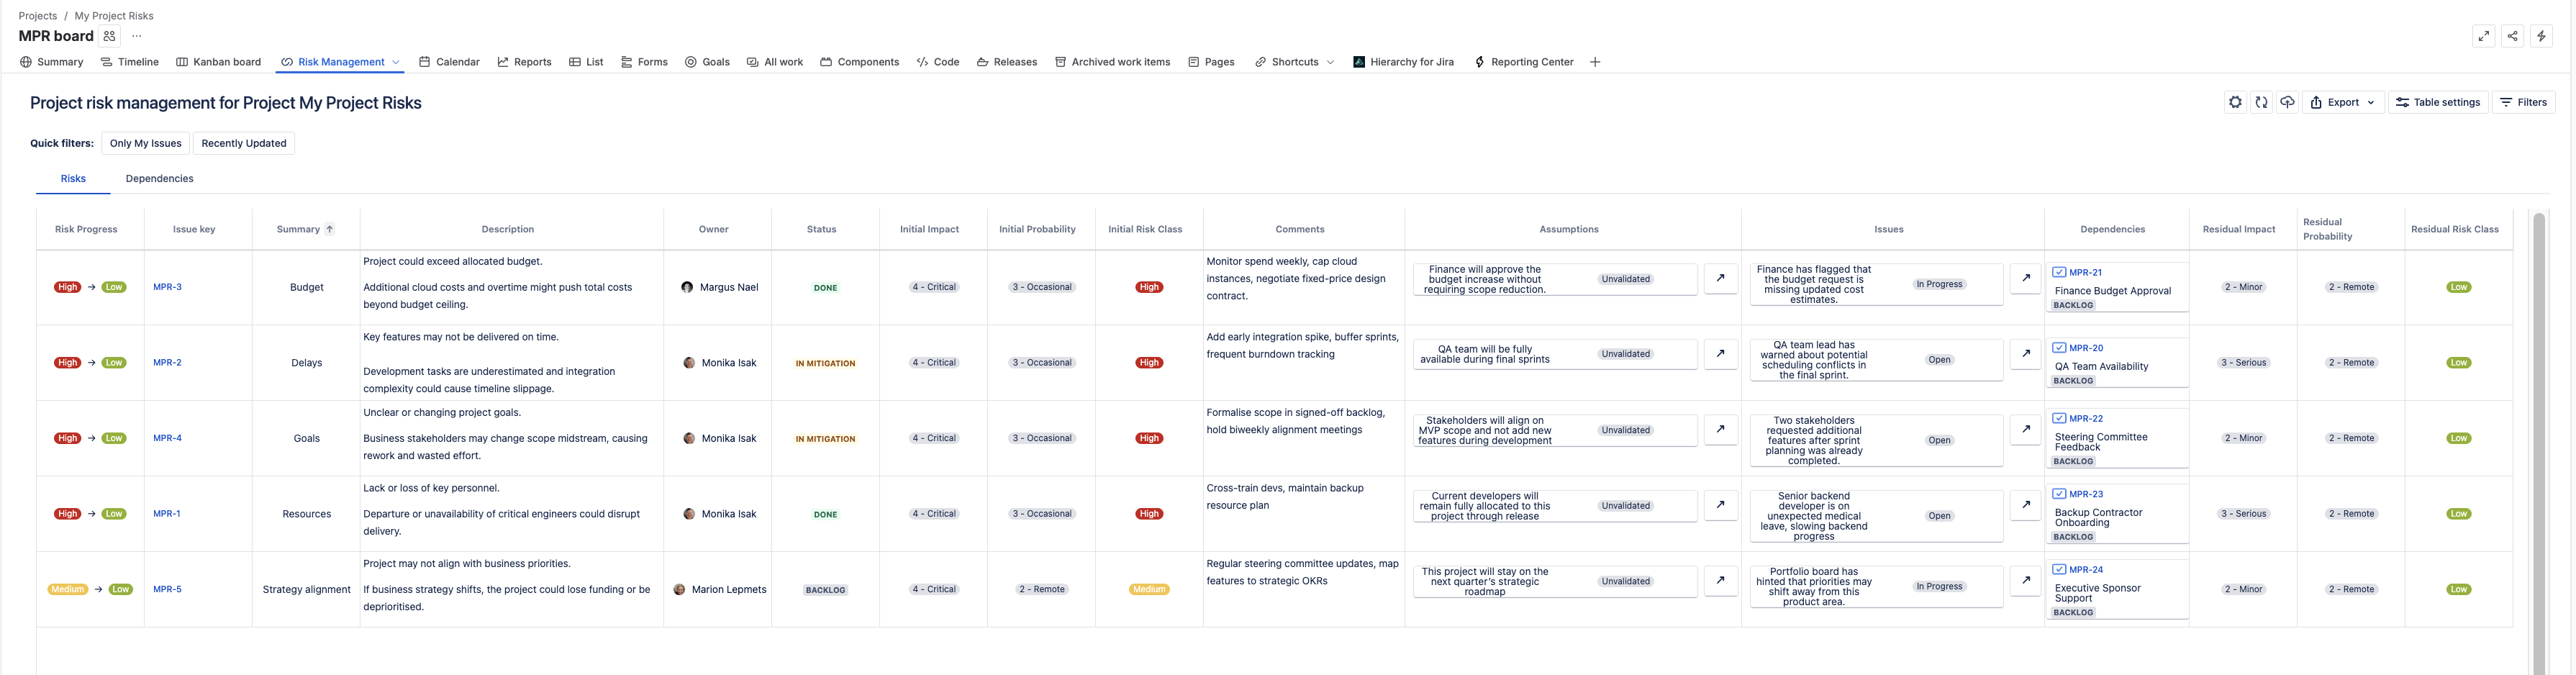
Step 4: Create Your RAID Log
Once you have assigned relevant Jira issue types for Risks and Dependencies, you can create Risk Table views for both of them.
After setting up the Risk Table sheets for both of these issue types, they will automatically be populated in the correct tab.
You will have 2 tabs in your risk table:
- One for risks,
- the other for dependencies.
Each risk should be described, at a minimum, with their respective risk owner, risk assessment related fields like Likelihood, Impact, Risk Class, comments, related Assumption, related Issue, related Dependency.
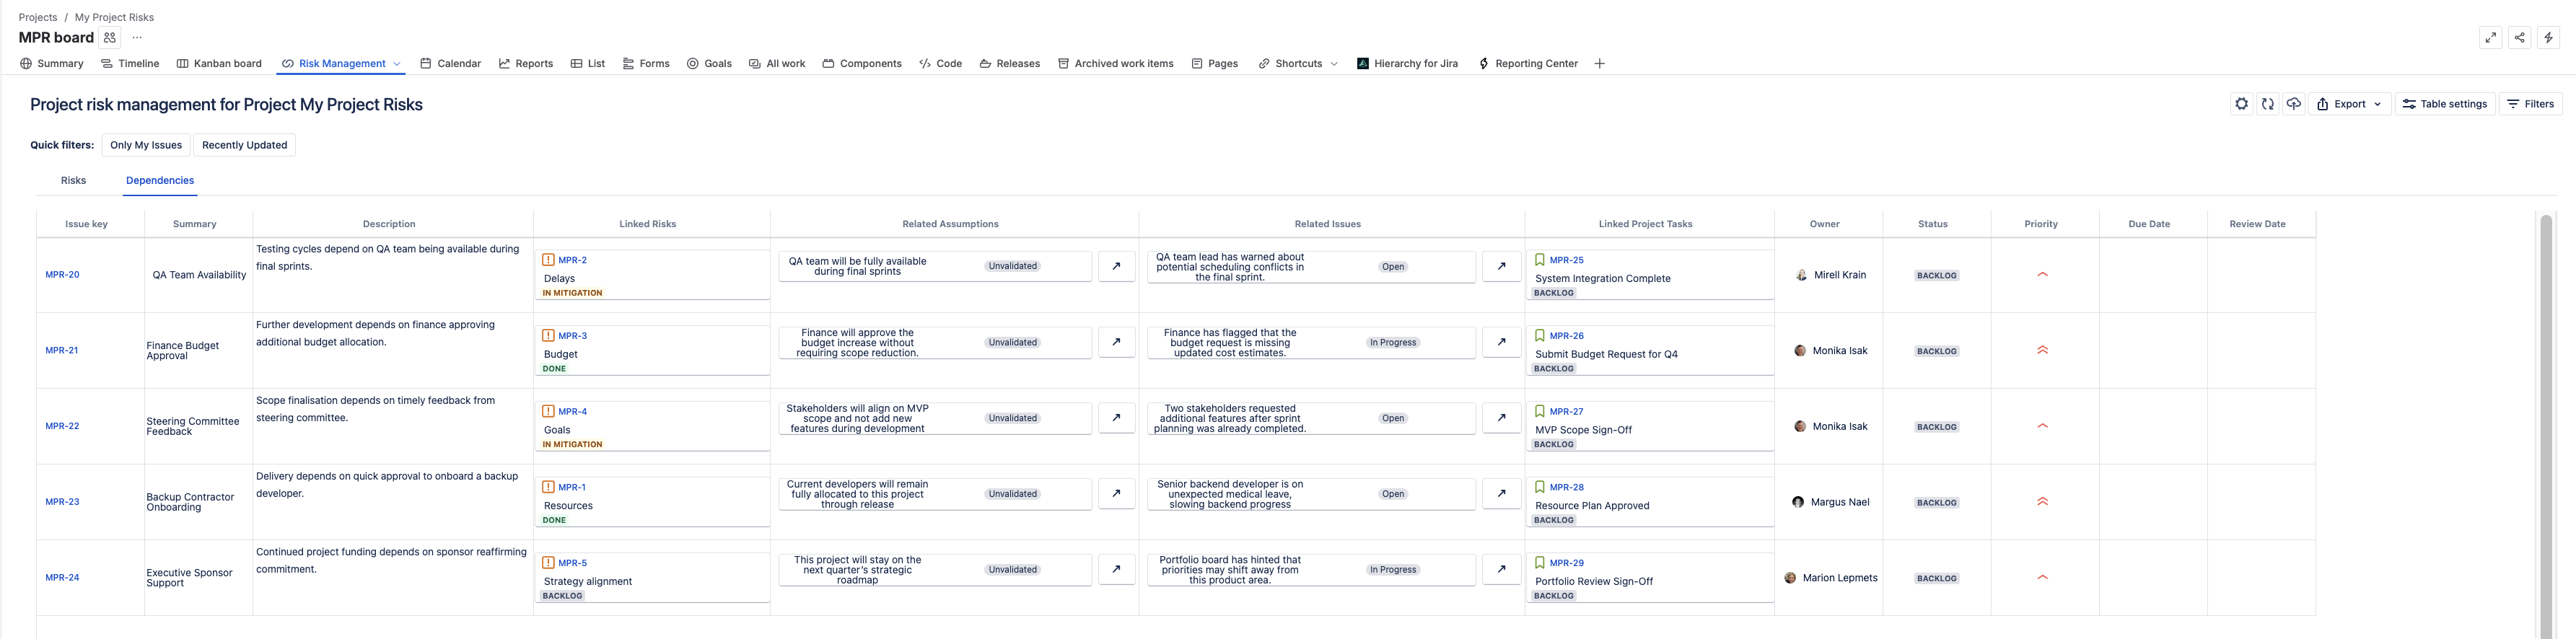
For each dependency, you should have, at a minimum, the owner of the dependency, priority, status, linked Project Tasks, related Assumption, related Issue, related Risk.
Step 5: Link Everything Together
This is where RAID becomes powerful. You can:
- Link assumptions to the risks they might trigger,
- Connect issues to the risks they’re causing,
- Tie all RAID items to specific project tasks and milestones.
This makes RAID part of the actual delivery plan rather than a side spreadsheet.
Real-World RAID Example: Software Development Project
Let me walk through a practical example. Say you’re managing a software development project.
Your assumptions might include:
- Finance will approve the budget without us having to decrease the project scope,
- The QA team will be available when needed,
- Stakeholders won’t add new requirements during development,
- Current developers stay allocated to this project until release,
- The project remains a strategic priority for the next quarter.
Your risks could be:
- Budget risk: Project exceeds allocated budget (mitigation: monitor spend weekly),
- Delay risk: Key features not delivered on time (mitigation: add integration spikes, buffer sprints, frequent tracking),
- Strategy alignment risk: Project may not align with business priorities (mitigation: ensure alignment at regular steering committee meetings),
- Resource risk: Key developers are unavailable during the project (mitigation: maintain backup resource plan),
- Goals risk: Project objectives are changing mid-project (mitigation: formalize goals at the start of the project and review periodically during development).
Dependencies might include:
- Finance department budget approval,
- QA team availability,
- Steering committee feedback,
- Backup contractor availability,
- Executive sponsor support.
Each risk and dependency has an owner, priority level and review dates. When assumptions prove invalid or dependencies slip, you can quickly convert them into tracked issues or risks.
Why This Approach Works Better Than Spreadsheets
Managing RAID in Jira with the Risk Manager Plus app gives you several advantages:
Real-time visibility – Everyone sees current status without hunting through email chains or shared drives
Automatic notifications – Team members get reminded when review dates approach or ownership changes
Traceability – You can see exactly how assumptions, issues, and dependencies connect to specific project deliverables
Integration – RAID becomes part of your actual delivery plan instead of separate documentation
Prioritization – Risk scoring helps you focus on what matters most
Getting Started with Your First RAID Project
The setup process is straightforward but if you want hands-on help, the SoftComply team offers live demos where we’ll walk you through configuring your first RAID project.
The key is starting simple. Don’t try to capture every possible risk or assumption on day one. Begin with the obvious ones, establish the workflow and build your RAID practice over time.
RAID works because it gives you a structured way to think about uncertainty. Instead of hoping problems won’t happen, you’re actively monitoring the things that could go wrong and taking action before they derail your project.
Ready to try it yourself?
Start your free trial of SoftComply Risk Manager Plus – it’s the most advanced risk management app on Jira Cloud, designed specifically for teams who need sophisticated risk tracking without the cost and complexity of standalone solutions.
The difference between projects that succeed and those that struggle often comes down to how well they manage uncertainty. RAID gives you the framework to do exactly that.
This article was originally published on SoftComply blog.
Was this helpful?
Thanks!
Marion Lepmets _SoftComply_
0 comments