Community resources
Community resources
Community resources
Make Confluence the Centerpiece of your Business: Nobody puts Confluence in the corner...
Confluence and it’s assortment of apps enable it to be one of the most popular document management systems on the market, yet it lacks an huge number of possible integrations with external systems. The ability to extend Confluence to have this power can open pathways to scenarios and solutions previously unfathomable.
Why do you need integrations?
Integrations offer the ability to have a fully managed system where all your applications work in a bliss unison. Having an event in one application trigger a related event an entirely different system opens a world of potential, create Issues, trigger Builds, the world is at your fingertips.
Confluence can be put at the heart of your organisation, and be transformed into more than just a documentation medium.
But how do you do it?
Workflows for Confluence now enables users to begin implementing these integrations, from Atlassian applications like Jira and Bitbucket, to thousands of others through a tool such as Zapier.
Enough about the possibilities! Now we’re going to demonstrate a specific use-case: Creating a Jira Issue! After this, you will have a clearer idea of how you can then do it with other applications.
Setting up your Jira Credential
Navigate to the Credentials Configuration
Here is where you can manage all your existing Credentials, create new Credentials, set their Permissions and Domains of which they can be used for.
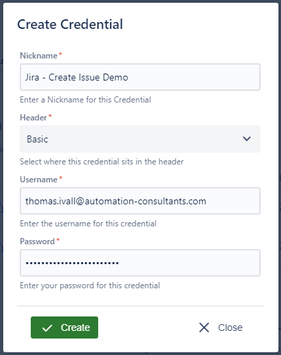
Create your Credential
To interact with Jira’s API, requests will need include a Basic Authorization Header, to learn more about how this works, click here. The header requires your users email address and the API token that only that account can generate.
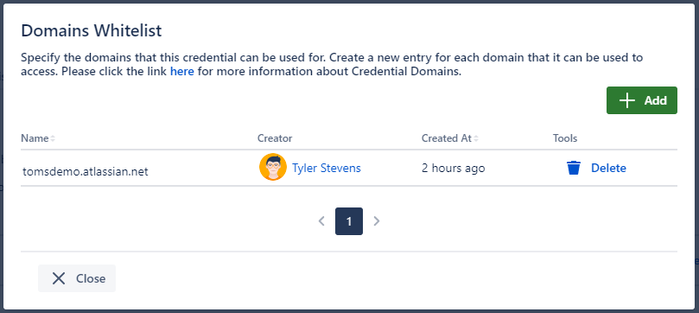
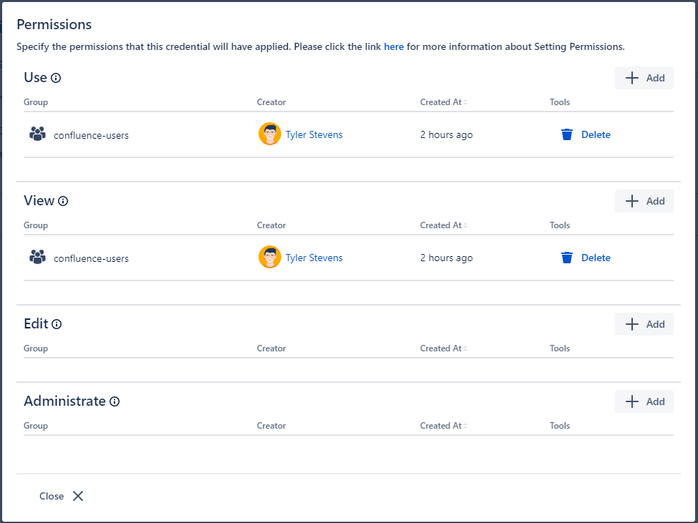
Set Permissions and Domains
Once you have created your credential, you will have to specify which users have the ability to use this credential in a Workflow. In addition to this the domains which it can be used for need to be added to the whitelist.
That’s it for the Credential, now we need to add it to our workflow and configure the payload that will be sent to our Jira instance!
Including it in your Workflow using Authenticated Webhooks
All we have left to do is add the Authenticated Webhook action to our Workflow!
Open up an existing Workflow, or create an entirely new one. Click on the Authenticated Webhook action to add it and we can begin the simple configuration.
For my workflow, once the page has been approved, I will have a Jira Issue created to let my colleagues know that our following task is now ready to begin.
Configuration
Select the Credential
In the Credential Select search for the Credential you need to use
Specify the URL endpoint
Using the Jira Cloud API documentation, find the endpoint for the Create Issue function, and enter it in the text box.
Enter the JSON payload
As described in the API documentation, we need to specify the JSON that will be sent to the Jira Instance to be used for creating the Issue.
We have included this article in our Knowledge Base with the full excerpt of the JSON payload we’re using. With the JSON payload, you can also include Page Related Variables such as the Title, the Transitioner or Page Creator, and many more using our Variable Substitution feature!
Once that is done, all we have to do is click Save and we can start using it on our pages!
Seeing it in action
After the Workflow is applied to your pages, either using our Default Workflow feature, CQL Auto-Assign or Ad-Hoc, you can transition through it until it reaches it’s Approved Status.
Above is our page that has been Approved and as you can see underneath that our Jira Issue has successfully been created!
We hope you understand that it’s very simple to begin integrating Workflows for Confluence with your various other applications. Let us know of any integrations you’d like to see and we can explore some more in our future articles!
Was this helpful?
Thanks!
Tom _Automation Consultants_
Atlassian Community Events
- FAQ
- Community Guidelines
- About
- Privacy policy
- Notice at Collection
- Terms of use
- © 2025 Atlassian


0 comments