-
Guaranteed Test Coverage: Verifies that every single business requirement has at least one corresponding test case.
-
Defect & Risk Management: If a bug occurs during testing, you can trace backward to identify which exact requirement is affected.
-
Change Impact Analysis: When a customer requests a requirement change, the matrix shows every linked test case, design specification, or code module that needs updating.
-
Audit & Compliance Readiness: Essential for meeting regulatory standards like IEC 62304 and GAMP 5.
How to Build a Traceability Matrix in Confluence Cloud
While many teams start by building manual spreadsheets, updating them manually quickly becomes a maintenance bottleneck. Spreadsheets lack real-time synchronization, leave room for human error during updates, and fail to provide an interactive visual representation of your lifecycle dependencies.
To understand how automated traceability works in practice, let’s see the example of NovaQC LIMS (Laboratory Information Management System), a custom software following the GAMP 5 Category 5 schema, where user requirements, design specifications, laboratory test protocols, risk controls, and validation documents must remain tightly coupled and audit-ready.
If your team works in Atlassian Confluence and Jira, you can automate this workflow using QC Traceability for Confluence Cloud.
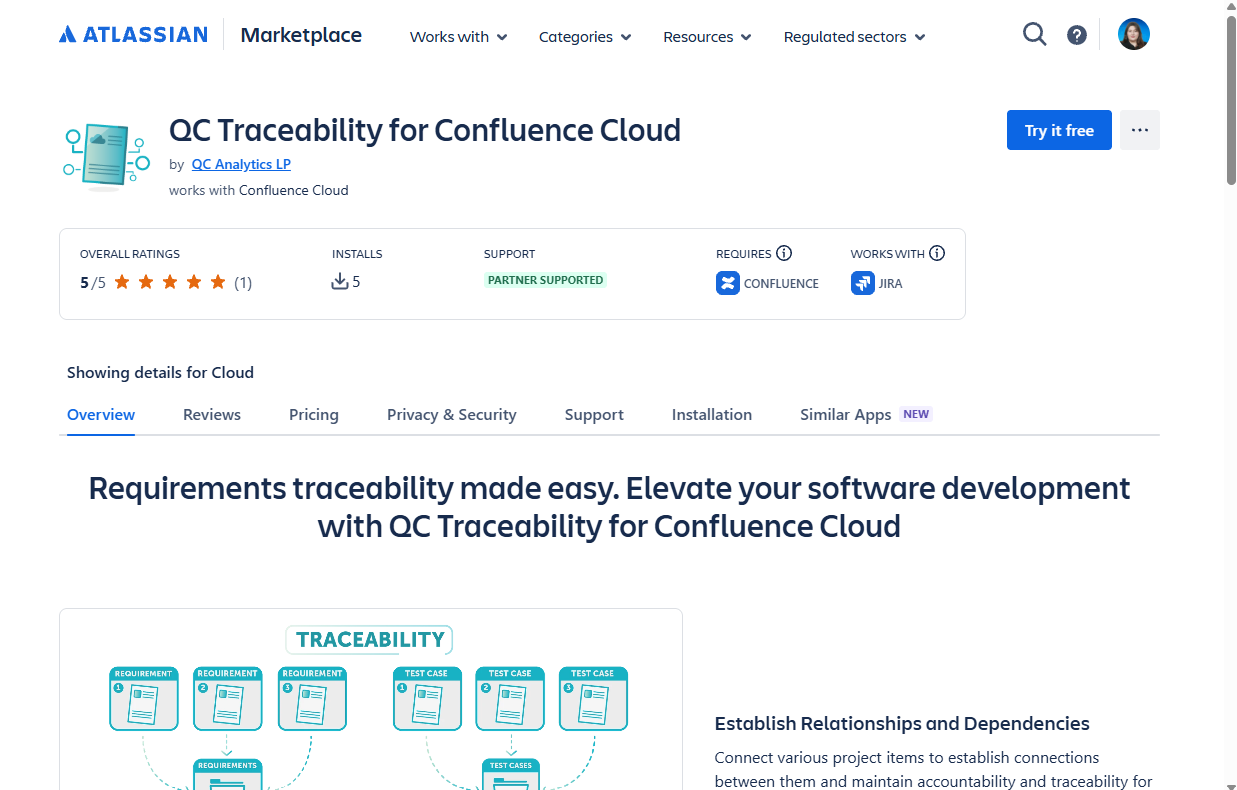
Install QC Traceability for Confluence Cloud from the Atlassian Marketplace.
With QC Traceability, you can:
-
Link Confluence pages, Jira issues, and external specifications together seamlessly.
-
Visualize project V-Diagrams and live dependencies right within Confluence.
-
Automatically generate live Traceability Matrix reports to track test coverage, mitigate risks, and easily export audit documentation.
What’s New: We have recently upgraded our QC Traceability app from Connect to Atlassian Forge. This improved architecture delivers enhanced security, tighter Cloud performance, and seamless native integration with Confluence and Jira.
Here is a step-by-step example of how to set up and visualize your matrix using the app:
Step 1: Create Items & Collections
Organize your project artifacts into specific collections corresponding to your GAMP 5 Category 5 documentation structure for the NovaQC LIMS project.
-
Jira Issues & External Links: Navigate to App → QC - Traceability → Items, click Create Link Item, and add Jira execution tasks (e.g., NQC-3: MS-03 Lot-material guard) or external references.
-
Group into Collections: Navigate to Apps → QC - Traceability → Collections and group your items into structured project levels, such as:
-
LIMS - User Requirements (LUR)
-
LIMS - Risks (LR)
-
LIMS - Functional Specifications (LFS)
-
LIMS - Design Specifications (LDS)
-
LIMS - Module Specifications (LMS)
-
LIMS - Unit Testing (LUT)
-
LIMS - Integration Testing (LIT)
-
LIMS - Functional Testing (LFT)
-
LIMS - Requirements Testing (LRT)
-
LIMS - NQC (Jira) (LNJ)
<span class="lia-inline-image-display-wrapper lia-image-align-inline" image-alt="qc traceability items overview.png" style="width: 999px;"><img src="https://us.v-cdn.net/6038660/uploads/images/441710i0DD0876B62562157/qc%20traceability%20items%20overview.png" role="button" title="qc traceability items overview.png" alt="qc traceability items overview.png"></span>
Create and manage items in Apps → QC Traceability → Items.
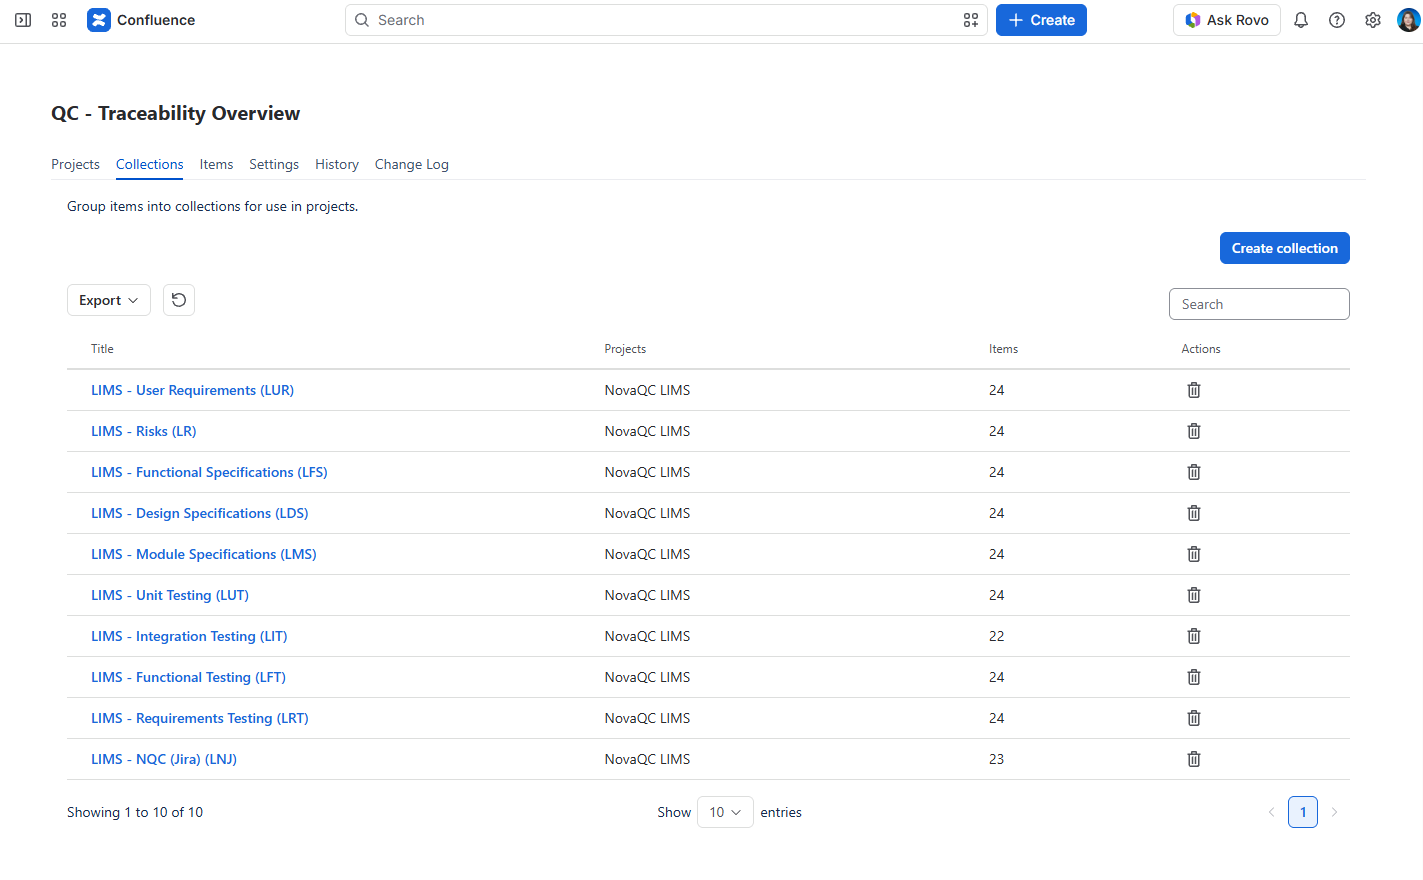
Group your items into collections in Apps → QC Traceability → Collections. Use these collections to create project rules.
Step 2: Set Up a Project & Rules
Configure relationship rules and align your collection lifecycle to automatically validate trace coverage and detect gaps across your NovaQC LIMS system.
-
Navigate to Apps → QC - Traceability -> Projects and click Create to establish your project (e.g., NovaQC LIMS).
-
Define relationship rules between collections:
-
Map LIMS - Risks (LR) as mitigated by LIMS - User Requirements (LUR).
-
Map LIMS - User Requirements (LUR) as specified by LIMS - Functional Specifications (LFS).
-
Map downstream testing collections (e.g., LIMS - Functional Testing (LFT)) back to left-side specifications using verifies.
-
Mark mandatory rules as Required to automatically flag unlinked requirements, missing test cases, or unmitigated risks.
-
Position your collections across levels 1–5 on the Left Side (Specification) and Right Side (Verification) to render a visual V-Diagram representing your full LIMS validation model.
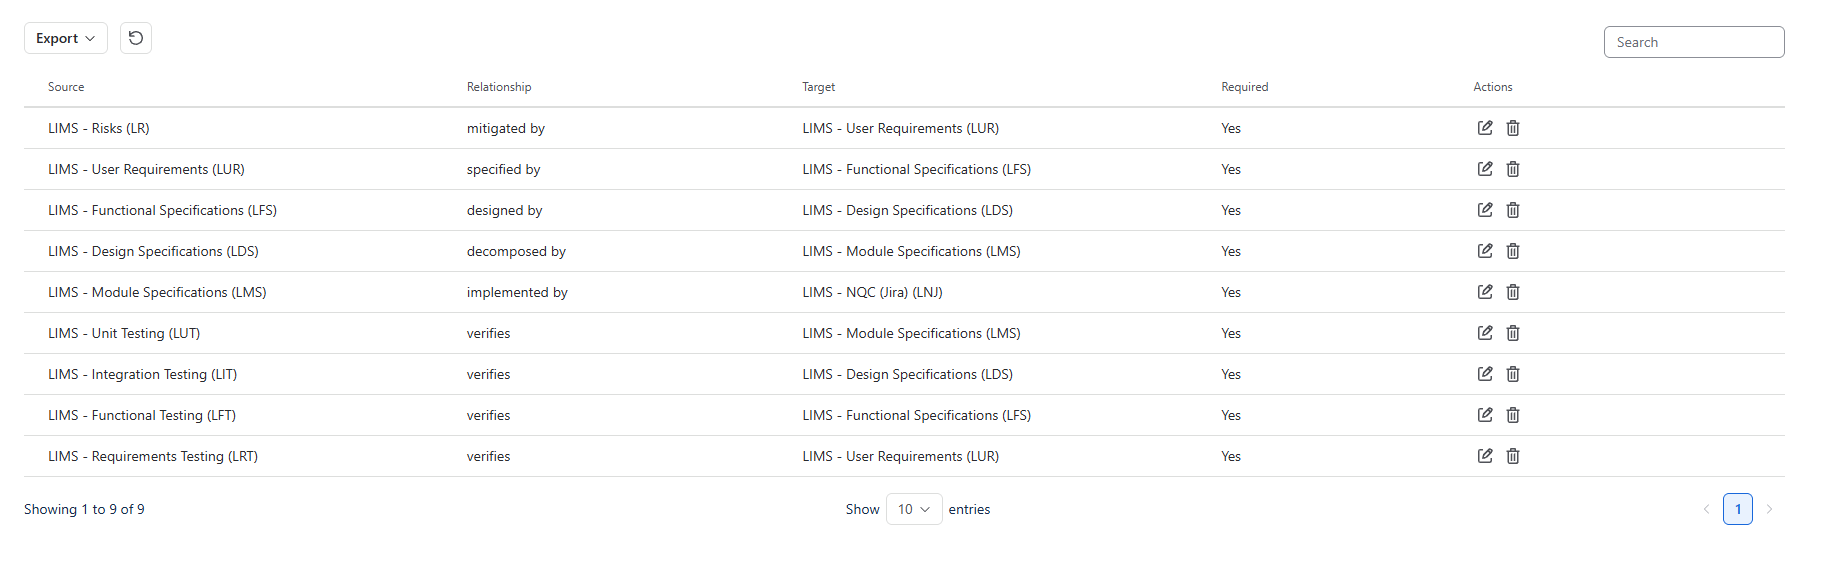
Define the relationship rules between the collections. These rules represent the mandatory trace links across your development lifecycle, ensuring every requirement, design specification, and test case is connected and compliant.
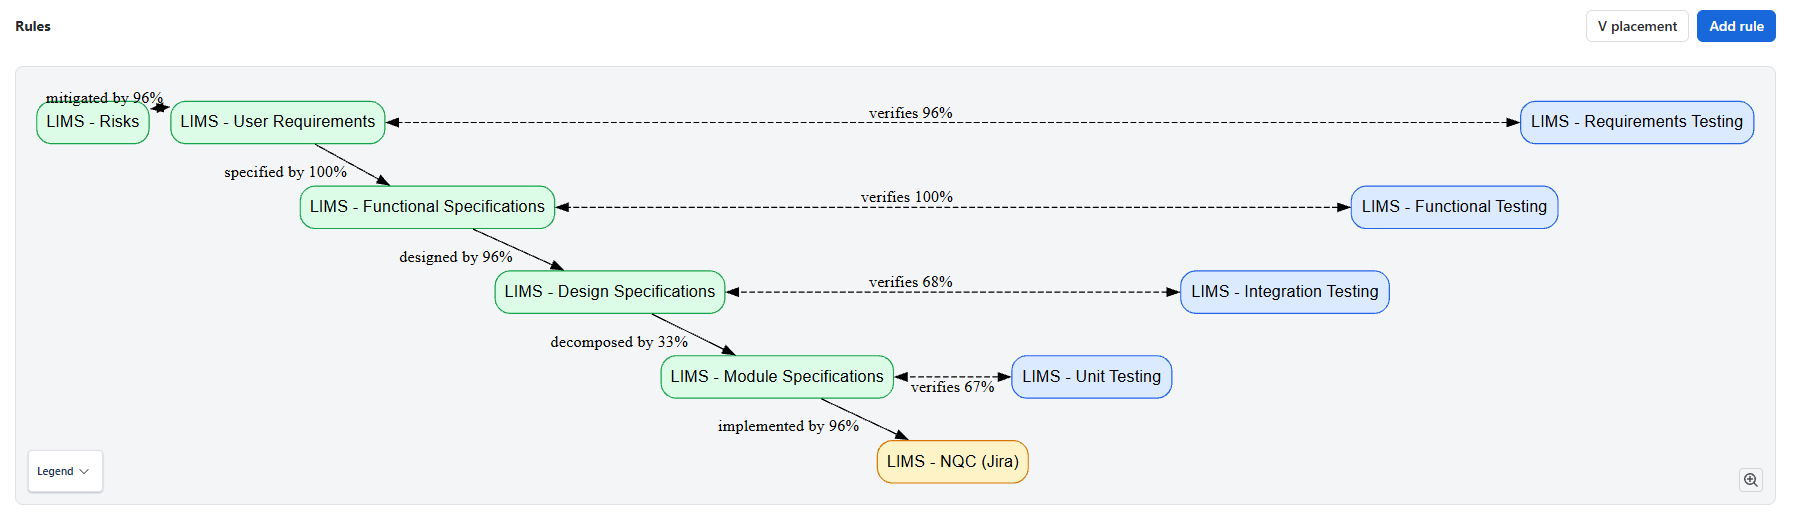
Configure your project’s V-model. Put collections to the correct side (left/right) and the correct level (1-5) to visualize end-to-end traceability, track real-time verification coverage, and quickly identify missing coverage gaps across project phases.
Step 3: Link Upstream and Downstream Items
Establish direct relationships between individual items directly from Confluence pages or within the app view.
-
Open any Confluence requirement page (e.g., URS-03 Sample-lot association), click the ••• menu, and select QC - Traceability Page Overview.
-
Click Add Link to specify relationships, directions, and optional rationales:
-
Upstream Link: Connect RISK-03 Sample linked to the wrong batch/lot (mitigates → URS-03).
-
Downstream Links: Connect FS-03 Lot and material binding at registration (specified by) and RT-03 Sample belongs to the correct lot (verified by).
-
View the Item-Level Diagram to dynamically inspect the complete visual dependency tree, tracing backward to business risks and forward to functional test results and Jira tasks (NQC-3).
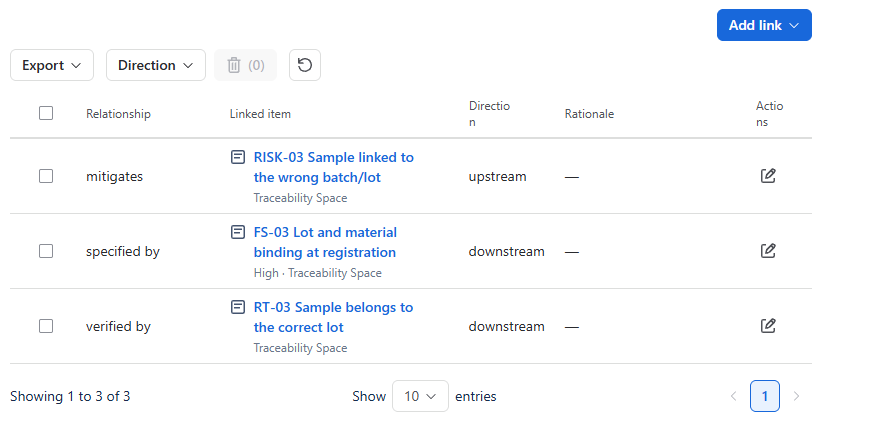
Easily add, edit, or track upstream and downstream items connected to the current page, including explicit relationship types, directions, and optional rationales.
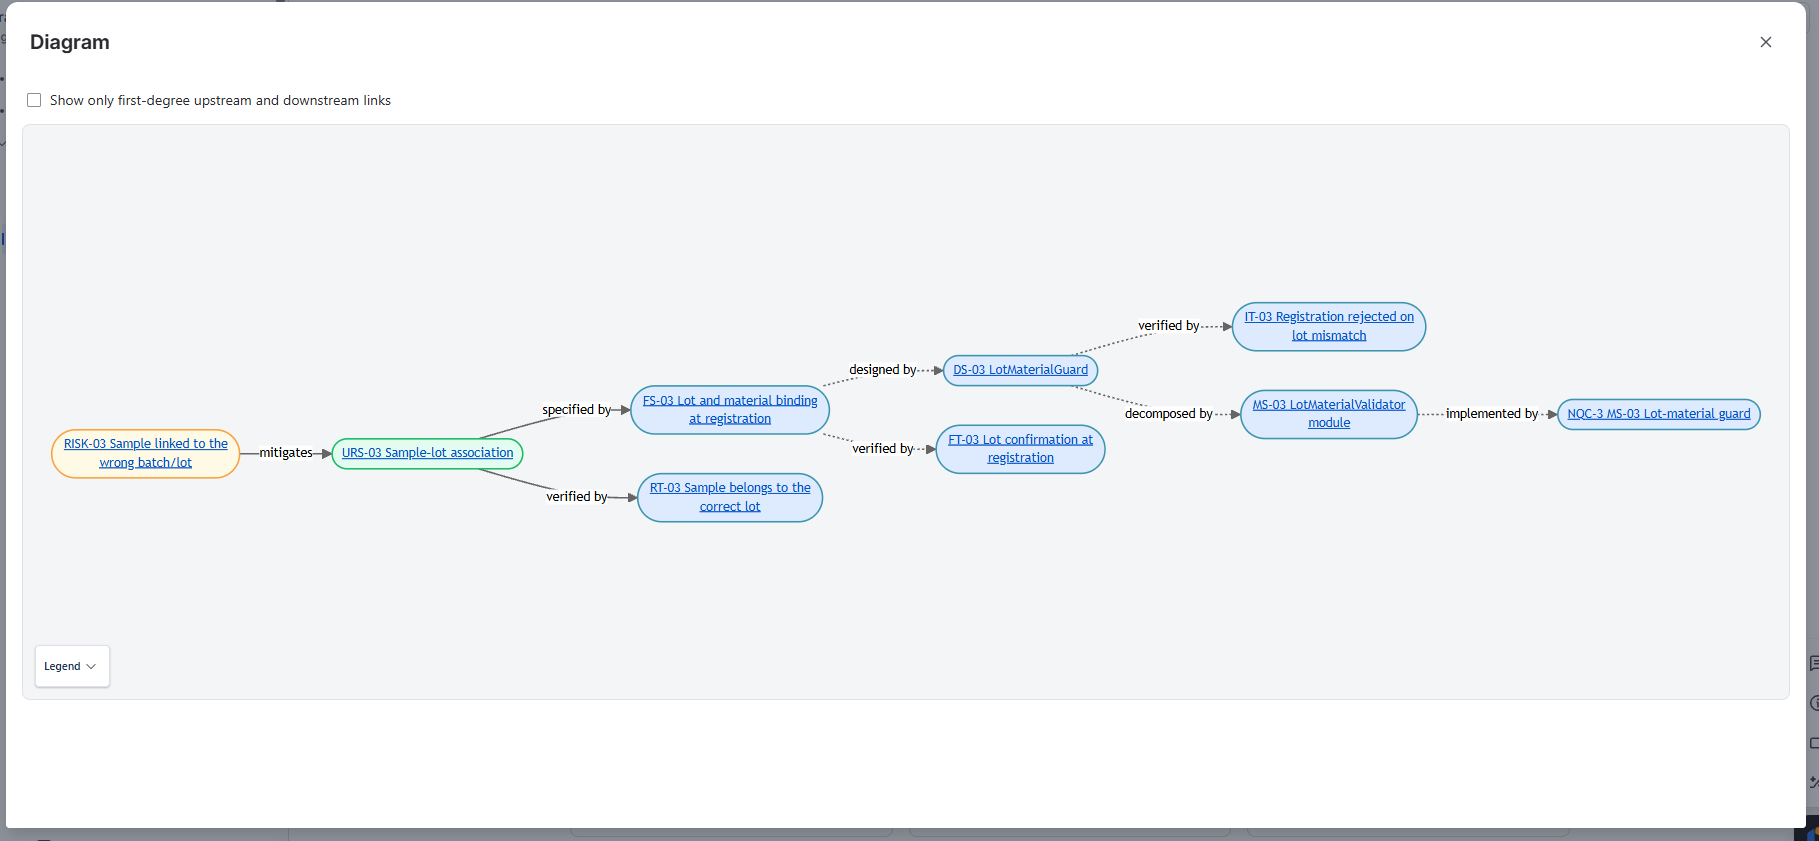
Visualize item-level traceability in real time. The diagram maps every upstream and downstream item linked across your software lifecycle.
Step 4: Generate & Export Reports
Generate complete, audit-ready matrices across your entire NovaQC LIMS project.
-
Navigate to Projects → Report within QC Traceability and select Traceability Matrix as your report type.
-
Filter columns by severity, reorder collection display order, and review live end-to-end verification status across all 10 collection stages.
-
Export your complete matrix directly into PDF, CSV, Excel, or Word format. The generated PDF matrix produces a fully structured, timestamped compliance report complete with project metadata and page numbers ready for GxP/FDA regulatory audits.
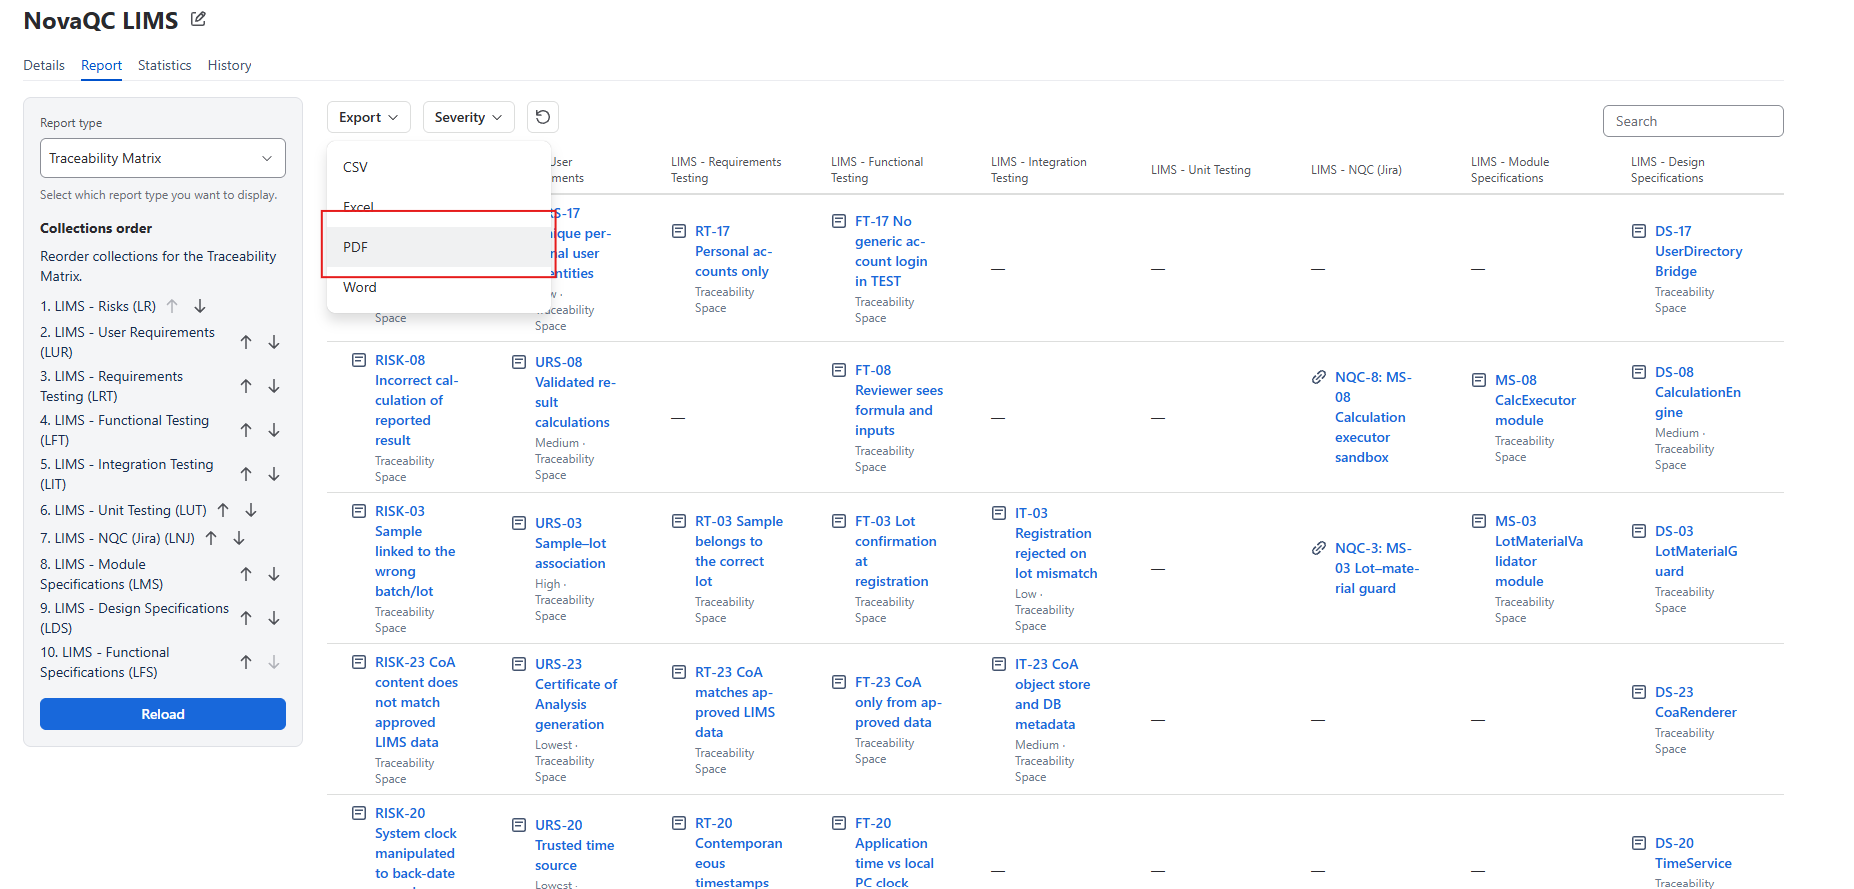
Generate full project-level reports directly within Confluence. The Traceability Matrix view displays end-to-end trace links across all configured collections, allowing you to reorder columns, filter by severity, and export matrix data directly into PDF, CSV, Excel, or Word format.
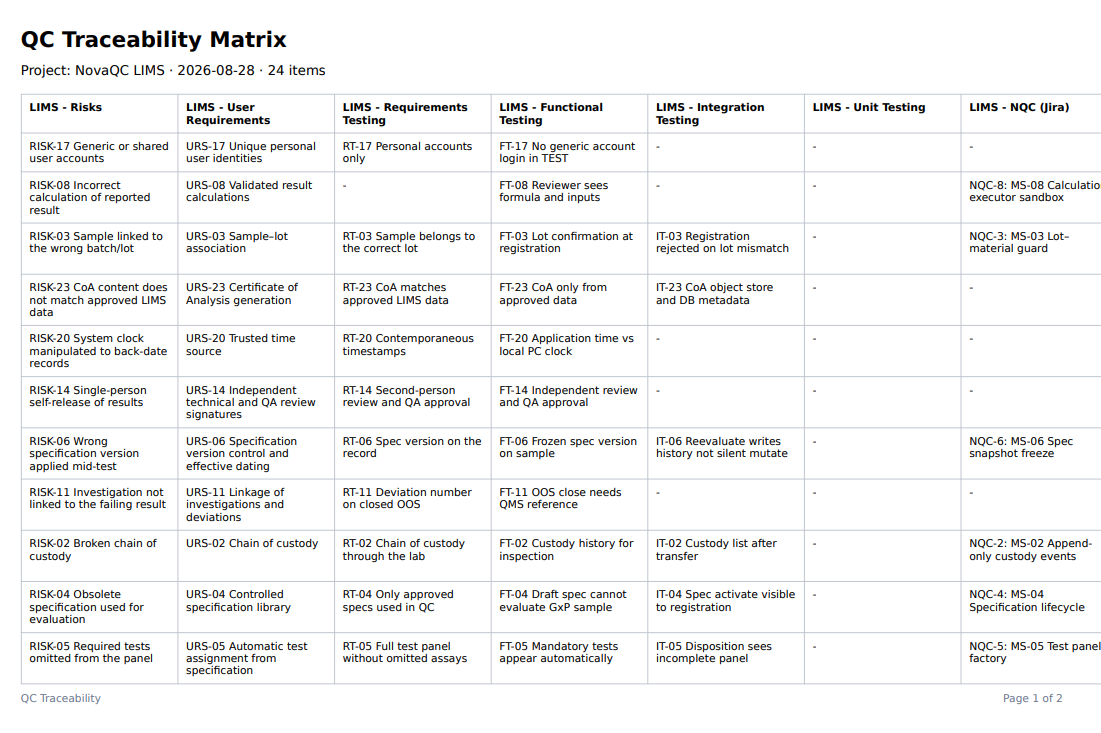
Export audit-ready documentation in seconds. The generated PDF Traceability Matrix presents a clean, structured table mapping all requirements, risks, design specifications, and test cases—complete with project metadata, timestamps, and page numbering for regulatory compliance.


