Community resources
Community resources
Community resources
Understanding Jira Hierarchy: Complete Guide in 2025
One of Jira’s key strengths lies in its hierarchy, which helps teams organize work from the big picture down to the smallest task. In this article, we’ll explore:
-
The core components of Jira hierarchy
-
Customizing hierarchy levels for your team
-
Best practices for using Jira hierarchy to enhance project visibility and efficiency
1. Core components of Jira hierarchy
Out of the box, Jira offers a straightforward hierarchy designed for agile teams:
-
Epics: the highest-level work item in Jira. Epics represent large bodies of work that can be broken down into smaller, manageable pieces. Think of them as your strategic goals or major features.
-
Issues (Stories, Tasks, and Bugs): these are the building blocks of your project, representing individual pieces of work within an Epic.
-
Sub-tasks: the smallest unit of work, breaking down Issues into specific actions or steps.
This hierarchy works well for most teams, but what if your organization needs more complexity? Enter custom hierarchy levels.
2. Customizing hierarchy levels
Jira Premium and Enterprise users have access to Advanced Roadmaps (Plans), which enable custom hierarchy levels. This is especially useful for organizations managing portfolios of projects or requiring cross-team alignment.
Here’s how to extend your hierarchy:
-
Initiatives: one level above Epics, representing strategic themes or goals across multiple Epics.
-
Features: a mid-level between Epics and Stories, ideal for teams delivering large functionality.
3. How to set up custom hierarchy levels
-
Create a Jira project that will hold your initiatives.
-
Create the initiative issue type, if it's not created yet.
-
In Jira Software, click
> Issues.
-
Click Issue type schemes > find your project > click Edit.
-
Drag and drop the initiative issue type to the issue types for your project.
-
In your plan, click more (
) > Configure > Issue sources.
-
Select your new project as an issue source for your plan.
-
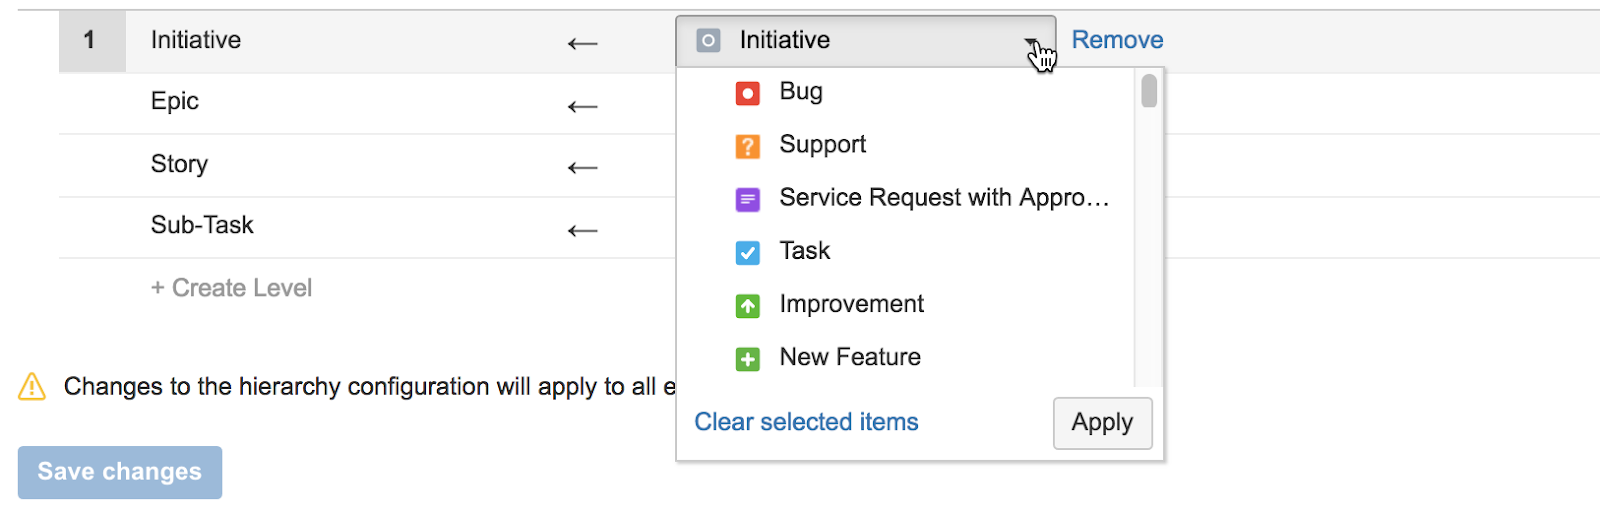
In your plan, click Settings > Hierarchy configuration.
-
Click + Create Level and create the new initiative level. Make sure to map the initiative issue type to it.
-
Click Save changes.

4. Best practices for using Jira hierarchy
To make the most of Jira hierarchy, consider these tips:
A. Use epics to drive clarity
Define clear and measurable goals for each Epic. Use the Epic’s description field to outline the scope and link relevant Issues.
B. Keep stories actionable
Ensure each Story is independent, negotiable, and delivers value. Break them into Sub-tasks only when necessary to manage execution.
C. Leverage roadmaps
Visualize work across teams and timeframes with Advanced Roadmaps or Planyway. Use dependency mapping to identify risks and ensure alignment.
D. Maintain consistency
Standardize your hierarchy across projects to avoid confusion. This is particularly important in large organizations where teams collaborate on shared goals.
E. Automate workflows
Integrate Jira automation rules to manage hierarchy relationships. For instance, automatically transition an Epic to "In Progress" when at least one linked Issue moves to "In Progress."
5. Common pitfalls to avoid
-
Overcomplicating the hierarchy: adding too many custom levels can make your project harder to manage. Stick to what your team needs to stay productive.
-
Ignoring dependencies: failing to account for how Issues, Epics, and Initiatives are connected can lead to missed deadlines.
-
Not updating work items: an out-of-date hierarchy is a recipe for confusion. Encourage your team to regularly update statuses and add comments.
6. How Planyway can help with Jira hierarchy
Jira’s hierarchy is powerful, but it can become overwhelming without the right tools to visualize and manage it. Planyway for Jira offers timeline and calendar views that help teams stay on top of their hierarchy. What’s more, you can have a timeline view and a structured board view side by side and schedule issues seamlessly.
.png")
With Planyway, you can:
-
See your project hierarchy and timeline on the same page.
-
Drag and drop items to quickly reschedule tasks.
-
Use color coding to differentiate between Epics, Stories, and Sub-tasks.
- Track how epics are progressing clearly.
- Coordinate work along sprints, releases, and milestones,
Conclusion
Mastering Jira hierarchy is a game-changer for agile project management. By understanding its components, customizing it to fit your needs, and following best practices, you can enhance team collaboration and project visibility. Tools like Planyway for Jira take it to the next level, making your workflows even more efficient and intuitive.
What does your ideal Jira hierarchy look like? Share your thoughts in the comments below!
Was this helpful?
Thanks!
Mary from Planyway
4 comments