Community resources
Community resources
Community resources
The Ultimate Jira Setup Guide 2026
You may have plenty of experience with Jira as a user, but working with it as an administrator is a whole different thing. Setting Jira up from scratch can still be tricky if you don’t know what to expect.
In this guide, I’ll walk you through the entire setup process. You’ll get step-by-step instructions, plus everything you need to choose the right parameters for your project. To make things even smoother, I’ve also packed in some best practices and hands-on tips to help you set up Jira efficiently 🚀

What Does Configuring Jira Mean, Exactly?
This process includes setting up several key elements. The first step is installing Jira software, which is also referred to as a Jira instance. Then, you’ll need to configure your first project. Depending on your needs, it can include multiple epics, which represent large chunks of work or high-level tasks. Each epic can contain multiple issues, or smaller specific tasks. You can also create issues directly within the project without making them a part of an epic.
The next step in the Jira setup process is to build a workflow - a series of stages that each issue moves through. The final stage is customizing your Jira board, which provides a visual overview of all your issues.
Now, let’s take a closer look at these key elements. You will need to be familiar with them for the further configuration process.
What You Should Know Before Starting With Jira Setup
-
Project 🏗️ – This is a space for organizing and managing related tasks (issues). It helps teams structure their work by grouping tasks under a common goal. You can have multiple projects in Jira, which makes it easy to separate workstreams. For instance, if a company manages several products, each with its own team, keeping their tasks in different projects allows them to use tailored settings and maintain order.
-
Epic 🎯 – This is a major task with a specific goal, consisting of many smaller tasks. Agile and DevOps teams often rely on epics to structure work. Take “Migrating to the Cloud” as an example - within this epic, you might have narrower tasks like “Prepare a migration strategy” or “Set up the cloud environment.”
-
Issue 📝 – The fundamental unit of work in Jira. An issue can be a task, a subtask, a bug, a support ticket, a story that outlines a user request, and more. Depending on what different teams do, an issue can take various custom forms.
-
Workflow 🔄 – Every issue follows a lifecycle, moving through different stages like “To Do,” “In Progress,” “Review,” and “Done.” Workflows can be customized to match how teams operate, making it easier to organize work and monitor progress.
-
Board 📌 – It displays all your tasks as cards within columns. Each column represents a stage in the workflow, helping teams track progress, plan work, and stay organized. Jira boards are widely used in agile methodologies, as they provide flexibility for sprint planning and day-to-day task management.
Which Jira Plan Should You Choose?
Choosing the right Jira plan depends on your team’s size and specific needs. Here’s a breakdown of the available options:
Free Plan
Ideal for small teams of up to 10 users, this plan includes essential features like Scrum and Kanban boards, agile reporting, and customizable workflows. Storage is limited to 2GB, and automation is capped at 100 rule executions per month. Support is community-based.
Standard Plan
Pricing for the Standard plan starts from $7.53 per user/month. It offers everything from the Free plan plus increased storage of 250GB, control over user roles and permissions, and 1,700 automation rule executions per month. It’s a good fit for companies with dozens to hundreds of members.
Premium Plan
At $13.53 per user/month, the Premium plan includes all Standard features, along with unlimited storage and advanced capabilities like Atlassian Intelligence (AI), cross-project planning, and dependency management. Automation limits are expanded to 1,000 rule executions per user per month. This plan is ideal for larger organizations with complex requirements.
Enterprise Plan
Designed for organizations with over 800 users, the Enterprise plan offers advanced analytics, enhanced access management, unlimited automation rule executions, and 24/7 support. Pricing is customized based on specific needs.
A 30-day trial is available, giving you the chance to explore features and evaluate what works best for your team.
Jira Setup Step-by-Step: Let’s Walk You Through The Process
First of all, you need to create a Jira instance by installing the app. In the case of Jira Cloud, it will be hosted and managed on Atlassian's side.
-
Go to www.atlassian.com and in the top menu, click Products.
-
Select either Jira (for project management) or Jira Service Management (for handling service requests).
-
Click Sign Up and enter your email. Then, verify it using the code sent by Atlassian.
-
Complete the setup by answering a few onboarding questions - this helps tailor Jira to your team’s needs.
Once that’s done, your Jira instance is ready, and you can dive into configuring your projects, issues, and workflows.
1. Add Your First Project - a Basis For Your Team’s Work
Setting up a project in Jira involves selecting a few key parameters: management type, project type, and project template. Let’s go through this step by step.
Choose a management type
Jira gives you two options for project management, each suited to different team structures:
- 🧑💻 Team-managed – Best for small, independent teams working on a single project. In this case, everything can be controlled by the project administrator, meaning you don’t need Jira admin permissions to adjust settings. Maintaining it is simpler, but the functionality is slightly limited. The configuration of a team-managed project does not affect other projects’ settings. Choose this option if your team is smaller than 10 people.
- 🏢 Company-managed – Designed for larger teams or organizations handling multiple projects. It allows shared configurations across different teams, making it easier to standardize workflows and settings. If you need cross-project collaboration or want to maintain consistency across multiple projects, this is the way to go. Changes made to one project can be applied to others automatically, saving time and effort. Select this option for a bigger team or several teams.
Decide on your project type
As of now, Jira offers four main project types, each built for different workflows and team needs. The project type you pick determines the features and structure of your work in Jira.
-
Software Development 🖥️
Ideal for dev teams working with agile methodologies. This type includes tools for sprints, backlogs, Kanban and Scrum boards, and bug tracking. If your team builds and maintains software, this is your best bet.
-
Service Management 🛠️
Designed for teams handling customer support, IT requests, or internal service tickets. It provides a structured way to collect, track, and process incoming requests - perfect for IT help desks, HR, or customer service teams.
-
Work Management 📅
A flexible project type for business and project management teams of various kinds. It includes basic Jira functionality and enables you to plan and manage various activities. In particular, you can organize them in a list view, timeline view, or calendar view.
-
Product Discovery 💡
Built for product teams that need to gather customer feedback, validate ideas, and prioritize features before software development begins. It helps teams create structured roadmaps and present them to stakeholders.
Upcoming Change: Atlassian is planning to merge Software Development and Work Management into a single project type called Jira. This new format is expected to combine the best features of both, making it a unified solution for teams across different industries.
Select a project template for your area or work
Jira comes with a variety of pre-built templates tailored to different industries and use cases. They are all based on one of the four project types we covered above.
Project templates include:
-
Pre-configured issue types (tasks, bugs, stories, etc.)
-
Ready-to-use workflows with customized statuses
-
A default Jira board and views (Kanban, Scrum, list, timeline)
-
Custom fields and forms for request submissions
-
Built-in reports and dashboards to track progress
Here are some of the most popular templates by category:
🖥️ Software Development – Kanban, Scrum, Bug Tracking template
📢 Marketing – Marketing Service Management, Project Management, Go-To-Market template
💰 Sales – Sales Service Management, Sales Pipeline, Lead Tracking template
📊 Finance – Budget Creation, Month-End Close, Finance Service Management template
⚖️ Legal – Document Approval, Legal Service Management, IP Infringement template
🛠️ Pet Projects & Personal Use – Project Managing, Task Tracking, Personal Task Planner template
You can also start with a blank project and configure everything from scratch.
How to Create a Jira Project
To set up a project in Jira, navigate to Projects → Create Project in your Jira instance. Select a project template that fits your needs or start with a blank project. Choose between a team-managed or company-managed type, give your project a name, and complete the setup. Once done, you’re ready to add your first issue and begin organizing your work.
2. Create a Jira Issue And Add Your Team
Before adding tasks to your project, it’s important to understand Jira’s issue hierarchy. By default, there are three levels:
-
Epic – A large work item that breaks down into multiple smaller issues.
-
Standard issue – A single task that can belong to an epic. This can be a task, bug, story, or a custom issue type defined by the user.
-
Subtask – A smaller piece of work that is part of a standard issue.
Let’s create your first issue. In your project, press the Create button and provide the necessary details. Some fields are mandatory, such as Project, Issue Type, Summary, and Reporter.
Others are optional: for instance, Description, Assignee, Status, Attachment, Priority, and Due date.
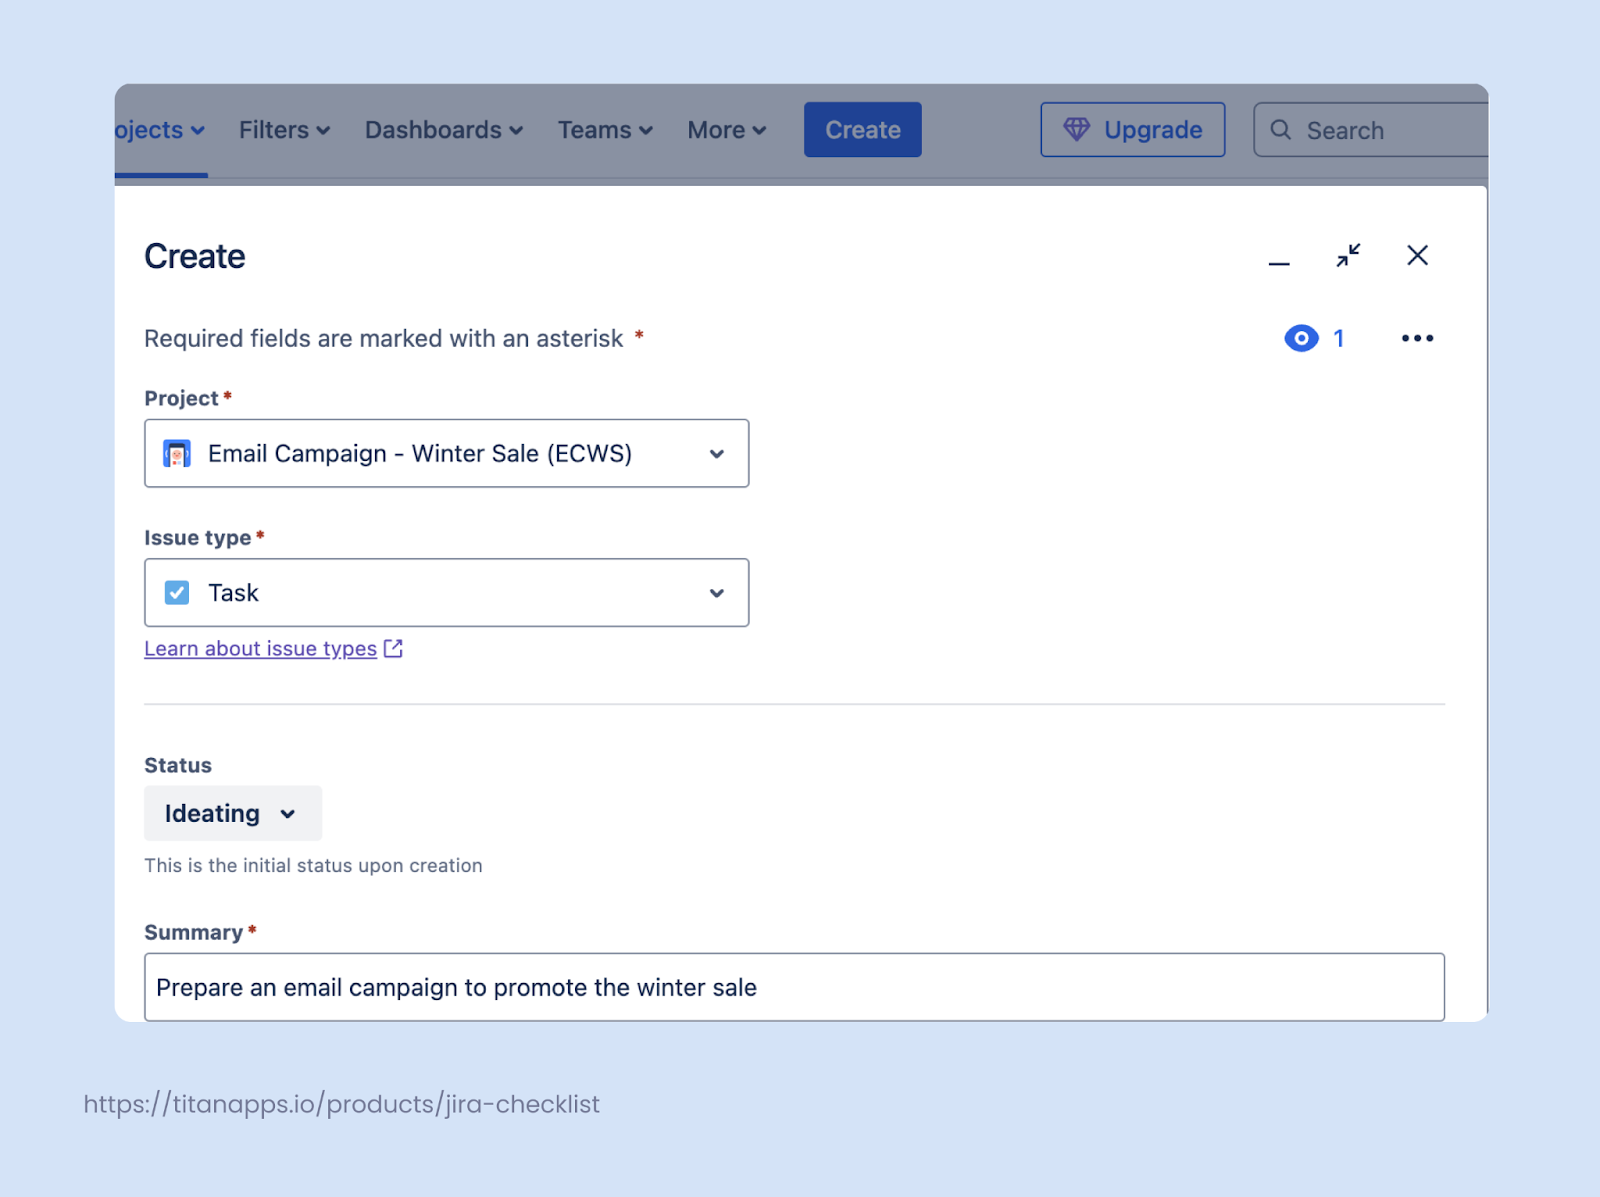
Jira lets you customize your issue fields, so you only see what’s relevant.
To adjust fields, click the three dots in the upper-right corner of the issue creation page and select Configure fields. You can choose which fields to show or hide. Need something extra? Jira also supports custom fields for more flexibility.
Another important step is adding users:
🧑💻 For team-managed projects, go to Project Settings → Access → Add People. Enter email addresses or import contacts from Gmail, Slack, or Microsoft. If you’re on a paid plan, you can assign user roles and customize access levels.
🏢 For company-managed projects, navigate to Project Settings → People → Add People. The rest of the steps are the same as for team-managed projects.
Once users are added, you can:
-
Assign issues – Set assignees and reporters so tasks land on the right person’s plate.
-
Mention teammates – Tag people in descriptions or comments (@username) to keep them updated.
-
Enable watchers – Click the eye icon on the issue page to let users follow updates. Watchers get notifications on status changes, edits, and new comments, even if they aren’t directly mentioned.
With these steps, your team stays informed and collaboration runs smoothly.
3. Adjust a Default Jira Workflow or Build a New One
When you create a project, it comes with a basic pre-configured workflow. It includes common stages like To Do, In Progress, In Review (or Testing), and Done. You can use this as a starting point and customize it as needed, or you can create an entirely new workflow to better match your processes.
A workflow consists of two core elements:
-
Statuses – The different phases an issue moves through, from creation to completion. Examples include “Backlog,” “In Progress,” “Blocked,” “Awaiting Approval,” or “Completed.”
-
Transitions – The actions that move an issue between statuses. For example, transitioning from “To Do” to “In Progress” might involve selecting “Start Work,” while moving from “In Review” to “Done” could require an approval step.
Before configuring a workflow, it’s a good idea to map out your process with your team. Identify the key stages that issues should go through and decide on any approval steps, automation rules, or dependencies between statuses.
For teams following agile methodologies, simplified workflows with minimal bottlenecks work best. Meanwhile, structured workflows with approval gates and multiple review stages may be necessary for compliance-heavy industries like finance or healthcare.
Here’s an example of a workflow for the email campaign launch process:
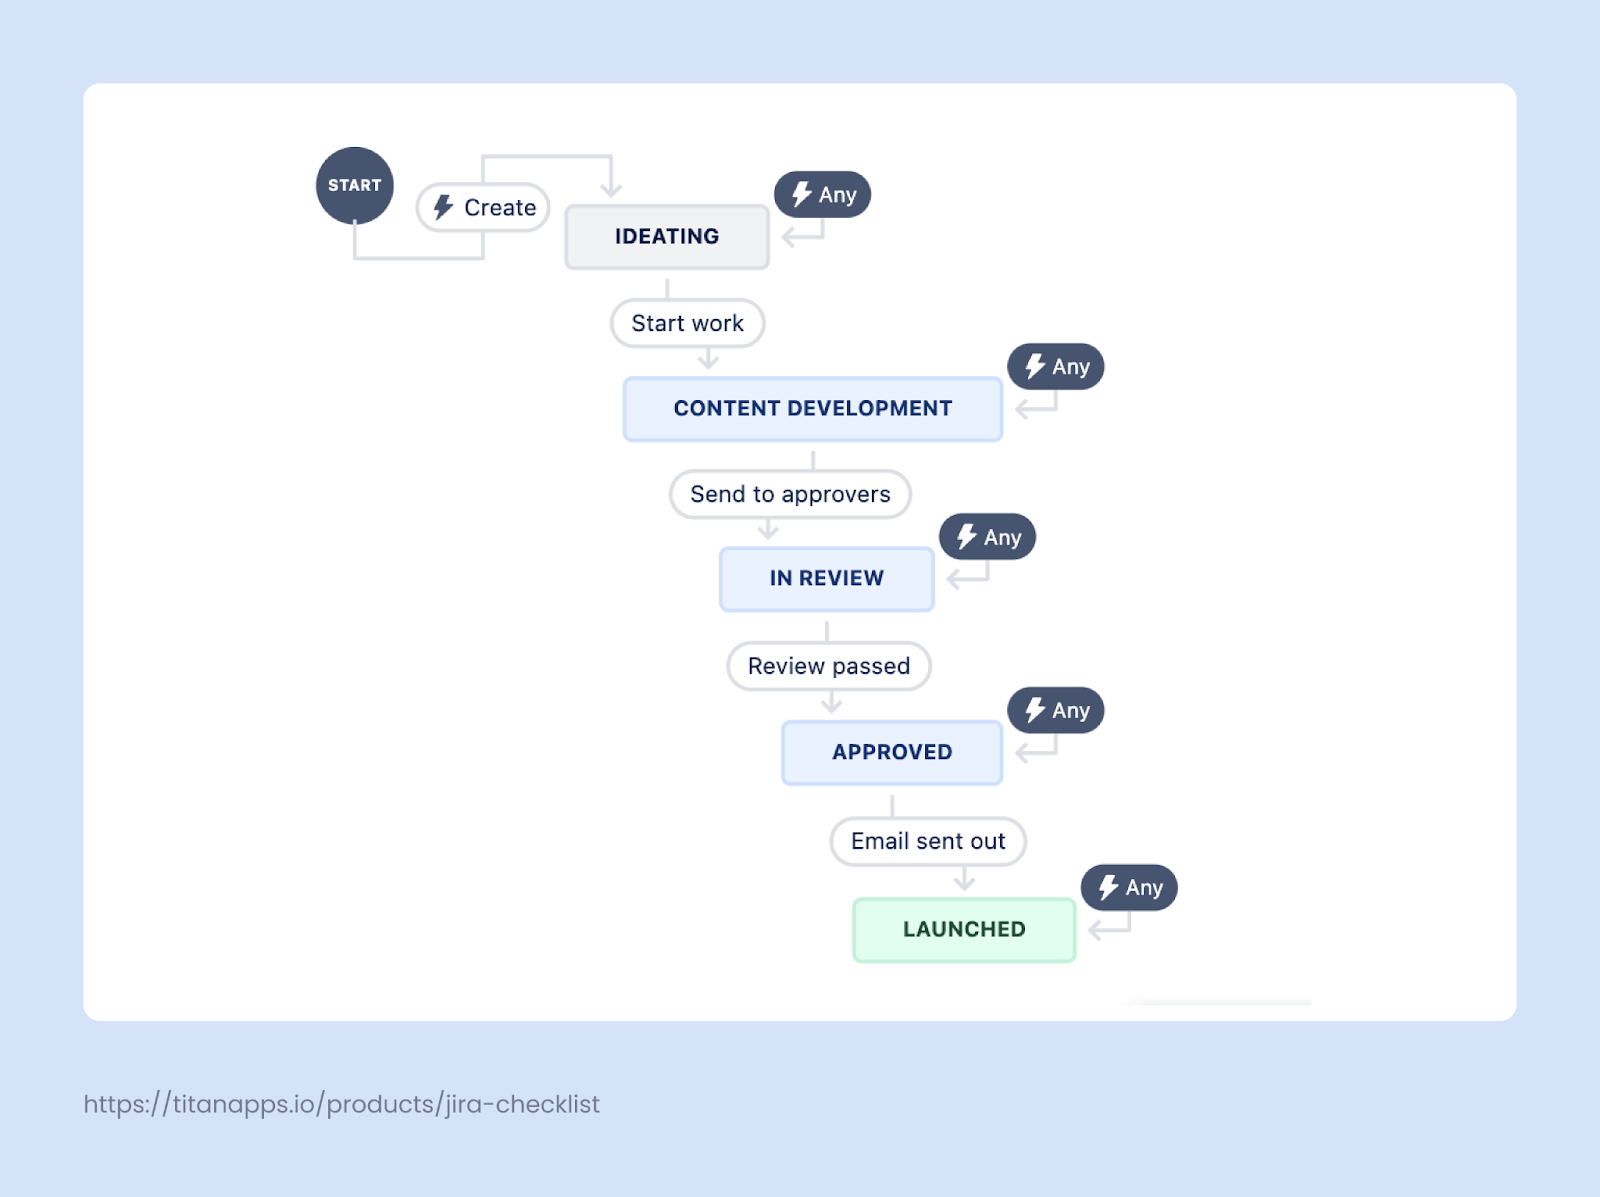
In a Jira workflow, statuses and transitions are visually represented by different shapes - rectangles for statuses and rounded plaques for transitions. If you see an “Any” label next to a status, it means that an issue can move to any other stage from there. However, transitions can be restricted based on your process requirements. For example, you might enforce a rule that an issue cannot move to “Approved” unless it has first passed through “In Review”.
Your workflow statuses directly impact how tasks appear on your Jira board. Each status is mapped to a column, allowing your team to track progress at a glance. By carefully aligning your board with your workflow, you ensure that issues move smoothly through different stages, making project tracking and collaboration more efficient. It’s also possible to assign several statuses to a column.
To create a custom workflow for your project, follow these steps:
-
Open Workflow Settings – In your Jira project, go to Project Settings → Issues → Workflows → Add Workflow → Create New.
-
Design Your Workflow – Use the workflow editor to add the necessary statuses and connect them with arrows to define the transition flow. Name each transition to specify how issues move between statuses.
-
Assign the Workflow to a Scheme – Go to Settings → Issues → Workflow Schemes. Locate your newly created workflow under the Inactive tab, click Edit → Assign, and select which issue types it should apply to (e.g., epic, task, subtask). You can also assign it to all issue types if needed.
-
Associate the Workflow with a Project to apply it to the specified issue types within that project – Navigate to Settings → Issues → Issue Type Schemes, find the relevant scheme, click the three dots, select Associate, and choose your project.
Once your workflow is applied, create test issues to ensure everything functions correctly.
For small changes such as adding an extra stage, you can modify the workflow directly from your Jira board. Adding a new column automatically creates a new status in the workflow, simplifying the adjustment process.
3. Configure Your Jira Board so That it’s Right For You
In agile development, Jira boards play a key role in tracking issues, planning work, and improving team collaboration. Each Jira project comes with a default board, which you can customize to fit your processes.
If your workflow is not very complex, each stage can be mapped directly to a column on the board. However, for more complex workflows, you might need to group multiple statuses under a single column or hide certain tickets based on their status.
Jira offers two main board types, each optimized for different work methodologies:
✔️ Scrum Board – Best for teams working in time-boxed sprints. Only the issues assigned to the current sprint are shown on the board, while the rest remain in the backlog for future planning.
✔️ Kanban Board – Ideal for teams with a continuous workflow. This board visually represents work items and can include work-in-progress (WIP) limits to prevent bottlenecks and keep tasks moving efficiently.
By selecting the right board type and aligning it with your workflow, you ensure better visibility, smoother project execution, and improved productivity.
To tailor your Jira board to your team’s needs, open the board and click the three dots in the upper right corner. Then, select Configure Board. Here’s what you can adjust:
-
Modify Columns – Add, rename, and rearrange columns as needed. You can also hide statuses that aren’t relevant or group multiple statuses under a single column for better organization.
-
Apply Custom Filters – Use JQL (Jira Query Language) to create reusable filters, making it easier to find and display specific issues based on your preferred criteria.
-
Organize with Swimlanes – Arrange tasks horizontally by grouping them based on common parameters. For instance, tasks with the same assignee, priority, or issue type, will be shown in the same section, so related work is displayed together.
You can add multiple boards to a single project. This is useful when different teams handle separate parts of the work. For example, a development team and a QA team might need their own boards within the same project. If there are multiple workstreams, separate boards help keep tasks organized.
Teams working across several projects can use cross-project boards to track all relevant issues in one view. This is great for team leads and managers who need to monitor different teams without switching between projects.
4. A Final Touch For Jira Setup: Optimize Your Work With Additional Apps
After setting up the basics, you can take your Jira setup further by adding external apps. The Atlassian Marketplace offers hundreds of tools to customize Jira for your team’s needs. Whether you need automation, advanced reporting, or integration with other platforms, there’s an app for that.
A great place to start is Smart Tools for Jira by TitanApps. These solutions help you automate repetitive tasks and processes.
Smart Checklist for Jira
Smart Checklist is a handy tool that allows you to add checklists to your Jira issues. This is especially useful for recurring tasks involving multiple steps. You can organize complex processes as actionable checklists featuring all the necessary stages. This helps you ensure that nothing gets skipped or forgotten along the way.
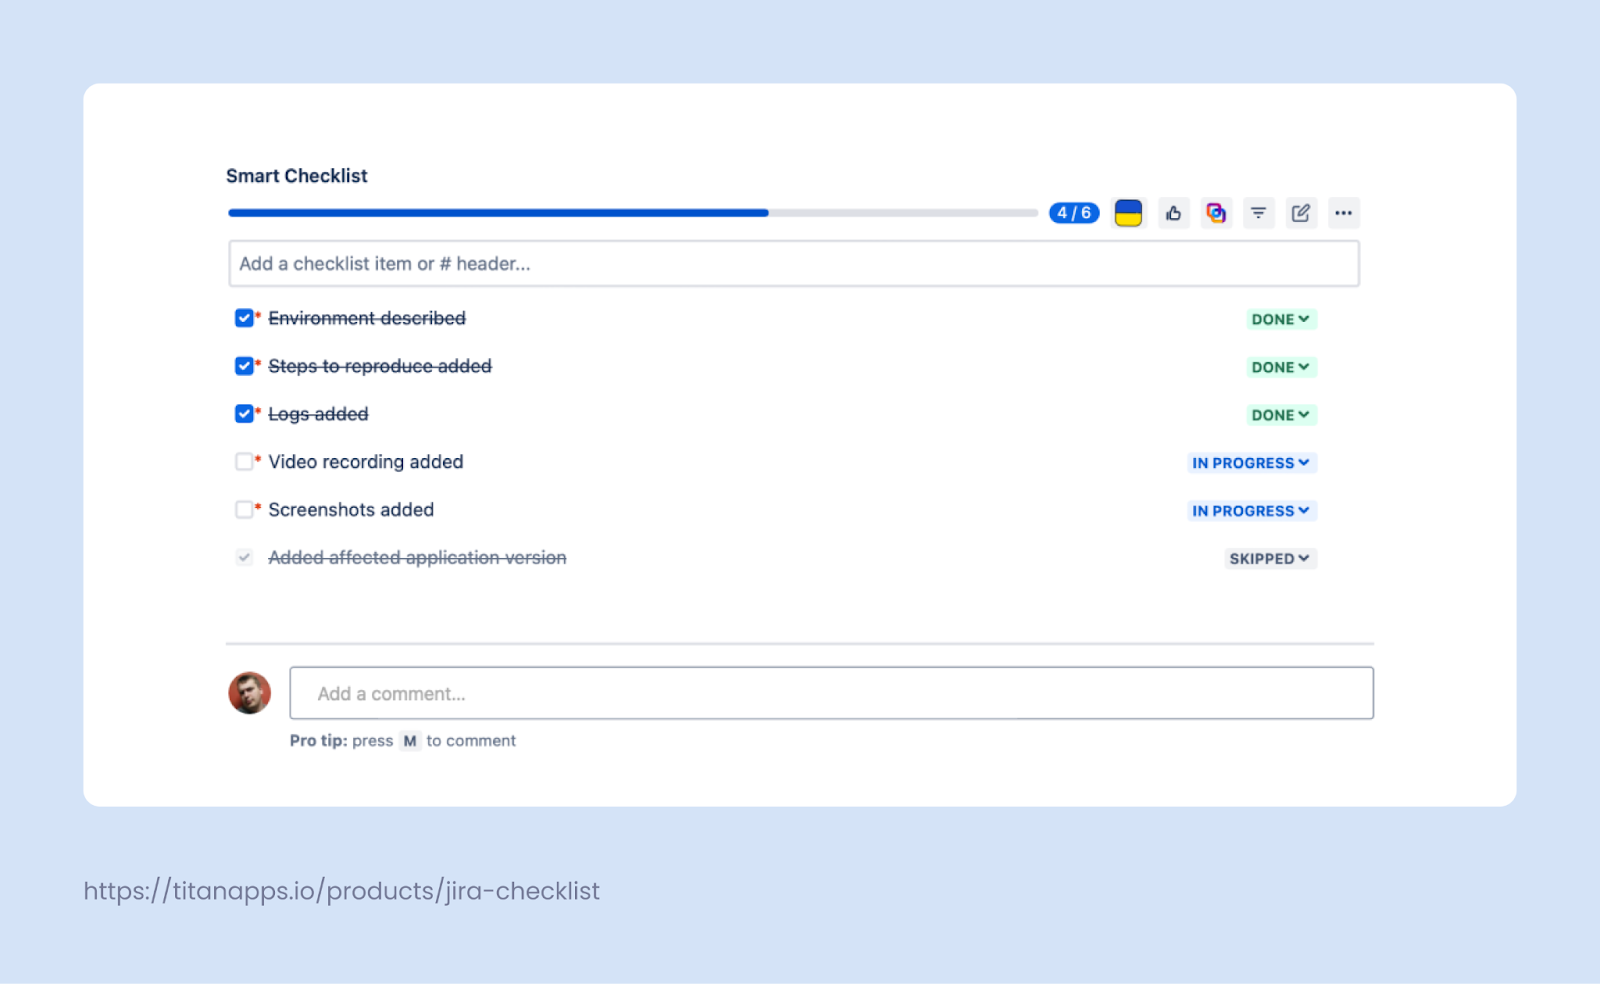
For each item, you can set custom statuses, mention people who should work on a specific step, and set deadlines for them. Smart Checklist supports headers and other rich formatting options.
This tool can be used with Jira automation, allowing you to add checklists to repetitive tasks automatically. Another thing worth mentioning is its Validate Completion feature. Thanks to it, you can mark selected checklists as mandatory. Then, an assignee won’t be allowed to transfer an issue with such a list to Done (or another status you chose) unless every item on the checklist is completed.
Smart Templates for Jira
Smart Templates let you save and reuse issue structures, whether for a single issue or an entire hierarchy. This helps you speed up repetitive processes and reduce manual work when creating tasks in Jira.
An example of a Smart Template for a Jira epic, Annual Stakeholders report:
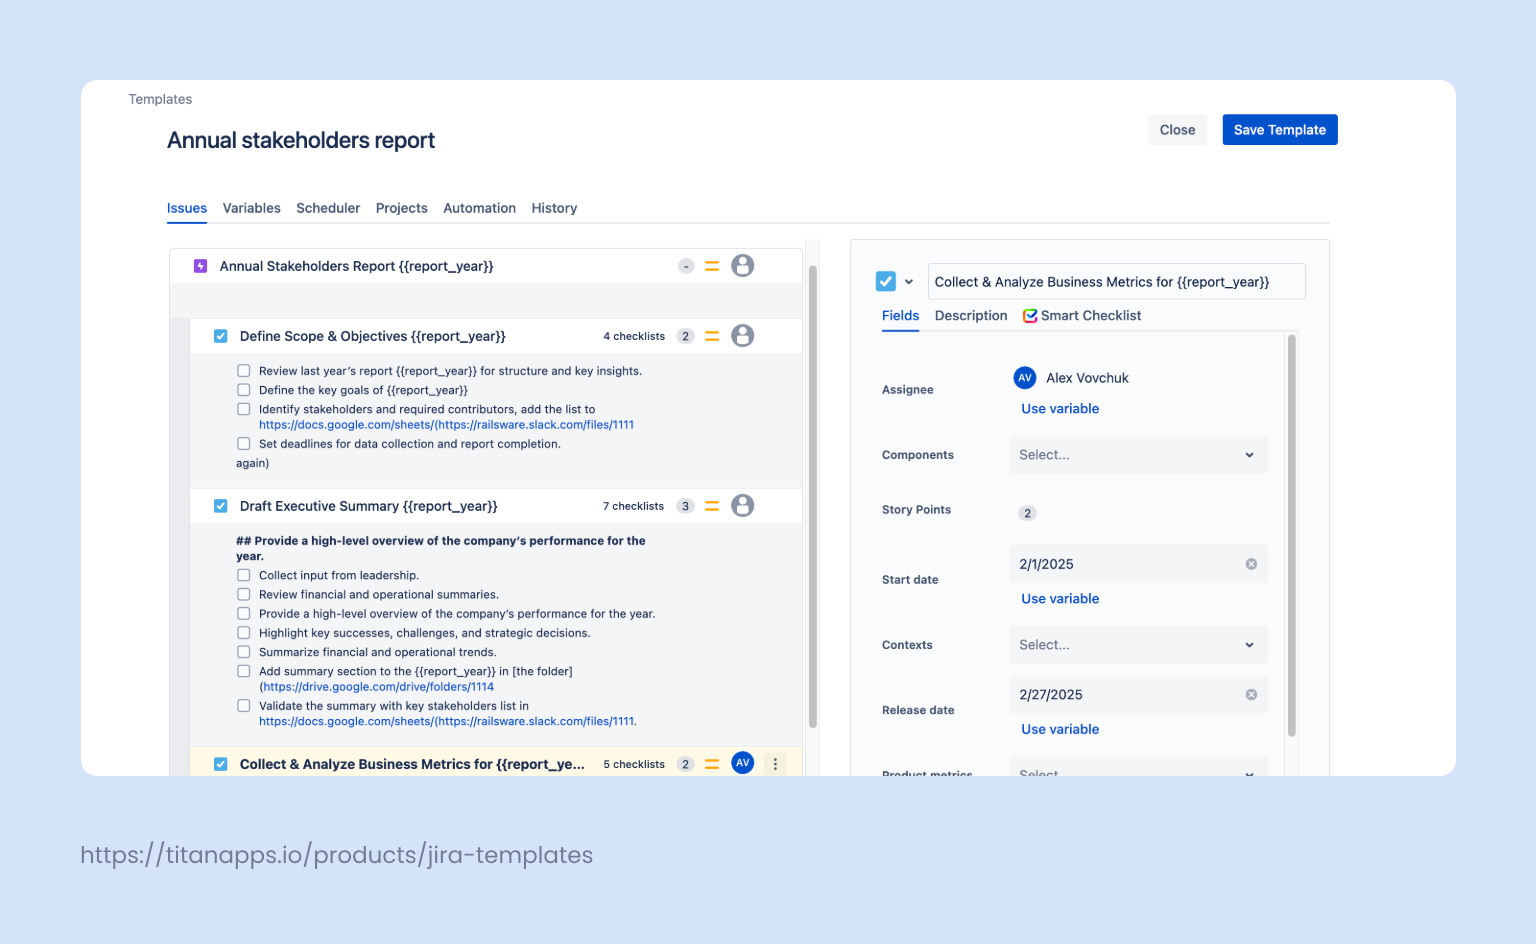
With dynamic variables, one template can be used across different workflows, adapting to various scenarios. You can also pre-fill fields, automatically mention team members, and customize issue details to ensure consistency.
For even more efficiency, Smart Templates allow you to schedule automatic issue creation, ensuring that recurring tasks are generated when needed.
Take a look at some hands-on examples of utilizing Smart Checklists and Smart Templates for different use cases:
More Smart Tools For Jira
In addition to Smart Checklists and Smart Templates, there are other Smart Tools for Jira worth checking out:
-
Smart Issue Hierarchy – Organize tasks with a clear issue structure.
-
Smart AI Release Notes for Jira – Automatically generate release notes based on Jira issues.
-
Smart Productivity & Team Performance Dashboard – Track team performance and project progress in one place.
These apps are easy to use and can improve your Jira experience, even on the free tier.
What You Should Keep in Mind When Configuring Jira
Here are some tips to make your Jira setup more effective and aligned with your team’s processes:
-
Start with a simple workflow. Use default statuses and add new ones only when necessary. Clearly define transitions and ensure your team understands how to use them.
-
Integrate with other tools. Connecting Jira with apps like Slack, GitHub, Microsoft Teams, and Confluence helps automate tasks and improve collaboration. For example, you can create Jira issues directly from Slack messages.
-
Use built-in reports. Jira includes sprint reports, control charts, time-tracking reports, and more, giving you insights tailored to your project type. Reviewing these reports regularly helps track progress and optimize workflows.
-
Create custom dashboards. Beyond built-in reports, Jira lets you design dashboards tailored to your team’s needs. Use them to track key metrics, monitor progress, and present insights in a clear, analysis-ready format.
-
Leverage JQL for advanced searches. Jira Query Language (JQL) allows you to search issues, utilize complex filters, run cross-project searches, and enable advanced backlog management.
-
Collect feedback and refine. Create a test project to explore different configurations and workflows. Ask your team to try it out, gather feedback, and tweak the settings to improve usability and efficiency.
Setting up Jira isn’t too complicated, but there are plenty of settings to figure out along the way. Hopefully, this guide made the process easier and helped you with the Jira setup - so that now your team is ready to start assigning issues and work on their next success story.

Was this helpful?
Thanks!
Olga Cheban _TitanApps_
About this author
Content Writer
Railsware
Poland
3 accepted answers
0 comments