Community resources
Community resources
Community resources
How to set up Hubspot Jira Integration with Getint
Integrating Jira with HubSpot can significantly enhance your team's efficiency by ensuring seamless synchronization between your project management and customer relationship management systems. Getint offers a robust solution to facilitate this integration, enabling a continuous flow of information and improved collaboration across your teams.
Step-by-Step Setup Guide
-
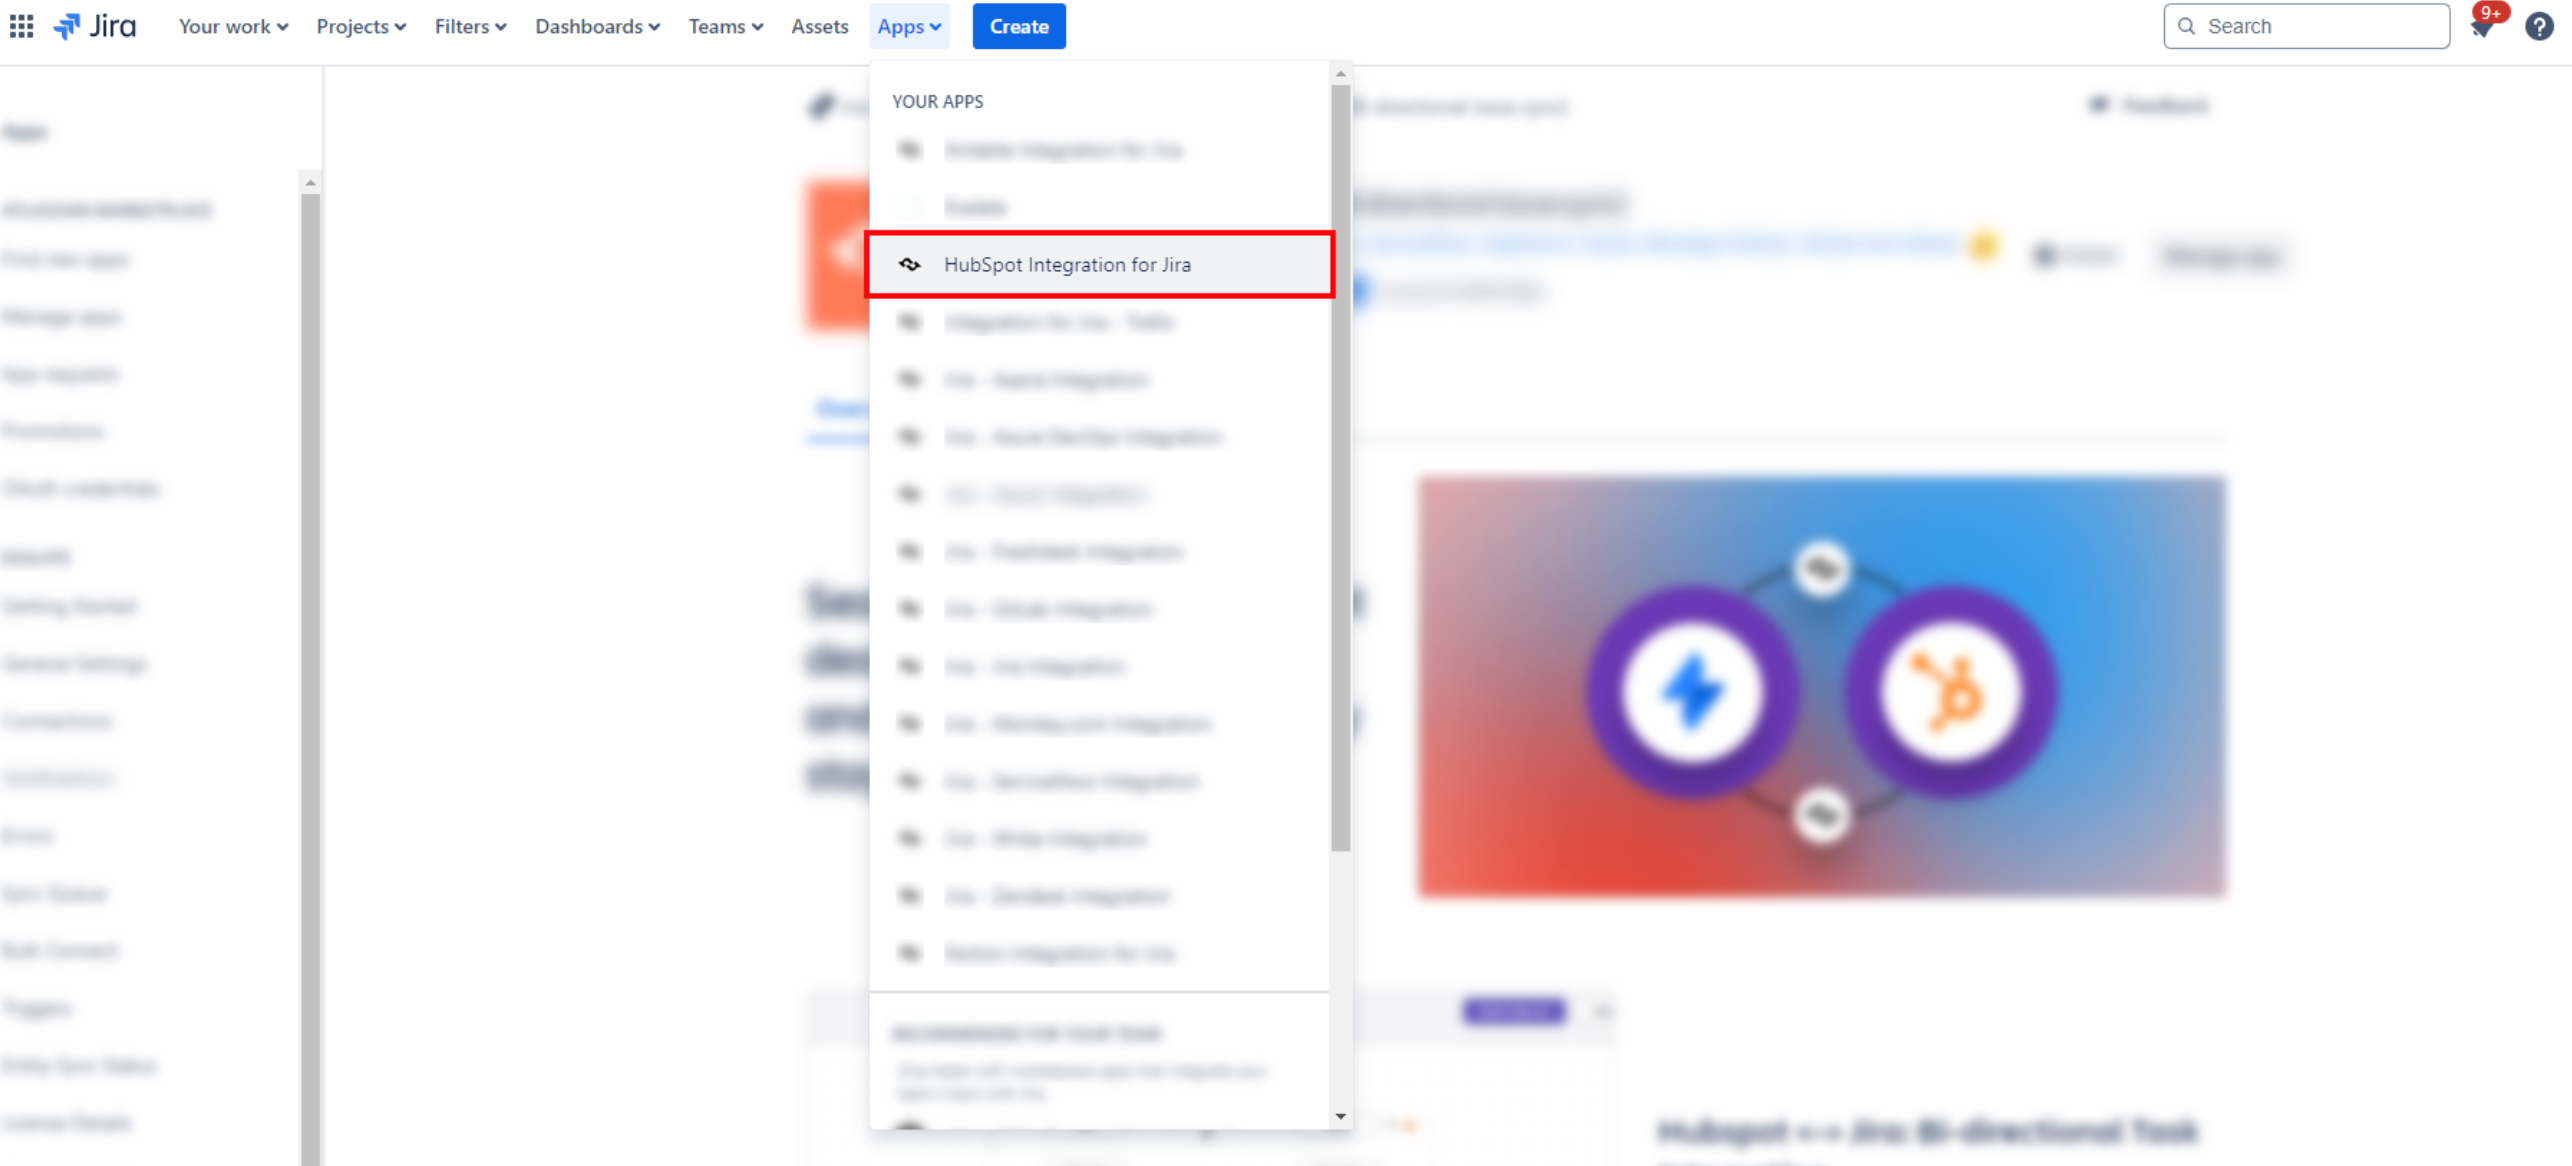
Access the Getint App in Jira
- Navigate to "Apps" in your Jira instance and select "HubSpot Integration for Jira."
-
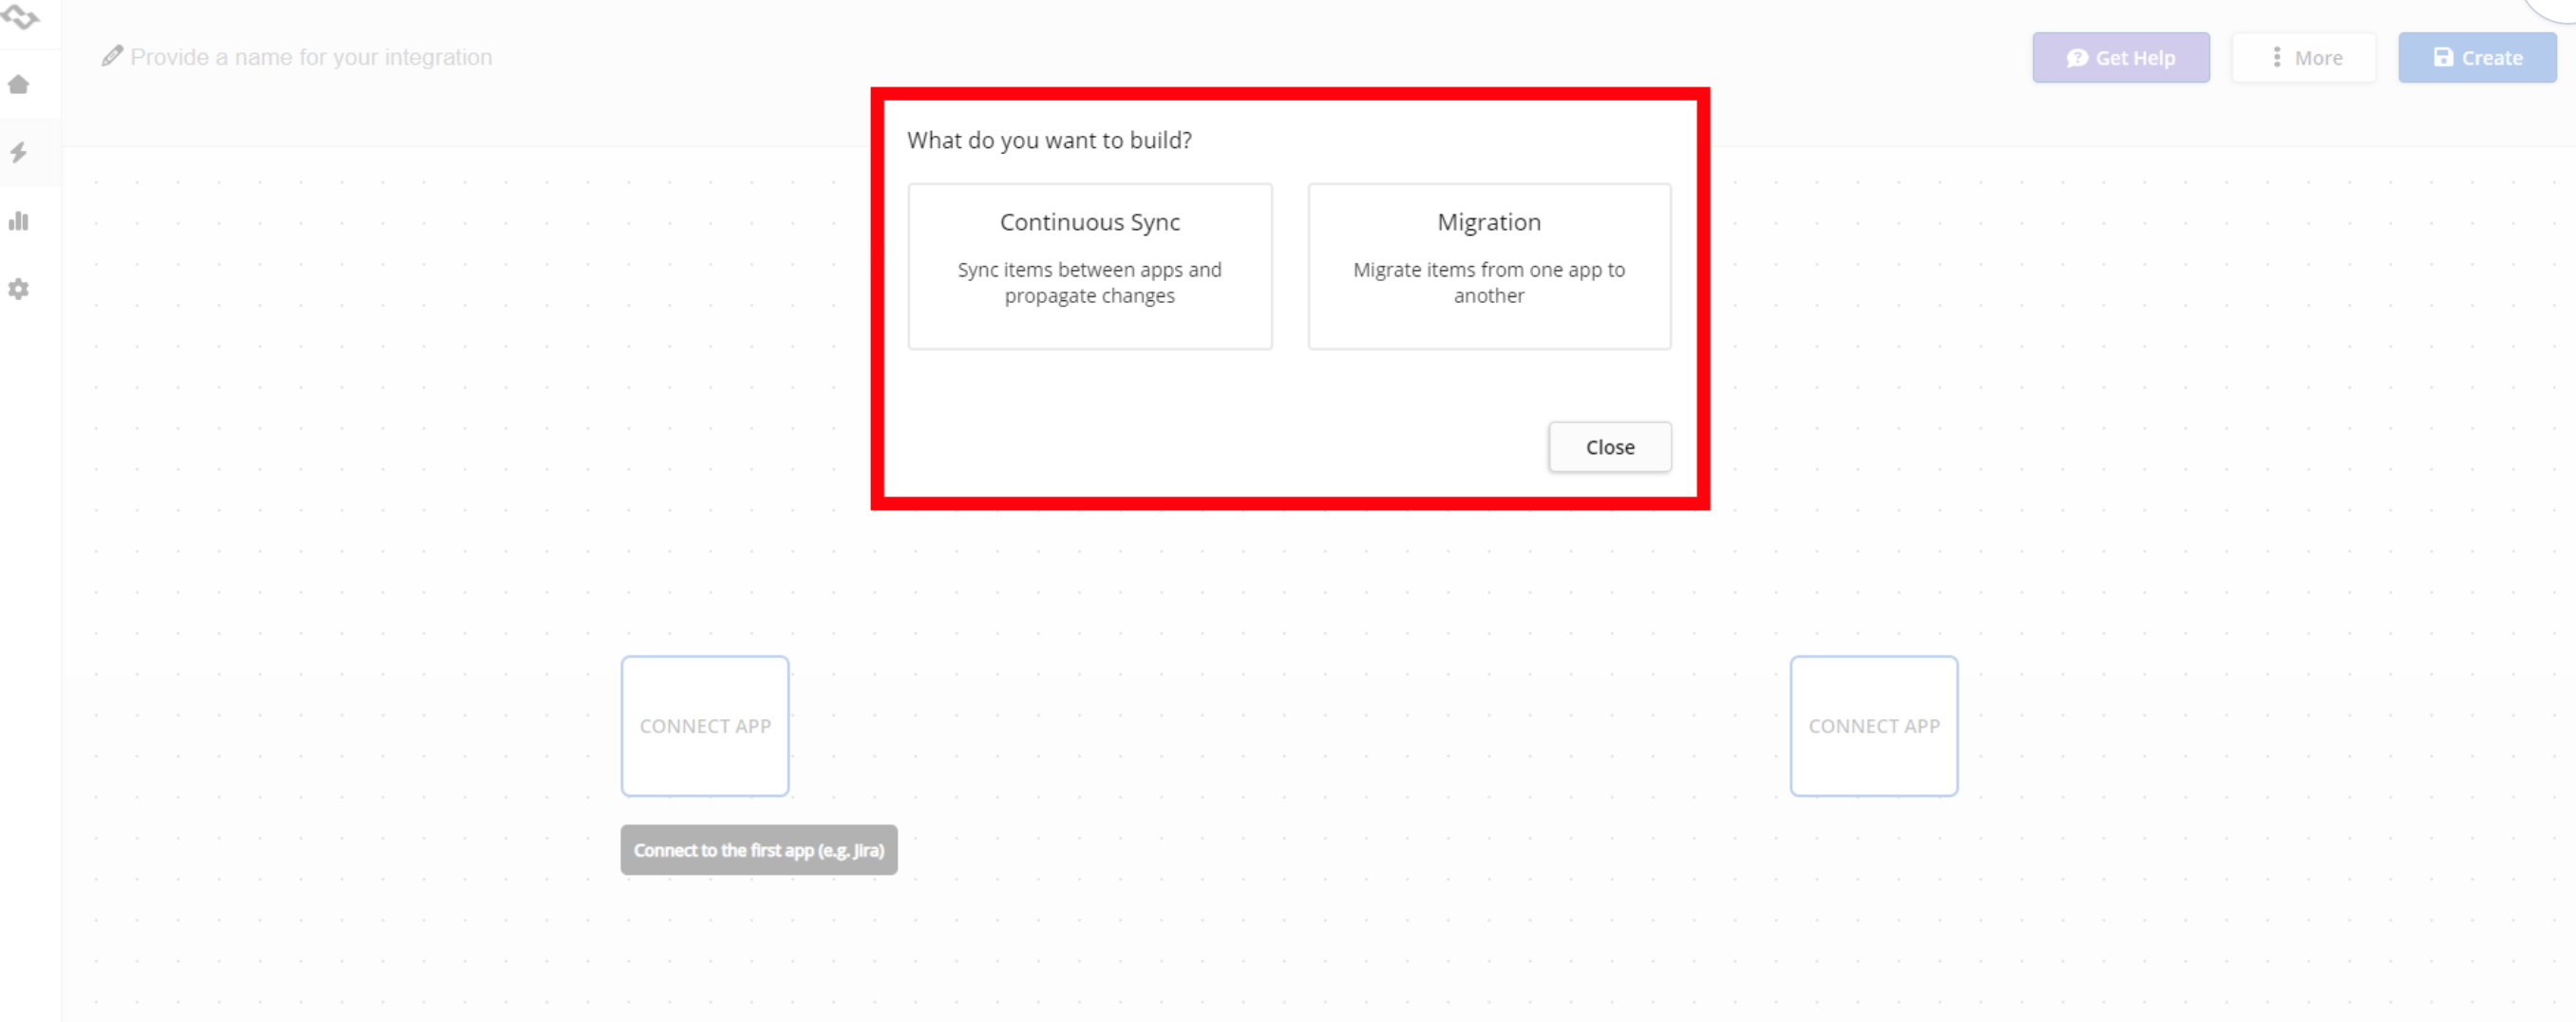
Create Integration
- Click "Create integration" for ongoing synchronization or "Migration" to transfer existing data.
-
Generate a Jira API Token (for Jira Cloud users)
- Go to your Atlassian Account Settings.
- Navigate to the Security section and generate an API token.
- Use this token as the password for Jira integration.
-
Establish Connections
- Ensure you are logged in as a user with admin rights.
- Click "Select App" and choose Jira.
- Select "Create New" to establish a new connection with your Jira instance.
- Enter the URL of your Jira instance (omit the trailing "/") and provide the admin user credentials.
-
Select the Jira Project
- Once the connection is established, choose the Jira project you want to connect to from the dropdown menu.
-
Connect to HubSpot
- Select the HubSpot app and click on "Create a new connection."
- Use the personal token created following the instructions in the guide.
- Click "Connect."
-
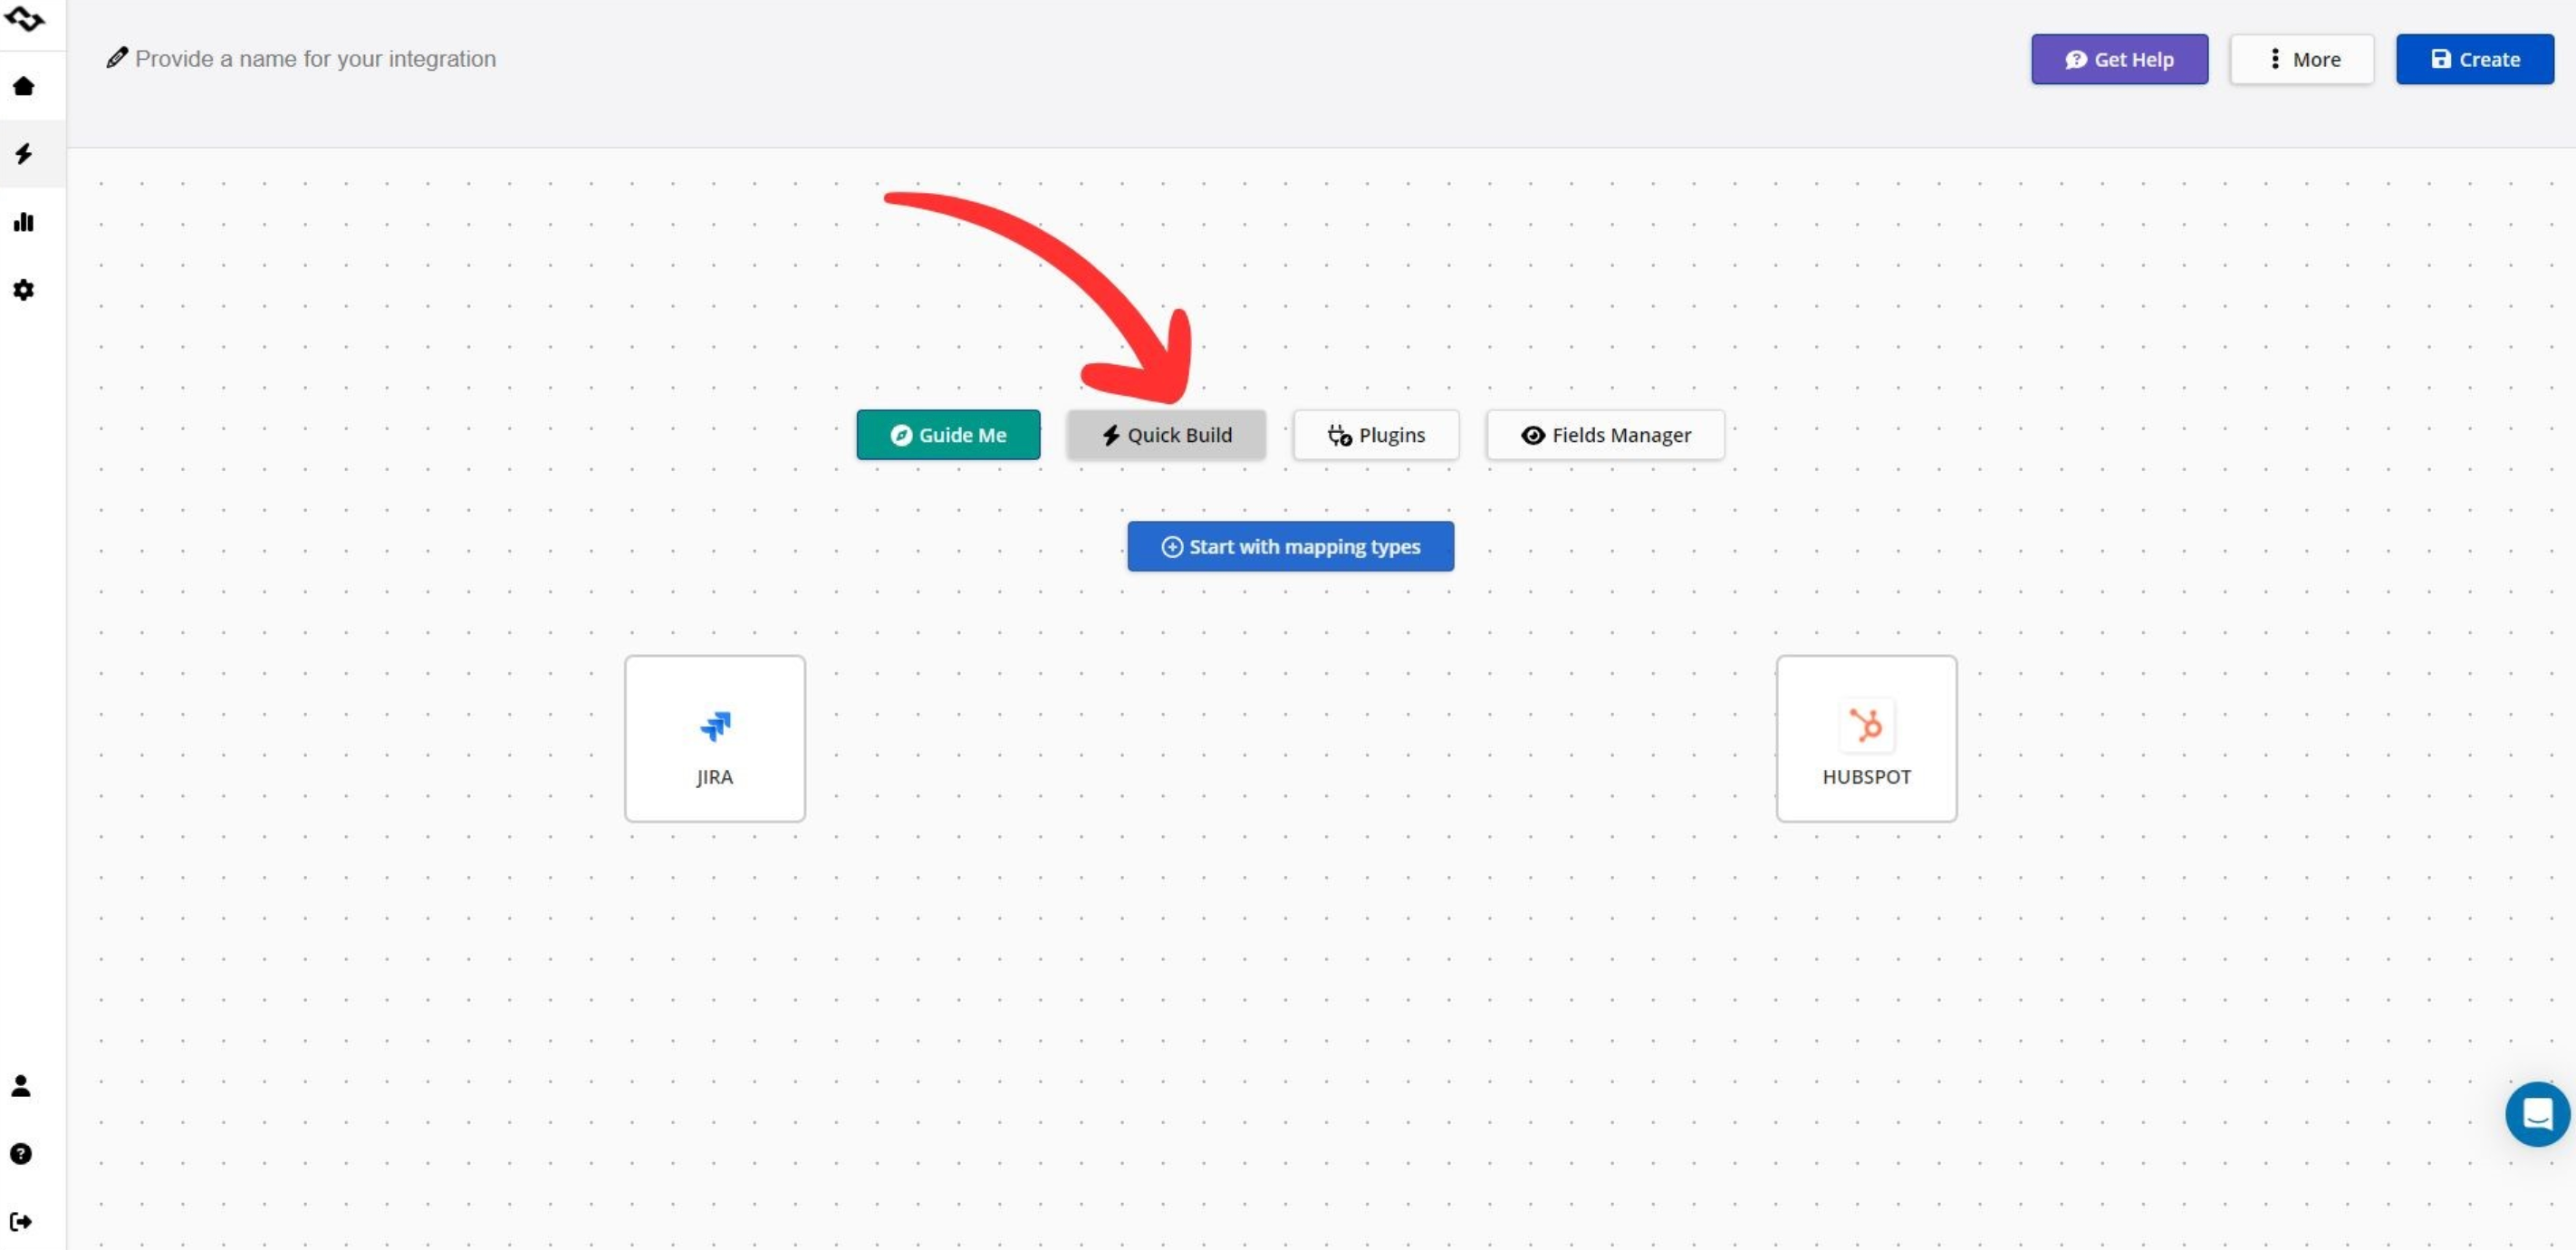
Type Mapping
- Map the Jira issue types you want to sync with HubSpot tasks, such as mapping a HubSpot task to a Jira issue or a Jira bug.
- Consider using the "Quick Build" beta feature for automated type and field mapping to facilitate the setup process.
-
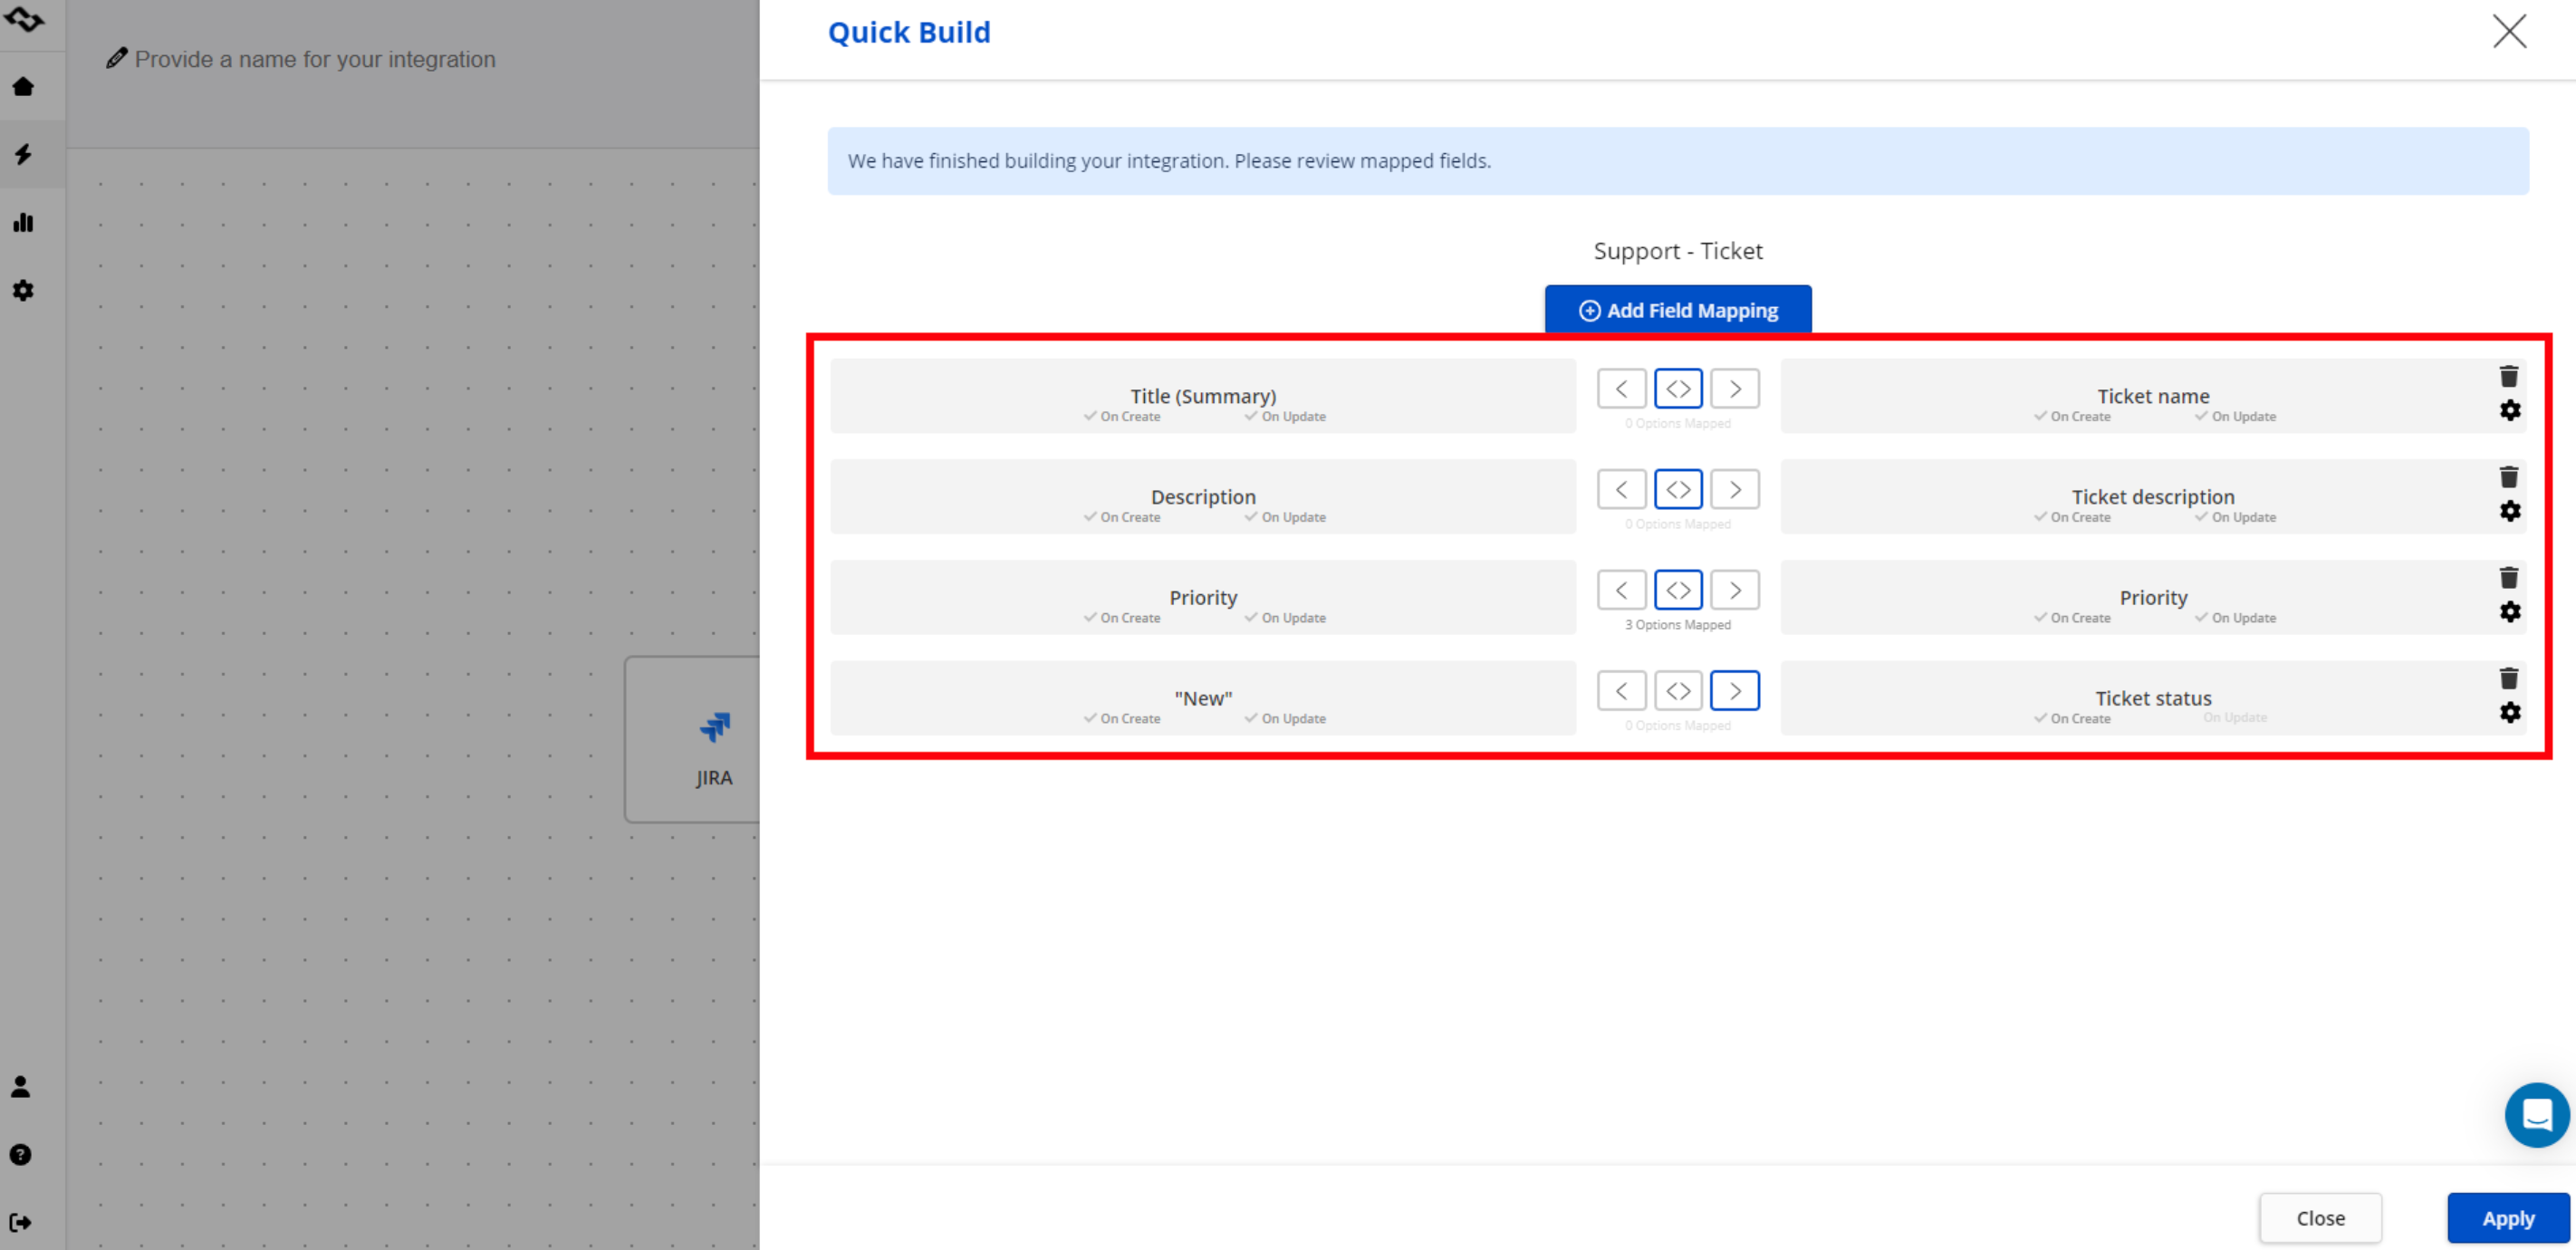
Field Mapping
- Review or manually map which fields to integrate and sync within supported mapped types.
- Make any necessary modifications and click "Apply."
Advanced Settings
-
Comments Synchronization
- If needed, enable the integration and synchronization of comments.
- Filter the comments with criteria that suit you, such as making them private/public or using preferred attributes like creation date or author.
-
Statuses Mapping
- Enable status mapping, then map the statuses as desired.
- Specify the HubSpot field that will keep the status data from Jira, ensuring fields in HubSpot mirror your Jira setup (e.g., To do - To do, Done - Done).
Note: In HubSpot, each mapped type has a different status field. For example, a Deal maps to Stage, while a Ticket maps to Ticket Status. Identify the correct field for the mapped type to ensure the status transition syncs properly.
Finalize Integration
-
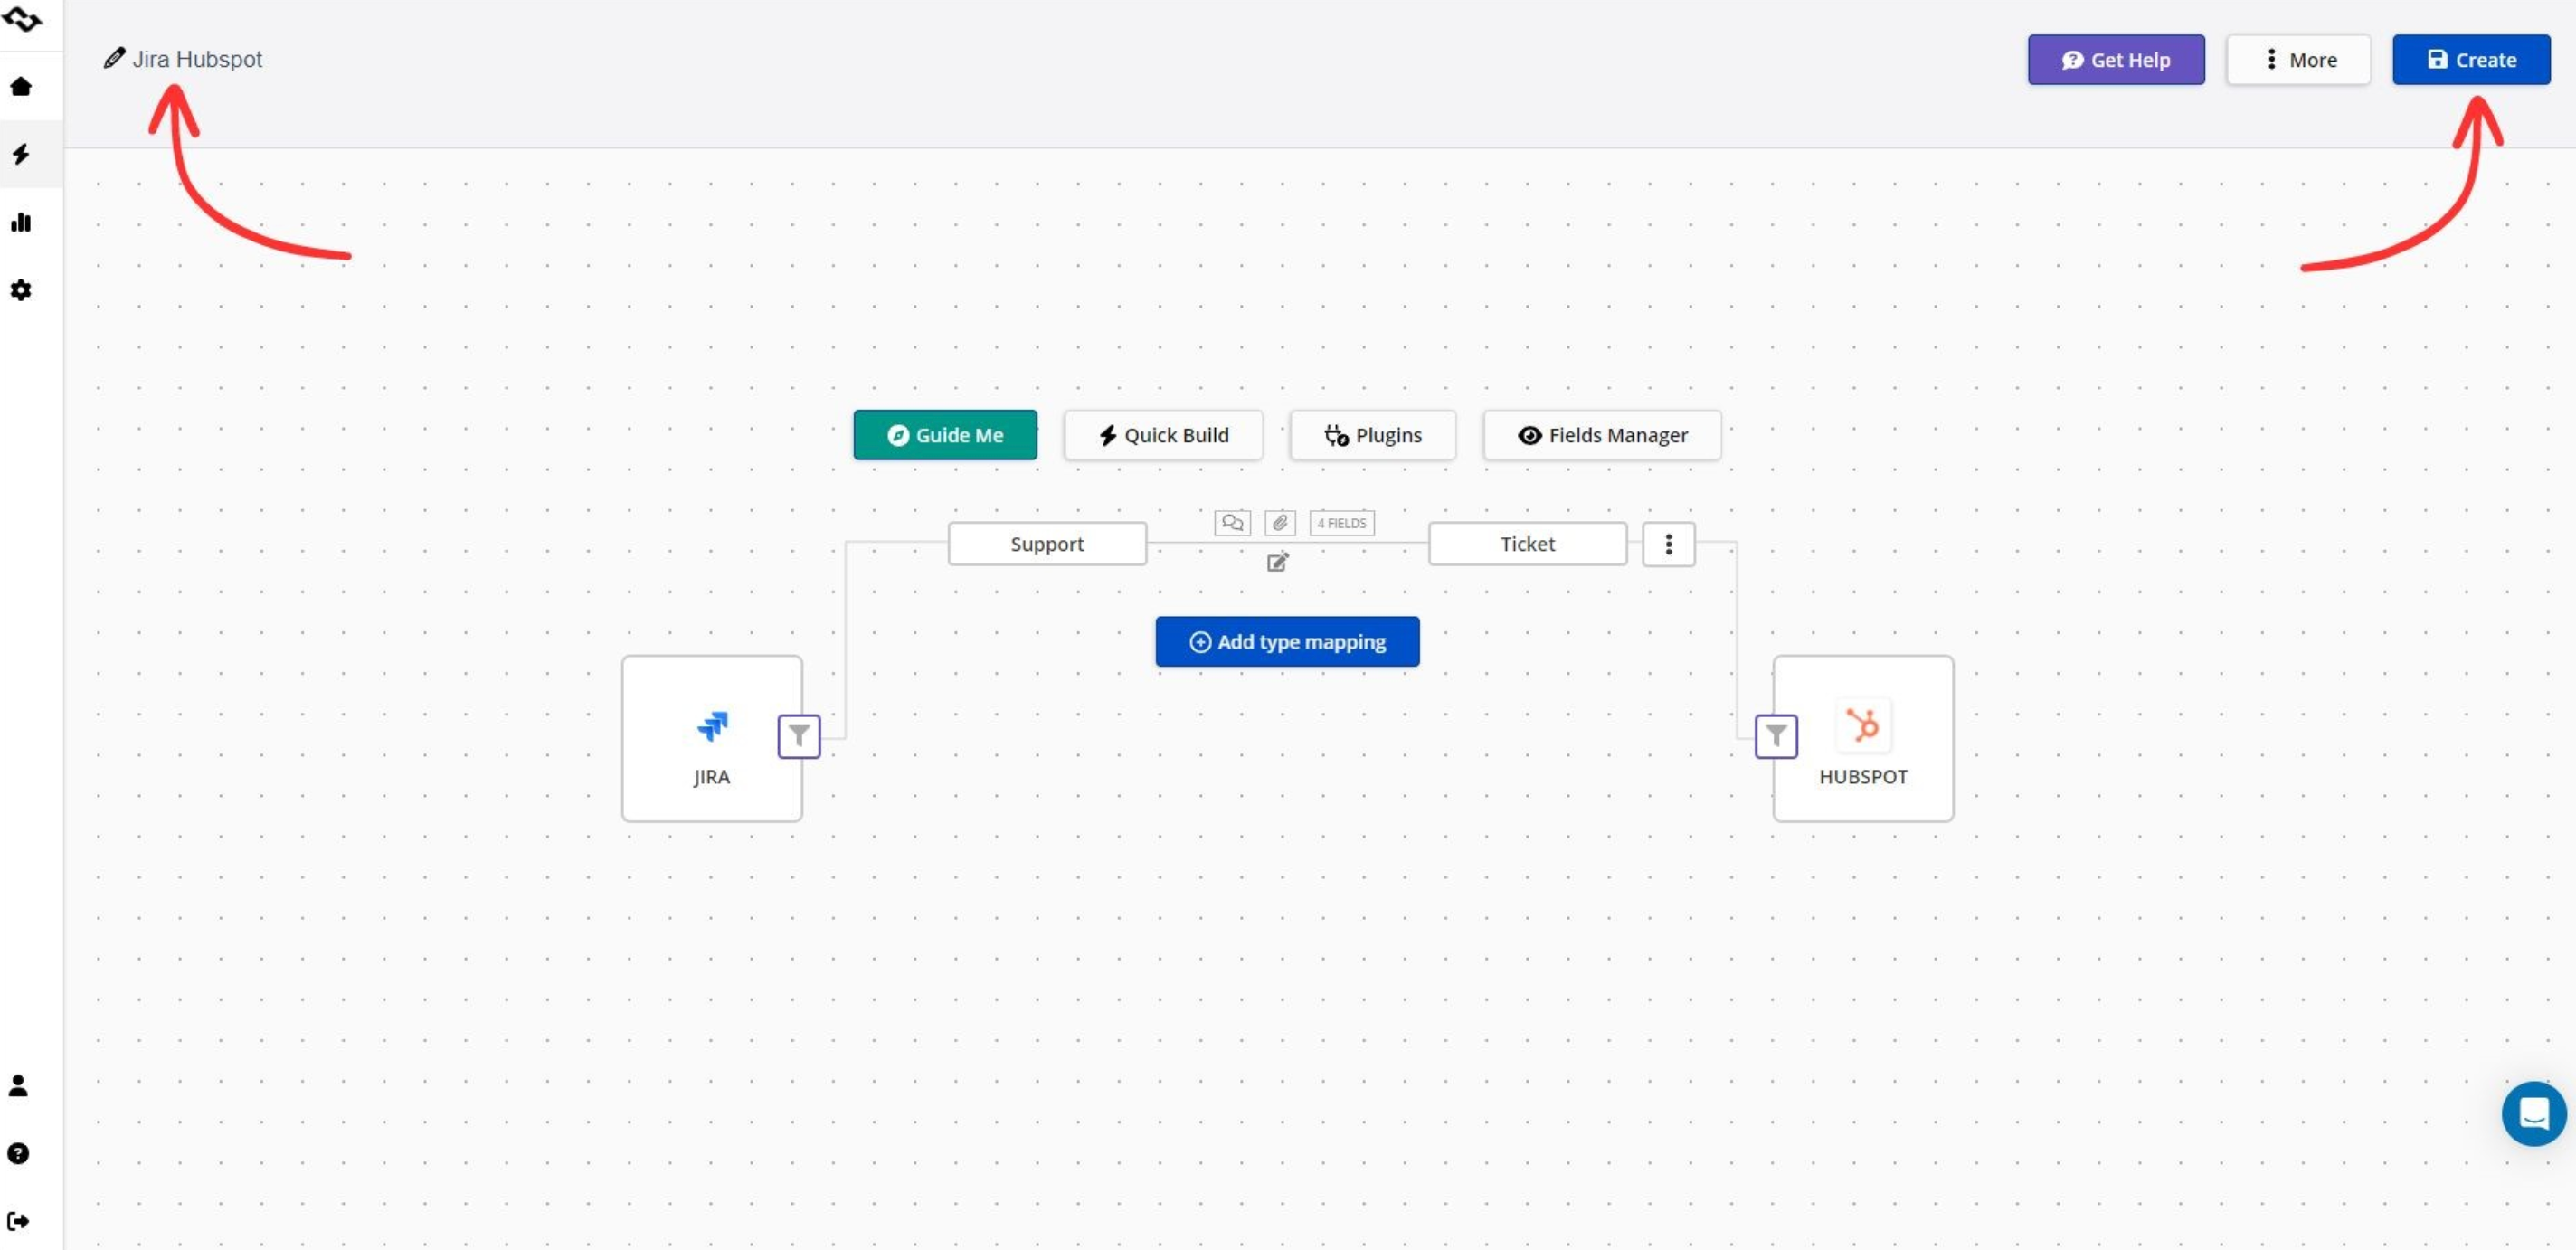
Name the Integration and Click "Create"
- Name your integration and click "Create" to finalize the setup.
-
Filtering
- It is possible to filter the synchronization to customize it for your needs and requirements.
- UI Filtering Option:
- Click on the filtering icon near the app icon in your integration. This will apply to that side of the integration.
- Select if the filtering applies to All, New, or Synced items.
- Choose the options and add the value for the filter. It is possible to filter more than one option for each field.
- Click "Apply" once you have created the filters and "Save" the integration.
-
Test the Integration
- To ensure everything is working correctly, create tasks and go to the reporting section to verify that all syncs are functioning as expected.
- If you encounter any issues, please contact our support team for assistance.
Conclusion
By following these steps, you can effectively integrate Jira with HubSpot using Getint, ensuring smooth synchronization of tasks, issues, and workflows between the two platforms. This setup enhances collaboration and project management processes. For further assistance, contact our support at our Support Center.
How to set up Hubspot Jira Integration with Getint
Integrating Jira with HubSpot can significantly enhance your team’s efficiency by ensuring seamless synchronization between your project management and customer relationship management systems. Getint offers a robust solution to facilitate this HubSpot CRM integration, enabling a continuous flow of HubSpot data and improved collaboration across your teams.
Introduction to HubSpot and Jira Integration
The HubSpot and Jira integration is a powerful tool that enables businesses to streamline their workflow, enhance collaboration, and improve customer satisfaction. By integrating HubSpot CRM with Jira, teams can access customer data, track progress, and manage issues in a single platform. This integration is particularly useful for companies that use both HubSpot and Jira, as it eliminates the need to switch between tools and provides a seamless experience for users.

Prerequisites for Jira Integration
Before setting up the Jira integration, ensure that you have the following prerequisites:
-
A HubSpot account with the necessary permissions
-
A Jira Cloud account with the necessary permissions
-
The HubSpot for Jira app installed from the Atlassian Marketplace
-
A clear understanding of your team’s workflow and requirements
Jira Hubspot CRM Integration: Step-by-Step Setup Guide
-
Access the Getint App in Jira
-
Navigate to "Apps" in your Jira instance and select "HubSpot Integration for Jira."
-
-
Create Integration
-
Click "Create integration" for ongoing synchronization or "Migration" to transfer existing data.
-
-
Generate a Jira API Token (for Jira Cloud users)
-
Go to your Atlassian Account Settings.
-
Navigate to the Security section and generate an API token.
-
Use this token as the password for Jira integration.
-
-
Establish Connections
-
Ensure you are logged in as a user with admin rights.
-
Click "Select App" and choose Jira.
-
Select "Create New" to establish a new connection with your Jira instance.
-
Enter the URL of your Jira instance (omit the trailing "/") and provide the admin user credentials.
-
-
Select the Jira Project
-
Once the connection is established, choose the Jira project you want to connect to from the dropdown menu.
-
-
Connect to HubSpot
-
Select the HubSpot app and click on "Create a new connection."
-
Use the personal token created following the instructions in the guide.
-
Click "Connect."
-
-
Type Mapping
-
Map the Jira issue types you want to sync with HubSpot tasks, such as mapping a HubSpot task to a Jira issue or a Jira bug.
-
Consider using the "Quick Build" beta feature for automated type and field mapping to facilitate the setup process.
-
-
Field Mapping
-
Review or manually map which fields to integrate and sync within supported mapped types.
-
Make any necessary modifications and click "Apply."
-
Advanced Settings
Comments Synchronization
-
If needed, enable the integration and synchronization of comments.
-
Filter the comments with criteria that suit you, such as making them private/public or using preferred attributes like creation date or author.
Statuses Mapping
-
Enable status mapping, then map the statuses as desired.
-
Specify the HubSpot field that will keep the status data from Jira, ensuring fields in HubSpot mirror your Jira setup (e.g., To do - To do, Done - Done).
Note: In HubSpot, each mapped type has a different status field. For example, a Deal maps to Stage, while a Ticket maps to Ticket Status. Identify the correct field for the mapped type to ensure the status transition syncs properly.
Finalize Integration
Name the Integration and Click "Create"
-
Name your integration and click "Create" to finalize the setup.
Filtering
-
It is possible to filter the synchronization to customize it for your needs and requirements.
-
UI Filtering Option:
-
Click on the filtering icon near the app icon in your integration. This will apply to that side of the integration.
-
Select if the filtering applies to All, New, or Synced items.
-
Choose the options and add the value for the filter. It is possible to filter more than one option for each field.
-
Click "Apply" once you have created the filters and "Save" the integration.
-
Test the Integration
-
To ensure everything is working correctly, create tasks and go to the reporting section to verify that all syncs are functioning as expected.
-
If you encounter any issues, please contact our support team for assistance.
Conclusion
By following these steps, you can effectively integrate Jira with HubSpot using Getint, ensuring smooth synchronization of tasks, issues, and workflows between the two platforms. This setup enhances collaboration and project management processes. For further assistance, contact our support at our Support Center.
Was this helpful?
Thanks!
Renata_Getint
About this author
Growth Specialist
Getint
Poznań, Poland
4 accepted answers
0 comments