Community resources
Community resources
Community resources


A simple way to monitor bug resolutions in Jira with SLAs
❓Want to learn an effective way to track bugs in Jira?
.png")
We have the solution for you. Whether you’re a product manager organizing projects or a reporter looking for accurate bug reports, we wrote this article to show you how to set it up.
Bug tracking is a vital stage in software development. According to the "Rule of Ten," the longer a bug goes unnoticed, the costlier it becomes to fix. Jira is powerful but not always intuitive, which complicates team bug tracking.
So, let’s dive in! 🌪️
How SLAs relate to bug tracking
Every week, teams identify hundreds of bugs, making it essential to have a scalable system for timely detection, tracking, management, and resolution. To address this, we suggest using a streamlined Service Level Agreement (SLA) process for bugs 🪲.
SLAs in Jira assist in tracking bugs and make it easy to set clear timelines for resolution, establish necessary conditions, and generate quality reports to keep all bugs under control.
For enhanced functionality in Jira, you can use the SLA Time and Report add-on, which allows you to set up SLAs specifically for bugs, ensuring that each issue is tracked against time-bound goals. This add-on lets you prioritize bugs based on severity, monitor real-time progress, and receive automatic notifications to prevent missed deadlines. This structured approach keeps your team focused and better organized ✍🏼.
How to set up SLAs for bug tracking?
We recommend following this concise yet detailed guide on setting up SLAs in Jira with the SLA Time and Report add-on to monitor your bugs. This step-by-step approach will help you streamline your bug-tracking process, ensuring that your team stays organized, meets deadlines, and resolves issues efficiently.
-
🔎 Define time measurement conditions
To get started, create a new project by selecting Software Development from the templates and choosing the Bug Tracking project type. Next, go to the SLA Manager and create a new SLA configuration to begin setting up your tracking process.
Then, naming your SLA configuration, such as "Bug Resolution SLA," to identify its purpose. Select the project where you want this SLA to apply, ensuring the setup targets the correct bug-tracking environment.
Set the Start, Pause, and Stop conditions for the SLA timer. For example, you might start the SLA when a bug enters the "Open" status and stop it when it reaches the "Review" status. This allows you to monitor the time to move a bug through critical stages of the resolution process.

Enable the Multi-Cycle option when a bug goes through repeated stages. With this feature enabled, the SLA will calculate total time across all instances of transitions between the start and stop conditions, ensuring accurate tracking even if the bug cycles between statuses multiple times. This helps teams get a complete picture of the time spent on each round of work. To enable this feature, simply toggle the button to activate it.
Also, you can use the Reset SLA option to start a new SLA cycle if certain conditions, reopening a bug, are met. When a bug is reopened, the SLA timer resets, starting a fresh tracking cycle.
To activate the Reset SLA feature, you need to set a specific condition to trigger it. For example, you could set the condition to "Status: Reopened." This way, whenever a bug’s status changes to "Reopened," the timer will automatically reset and start counting a new SLA cycle.
-
📌 Set SLA goals and actions for exceeding limits
Review all bugs and determine which ones are the most critical. Assess the impact of each bug on the project and decide which issues must be addressed first.
With the SLA Time and Report add-on, you can define specific SLA time goals, such as "High Priority Bug - 24 hours" or "Low Priority Bug - 72 hours," based on the urgency and priority of the bugs. For each goal, set actions to be taken if the time limit is exceeded. At this SLA goals setting menu, you can specify SLA goals and choose the Automate action for exceeded issues:
-
notification,
-
changing reporter,
-
changing priority,
-
changing status.

This action allows you to assign bugs to specific team members, ensuring everyone knows who is responsible for resolving each issue. With built-in notifications and mentions, team members stay informed about bug assignments and receive real-time updates.
Once you've configured all settings, save your SLA configuration: click on the button “Save & Go to report.” You can now monitor bug resolution progress in real-time using SLA Time and Report tracking and reporting features, ensuring your team stays on top of deadlines and bug resolution timelines.
-
📈 Track your bugs and generate reports
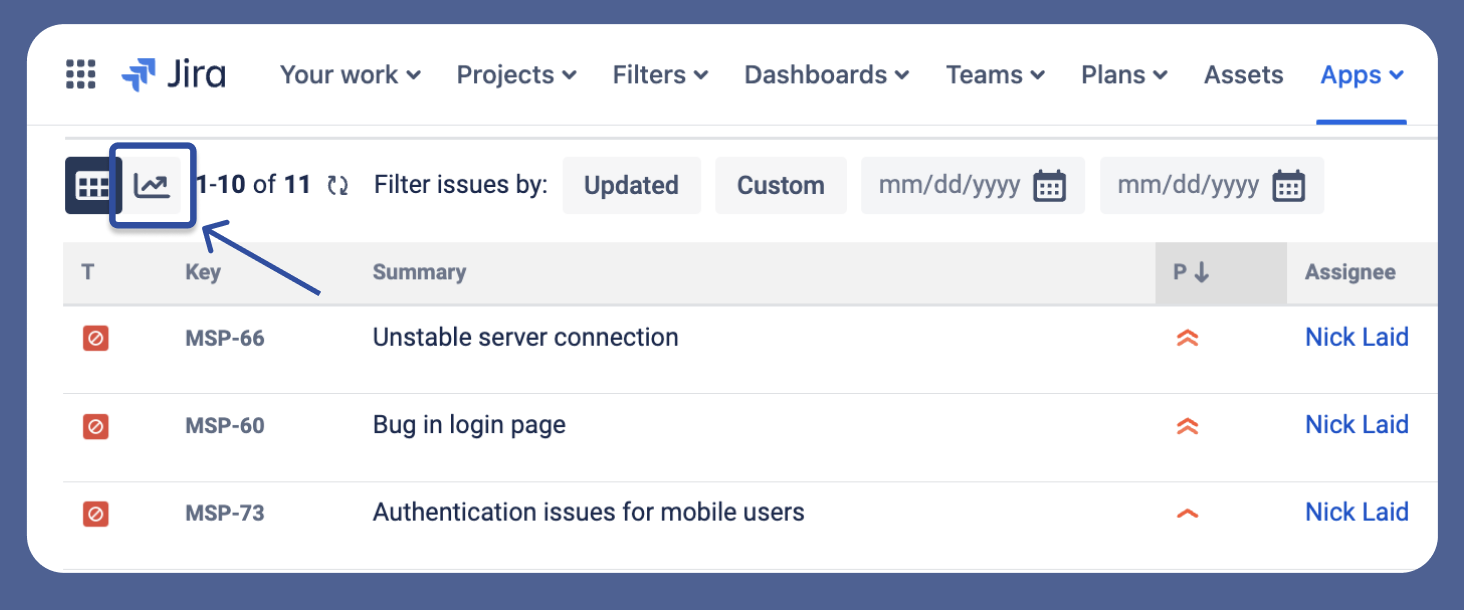
So, after you click the “Save & Go to report” button, you will see a table like this:

You can easily monitor bug fulfillment and issues' statuses according to the data in the grid table, which contains a set of data structured in rows and columns.
Then, sort the data by Type, Key, Summary, Assignee, or Status in ascending or descending order.
On the SLA timer, you can also monitor the time left until the SLA goal is exceeded. Tickets with exceeded timers are red. Before or after the issue meets the time goals, a goal is green.
Hover over the column title to access detailed information about its settings.

You can also check the SLA completion percentage relative to the target date by accessing the table view reports. Here, you’ll find tooltips with key details, including:
-
Start and target dates,
-
Completion percentage, elapsed time, and remaining time,
-
SLA status,
-
The type of calendar used for time calculations.

To create reports and view graphics, click the appropriate button:
Through these reports, you can track the following:
-
SLA Met vs Exceeded issues;
-
SLA Statuses Pie Chart;
-
SLA Met vs Exceeded per Assignee.
Generate reports on outstanding and longest-standing bugs to identify features with recurring issues that drain resources. These reports help pinpoint development areas needing improvement to prevent similar issues in the future.
Additionally, analyze which priority levels have the most bugs. If there’s a high number of critical or high-priority bugs, it may signal underlying issues that require attention. Tracking these metrics not only improves time management but also enhances cost efficiency and team productivity, enabling better-informed decisions to optimize the development process.
Following these steps, you can effectively set up and manage SLAs for bug tracking in Jira with minimal effort. The SLA Time and Report add-on simplifies tracking, prioritizing, and reporting on bugs, ensuring timely resolution, maintaining your team’s productivity, and saving you money. 💸
📝 Real-Life Use Cases for Monitoring Bugs in a Team
Using SLA Time and Report for Jira helps our clients enhance bug monitoring, boost team accountability, and streamline bug resolution processes. Here are key use cases that may benefit you:
-
High-priority bug management: high-priority or critical bugs often require immediate attention. The add-on enables teams to set strict SLAs (e.g., a 24-hour resolution goal) and receive real-time alerts if deadlines are at risk, ensuring quick responses and minimizing project delays.
-
Ensuring accountability and transparency: assigning bugs to specific team members ensures everyone knows their responsibilities. This approach informs the team about tasks and progress with regular notifications and updates.
-
Retrospective analysis and improvement: teams can use reports to review their SLA compliance in bug fixes. By exporting data and analyzing performance, teams identify trends like recurring delays and implement process changes to improve future results.
-
Managing multiple projects: monitoring with the add-on provides a clear overview of bug statuses for teams working on multiple projects. This aids in prioritizing tasks, focusing resources on critical issues, and ensuring each project meets its specific SLA requirements.
-
Supporting agile processes: during agile sprints, where speed and adaptability are crucial, SLA monitoring helps teams stay on track with sprint goals. By tracking bug resolution timelines, teams make informed decisions during sprint reviews and adjust workflows as needed.
✏️ Tips for Common Challenges
Setting up and monitoring SLAs for bug tracking in Jira can come with specific challenges that may hinder the team's efficiency. Awareness of these potential obstacles is essential for maintaining effective tracking and timely bug resolution. Below, we outline common challenges teams might encounter during the setup and monitoring of SLAs for bug tracking in Jira and share practical tips:
-
Defining clear SLA conditions: ensure the team agrees on SLA triggers (start, pause, stop) to prevent confusion and inaccurate tracking.
-
Managing workflow complexities: adapt SLAs for workflows with multiple cycles or statuses to maintain accurate tracking.
-
Monitoring SLA progress: use the SLA Reports and alerts for real-time updates to avoid missed deadlines.
-
Handling SLA breaches: set up automated escalation actions to keep teams proactive when SLAs are at risk of being missed.
-
Balancing priorities: set different goals for various bug priorities to reduce unnecessary pressure on the team.
Summary: how do I resolve bugs in Jira? 🤔
Providing a QA team with the right tools for bug monitoring and collaboration is essential. Team leads must ensure that each member can detect and report defects, and that issues are assigned to the appropriate team members at the right time.
SLA Time and Report for Jira offers the flexibility to set up custom workflows for bug tracking and resolution, enhancing monitoring capabilities. This powerful add-on helps teams prioritize and automate tasks, including bug management, making it an invaluable resource for maintaining quality, optimizing efficiency, and ultimately delivering greater value to customers.
Was this helpful?
Thanks!
Olha Yevdokymova_SaaSJet
About this author
Product Marketing Manager
SaaSJet
Ukraine
10 accepted answers
Atlassian Community Events
- FAQ
- Community Guidelines
- About
- Privacy policy
- Notice at Collection
- Terms of use
- © 2025 Atlassian
0 comments