This article will show you how to install, configure and run JEC on a Windows environment.
We have various JEC packages available for download from the JSM integration scripts repository - Releases. Note: each package are designed for a particular 3rd party application and comes with some pre-loaded configuration.
Installing JEC
For this article, we are using a Windows 11 (64bit) machine with a generic JEC package (jec-1.0.2_jec-1.0.5)
If you are on a 32bit or 64bit architecture you will need to either use the package with “-win-386” or “-win-amd64” in the name respectively.
-
Download the jsm-jec-1.0.2-win-amd64.zip (since we are using 64bit)
-
In your C drive, create a folder name jsm and within it create a subfolder jsm-jec. (Note: the location and name can be per your requirement. We have left is as default so we do not have to make changes to the JEC config file)
-
Extract the content of the jsm-jec-1.0.2-win-amd64.zip into the jsm-jec folder
- Go to the jsm-jec folder and then rename the jecService64.json.example to jecService64.json
<br><br><span class="lia-inline-image-display-wrapper lia-image-align-inline" image-alt="Screenshot 2025-08-04 141548 (1).png" style="width: 768px;"><img src="https://us.v-cdn.net/6038660/uploads/images/402143i62472FB2D83911DE/Screenshot%202025-08-04%20141548%20%281%29.png" role="button" title="Screenshot 2025-08-04 141548 (1).png" alt="Screenshot 2025-08-04 141548 (1).png"></span>
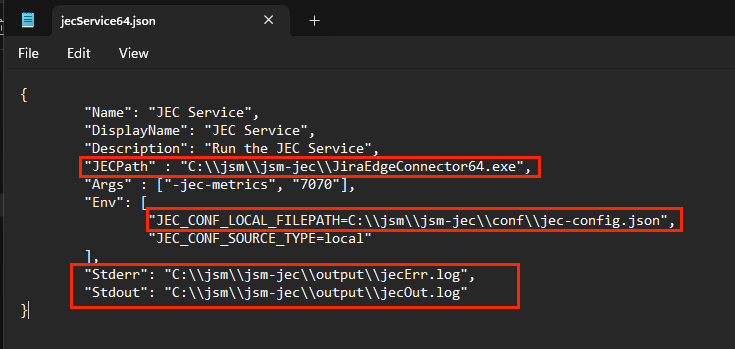
- Open the jecService64.json file in Notepad or your preferred text text editor. If you have chosen a different name or location than that from step 2 above, make sure to update the paths below to match your chosen folder name/location.
- Open a command prompt (run as administrator), and then go to the jsm-jec folder. Use the following command:
cd c:\jsm\jsm-jec
- Run the following command
<span data-testid="renderer-code-block-line-1" data-ds--code--row=""><span>jecService64.exe install</span></span>
- Once installed successfully, it should output “JEC service installed successfully“

- Open Task Manager and make sure JEC service appears under Services
Configuring JEC
-
Setting environment variable: We have two options to read the configuration file, either local or using git. In this article we will be setting up JEC to use local drive.
-
Go to “C:\jsm\jsm-jec\conf” folder and edit the jecService64.json file
-
Under “Env” make sure the "JEC_CONF_LOCAL_FILEPATH" is pointing to the conf folder (part of the package downloaded) and "JEC_CONF_SOURCE_TYPE" is set to “local”
-
“Stderr” and “Stdout” is pointing to the correct path. Note: if the output folder does not exists in the path, you will need to create one.
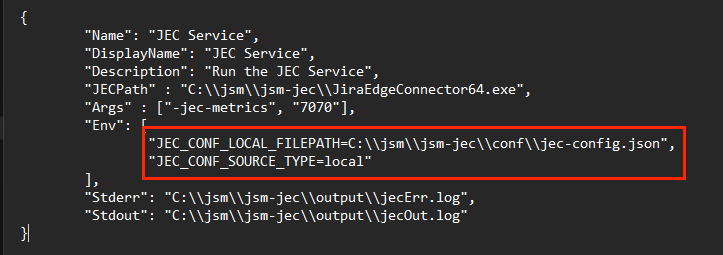
- Configuration file: Once you have configured the jecService64.json file with the correct JEC conf path and source type, open the config.json file located under “C:\jsm\jsm-jec\conf” folder. Make sure all the mandatory fields are populated as outlined on our documentation for Configure file.
Running JEC
In Windows SIGINT and SIGTERM signals are used to stop JEC. You can’t stop/restart JEC via native methods of Windows while using JEC as a service. A helper executable is provided to run JEC as a service.
Use the following commands to start, stop and restart JEC (version amd64)
-
To Start: jecService64.exe start

- To Stop: jecService64.exe stop

- To Restart: jecService64.exe restart

Troubleshooting
If you are facing issues starting the service, you can check the log file jecOut.log to check for any error message. The path of this log folder is defined in jecService64.json under “Stdout”
