Build and deploy a Forge app
15 min
Beginner
By the end of this lesson, you’ll be able to:
- Create a new Forge app with a suitable template using the Forge CLI.
- Explore the structure of the generated app, including its files and folders.
- Identify and configure modules within the app to enable specific functionalities.
- Update the manifest.yml and index.jsx files to fit the app’s requirements.
- Recognize the environments available in Forge and how apps are deployed between them.
- Describe what it means to install a Forge app on an Atlassian instance.
- Use Forge install commands to install and update apps.
Build your first app
Now that you have all the tools set up to build a Forge app, we can look at building a sample app. The goal is not to build something complex but to familiarize yourself with the core workflow and file structure so you can confidently begin customizing and expanding your apps.
Scenario
Your engineering team is working on a support project, and each Jira work item needs to be handled according to its assigned priority level. Team members often forget or misapply the correct process. You decide to build a simple Forge app using a jira-issue-panel that displays priority guidelines right inside the work item view to remind users what to do.
👇Click the icons below to see the steps involved in building an app.
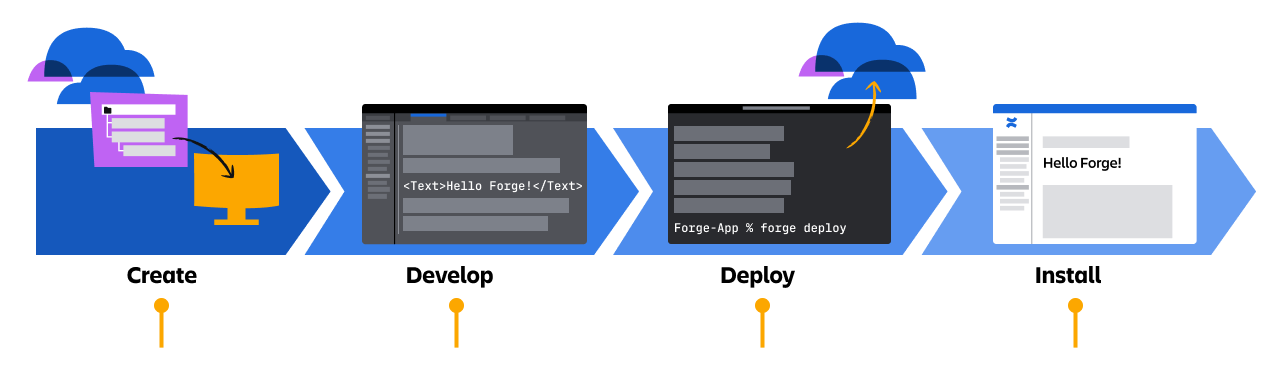
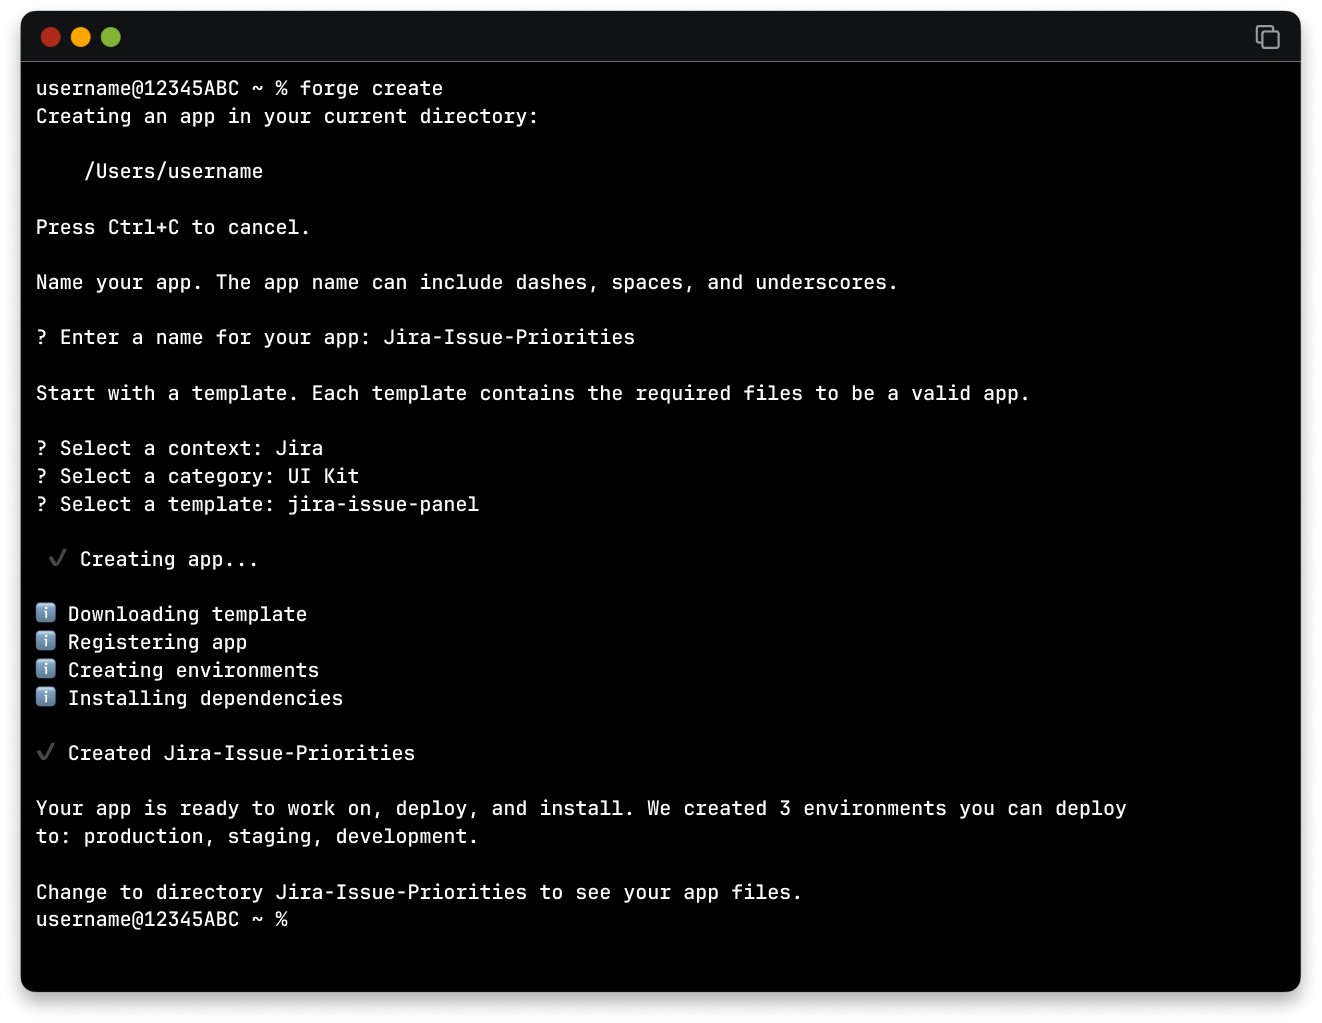
Create the app
After setting up your development environment, open your terminal.
👇Click the boxes below to walk through the Forge create process.
👇This is how your finished command should look.
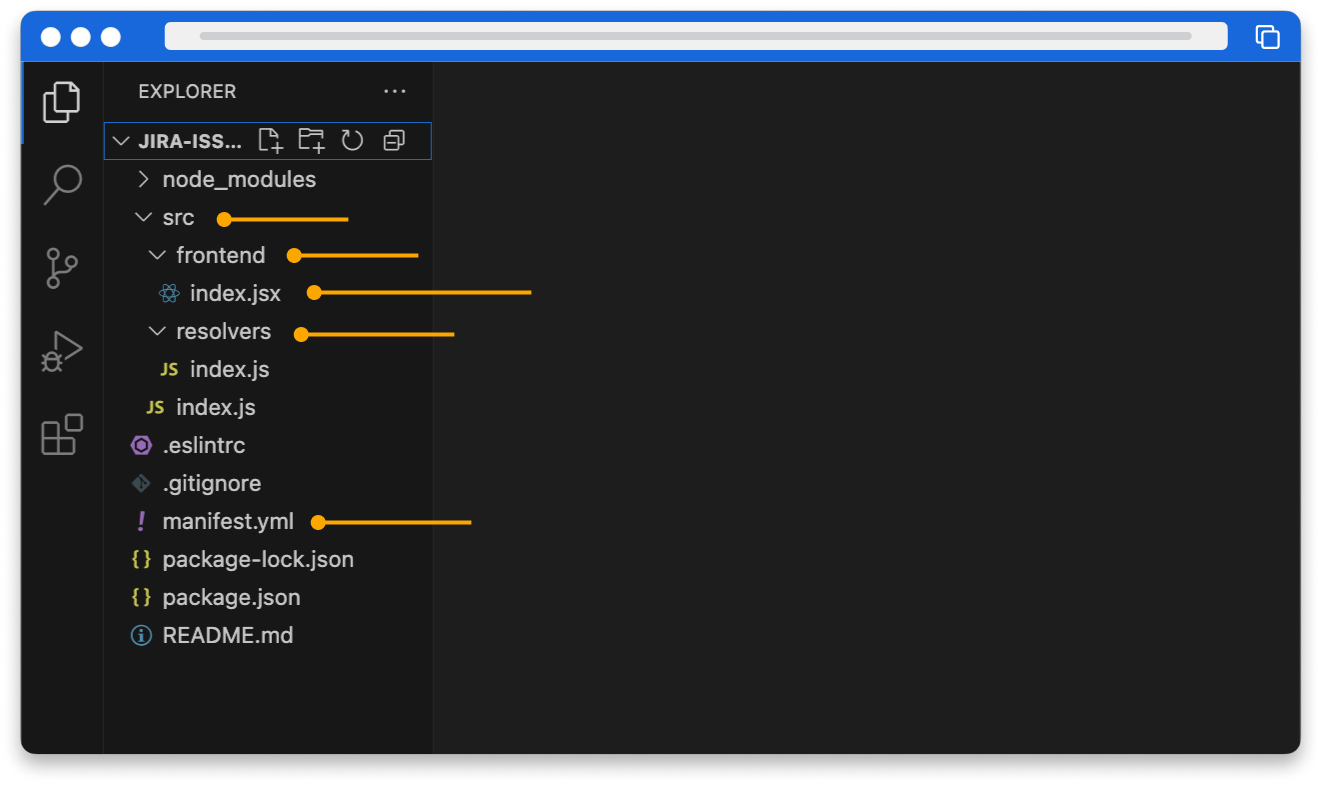
Explore the app’s file structure
Forge has now created your app from the app template. Open the app directory in your preferred code editor, for example, Visual Studio Code, to look at its directory structure and the downloaded files.
The jira-issue-panel template uses Node.js and has the following structure.
👇Click the icons below to learn what each component does.
Develop the app
Now that Forge has set up your app's scaffolding, based on the jira-issue-panel template, it's time to bring your app to life by defining its functionality and user interface.
To do this, you will need to modify a few files.
👇Click the tabs below to learn more about these files.
This app displays content in a Jira issue panel using the jira:issuePanel module. Jira shows the title of the jira:issuePanel as the panel's heading. Let's change the title to Team Guidelines by Priority.
- In the app’s top-level directory, open the manifest.yml file in your code editor.
- Find the title entry under the jira:issuePanel module.
- Change the value of title from Jira Issue Priorities to Team Guidelines by Priority.
- Save the file
Your manifest.yml file should look as follows, with your values for the title and app ID:
1modules:2 jira:issuePanel:3 - key: hello-world-hello-world-issue-panel4 resource: main5 resolver:6 function: resolver7 render: native8 title: Team Guidelines by Priority9 icon: https://developer.atlassian.com/platform/forge/images/icons/issue-panel-icon.svg10 function:11 - key: resolver12 handler: index.handler13resources:14 - key: main15 path: src/frontend/index.jsx16app:17 id: '<your app id>'Deploy your app
When you're building an app with Forge, you’ll work across three environments.
👇Click the icons below to learn about each environment.
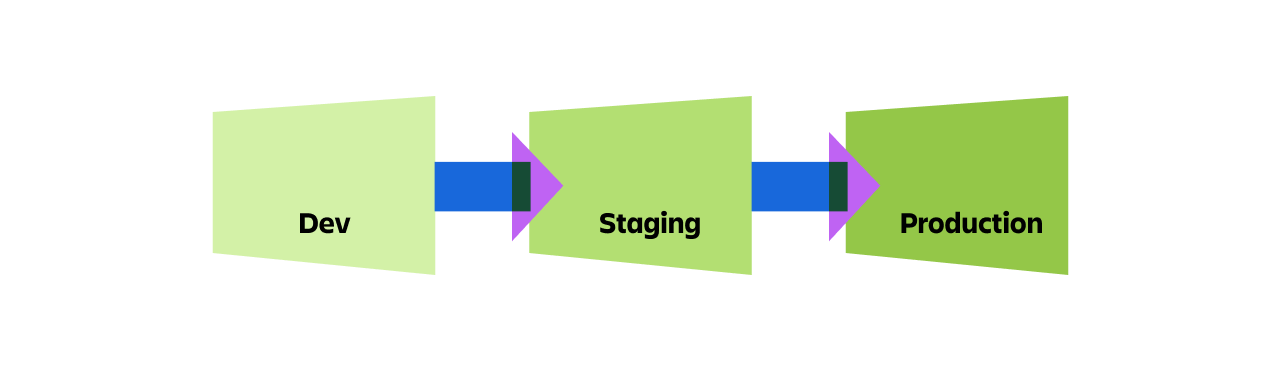
Each environment is isolated from the others, which means you can test changes in development without affecting production users. This structure helps prevent unintended disruptions and keeps your app lifecycle manageable and safe.
If you want more flexibility than the default ones, you can create and manage custom environments with the Forge environments commands.
Deploy your first app
Now that you have built your first app locally, it is time to deploy it to the Atlassian Cloud:
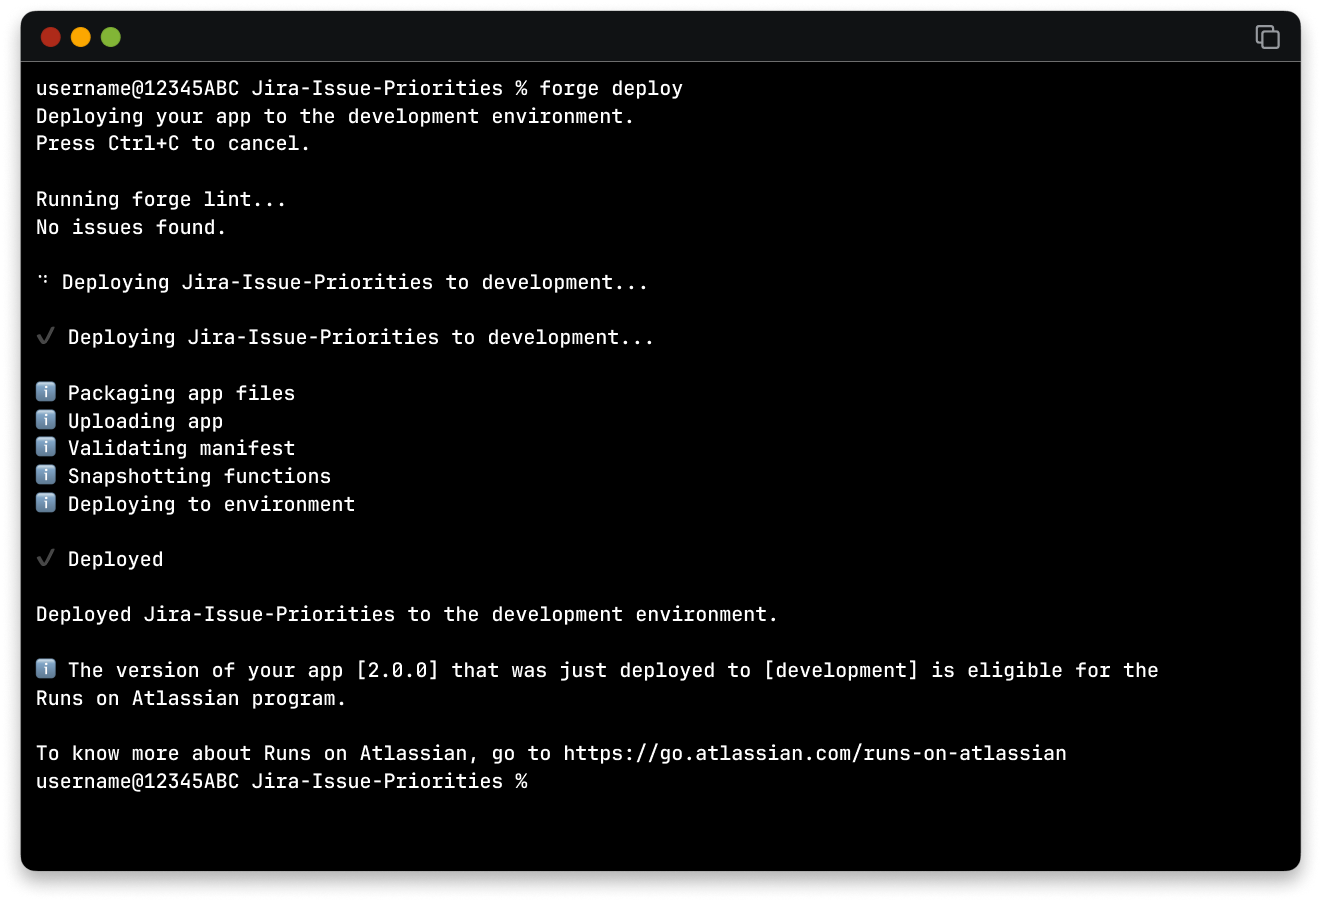
To do this, run the Forge deploy command from the CLI.
When you run Forge deploy, a few things happen.
👇Click each tab to learn about this process.
Your app code is bundled.
You’ll see output confirming a successful deployment, including which environment was targeted.
👇This is Forge deploy uploading the app.
Get your app onto an Atlassian site
After deploying your app and before you can see your Forge app in action, you need to install it into your Atlassian site. Think of installation as connecting your deployed code to the live product instance.
To install your new app:
- Use the command Forge install from the CLI. When you run the Forge install command, Forge will prompt you with a few questions about your site:
- Select a context: You’ll be asked to choose a product for which your app is built. For our Jira app, select Jira.
- Enter the site URL: Enter your developer site address, for example: woozleco.atlassian.com.
- Do you want to continue?: Select Yes to install the app on the selected site.
👇This is Forge install integrating the code to with a site.
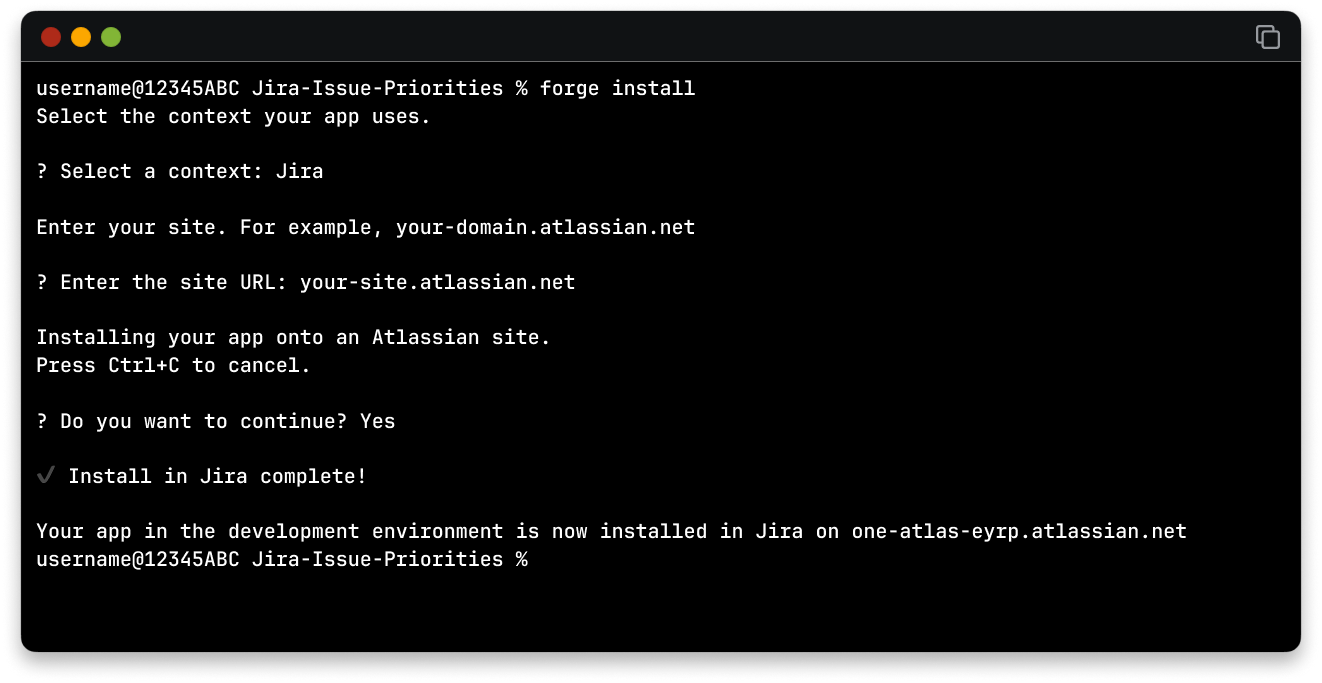
Once installed, Forge securely links your app to that product instance. You can now interact with it in the UI, for example, a panel in a Jira work item, or a macro in Confluence.
If you change your app's manifest.yml file (for example, to add a new module or permission), you'll need to reinstall the app for those changes to take effect.
Access your app
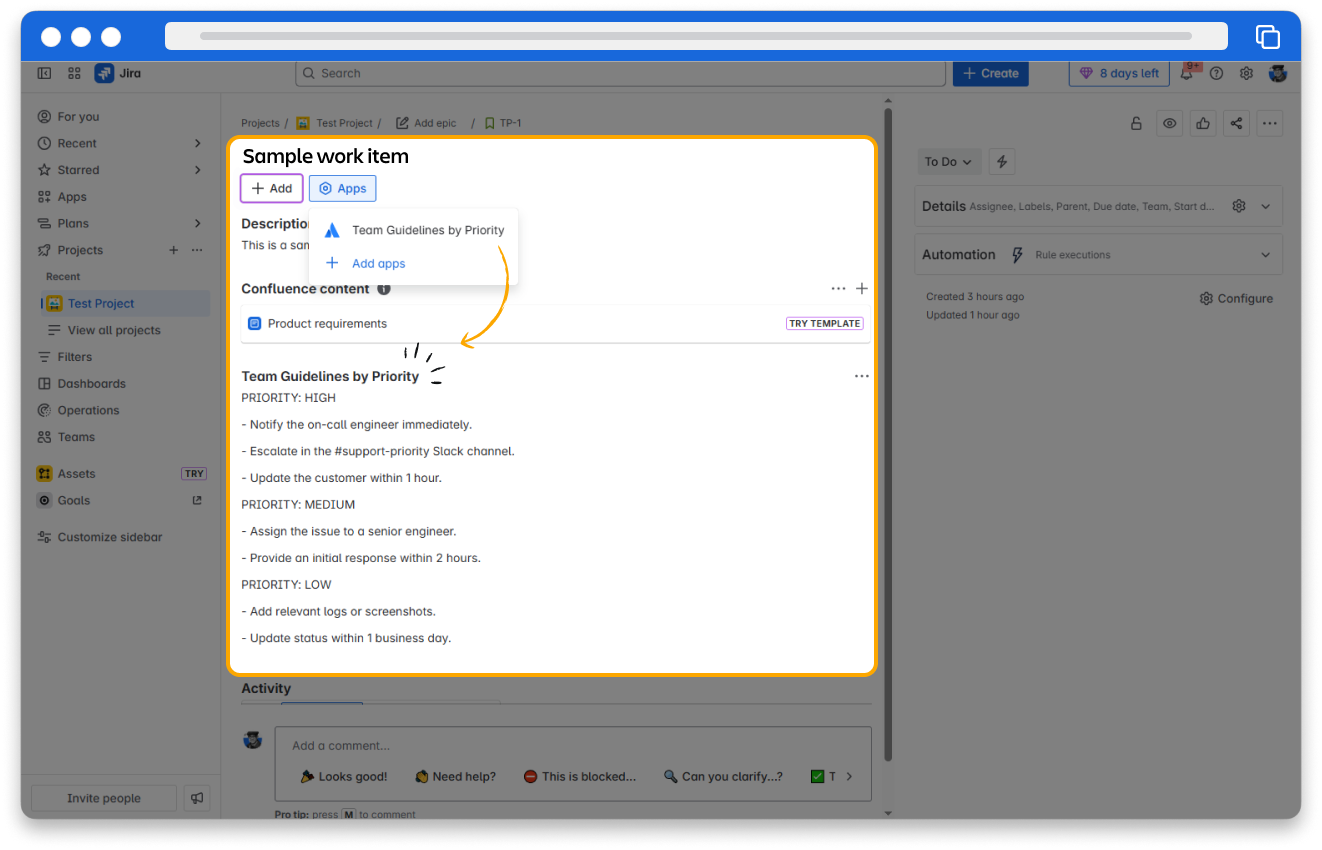
Once you’ve built, deployed, and installed your Forge app, the next step is to see it in action inside Jira.
Forge apps will appear in the Apps dropdown within the Jira work item. The module's name in your manifest.yml file (Team Guidelines by Priority) will be the label users see.
👇The app is launched from the Apps dropdown and appears as a work item panel.
Update an installed app
You installed your Forge app, but then you made some code tweaks to it. Maybe you changed some text or updated a function. You’ve redeployed the app to development using Forge deploy, but you don’t see those changes live on your site yet.
To reflect those updates in your Atlassian site, you can run the command:
Forge install --upgrade
This command updates the existing installation with the latest deployed code. It saves you from having to uninstall and reinstall the app manually and is especially useful during iterative development.
How was this lesson?
next lesson
Set up your local Forge development environment
- Create a free developer site
- Set up your developer environment
- Install the Forge Command Line Interface (CLI)
- Log in to Forge CLI with your Atlassian API token
- Download a code editor