
Extension for Jira Service Management has emerged as a powerful tool for organizations seeking to optimize their service desk operations. Its robust features and capabilities address the diverse needs of businesses.
That being said, let's address the most frequently asked questions about the Extension, including the Data Center version specifics and features.
Possible configurations of combined features: dynamic forms and bundled fields (DC/Server)
The Extension for Jira Service Management provides customizable configurations, combining dynamic forms and bundled fields. Dynamic forms enable the creation of adaptive and intuitive forms that display or hide fields based on user selections. Bundled fields allow you to group related fields for improved organization.
Configuring dynamic forms with bundled fields offers your service desk users a comprehensive and user-friendly experience.
Dynamic Forms – related field | Bundled fields -sub-fields | Customers – Create form in CP | Agents – Edit in Jira |
Optional | Optional | Can submit a request without providing any value | Can edit a request without providing any value |
Required | Required | Have to provide values for each sub-field | Have to provide values for each sub-field |
Optional | Required | Have to provide values only for required sub-fields | Have to provide values only for required sub-fields |
Required | Optional | Have to provide values for each sub-field | Can edit a request without providing any value |
Related Field in Dynamic Forms
The column refers to the setup of dynamic forms on both global and project levels. It comprises interconnected and custom fields that can be specified as mandatory or discretionary.
Sub-Fields in Bundled Fields
It pertains to the setup of bundled fields on the global level. The column encompasses sub-fields that can be designated as mandatory or voluntary.
Extension vs. Dynamic Forms - what is the difference?
Various features are available within the Extension for Jira Service Management, with dynamic forms emphasizing form customization and flexibility. These intelligent forms adapt to user inputs, streamlining the form-filling process for improved user experience. Additionally, the Extension offers a range of other capabilities, including:
- advanced reporting
- automation
- integration options and more.
| | | |
|---|
Dedicated to | Jira Service Management | Jira Software |
Available on Cloud | | |
Dedicated fields | | Dynamic Cascading Select Dynamic Checkboxes Dynamic Multiselect Dynamic Radio Buttons Dynamic Select
|
Using Jira Fields and standard custom fields as master fields | Supported Jira fields: Supported custom field types: | |
Bundled Fields | | |
Dynamic Tabs | | |
Dynamic Forms Visualisation | | |
Available project configuration | | |
How to avoid problems with displaying Bundled Fields in Jira emails incorrectly?
Following best practices is crucial to display bundled fields in Jira emails correctly. Firstly, confirm that the bundled fields are accurately configured and linked with the appropriate email notification templates.
Next, verify that the email template supports the required formatting and styling for bundled fields. Consider testing the email notifications in a staging or test environment before deploying them to production, allowing you to identify and resolve potential issues.
When incorporating bundled fields in an email, they can be treated as standard custom fields. Nonetheless, the configuration of bundled fields slightly differs from that offered by Jira. To avoid any display-related problems with bundled fields:
- Get Bundled Field custom field ID.
- Edit the velocity template in HTML format
- locate the Velocity template of the desired email type within the designated folder
.../atlassian-jira/WEB-INF/classes/templates/email/html/issuecreated.vm
- insert the provided code snippet in the desired location within the file to display a bundled field
#parse("templates/email/html/includes/fields/customfield.vm")
- access the designated path
.../atlassian-jira/WEB-INF/classes/templates/email/html/includes/fields/
and generate a fresh Velocity file with the name customfield.vm
- include the provided code snippet in the file, making sure to replace the custom field ID in the second line with the appropriate ID for the Bundled Field
#disable_html_escaping()
#set ($customfield = $customFieldManager.getCustomFieldObject("customfield_10000"))
#if($issue.getCustomFieldValue($customfield))
<tr>
<th>#text($customfield.name):</th>
<td class="has-icon">
#set ($componentAccessor = $constantsManager.getClass().forName('com.atlassian.jira.component.ComponentAccessor').newInstance())
#set ($htmlGeneratorClass = $componentAccessor.getComponentClassManager().loadClass("com.deviniti.plugins.bundledfields.HtmlGenerator"))
#set ($bundledFieldsServiceClass = $componentAccessor.getComponentClassManager().loadClass("com.deviniti.plugins.bundledfields.BundledFieldsService"))
#set ($contextId = $customfield.getRelevantConfig($issue).getId())
#set ($htmlGenerator = $componentAccessor.getOSGiComponentInstanceOfType($htmlGeneratorClass))
#set ($bundledFieldsConfig = $componentAccessor.getOSGiComponentInstanceOfType($bundledFieldsServiceClass).getConfiguration($contextId, $customfield.getIdAsLong()))
$htmlGenerator.toHtml($issue.getCustomFieldValue($customfield), $bundledFieldsConfig)
</td>
</tr>
#end
Enter the ID of the desired Bundled Field as the parameter for the getCustomFieldObject. The provided ID for the Bundled Field is given as an example.
- After saving the files, restart your Jira instance once the file configuration is complete.
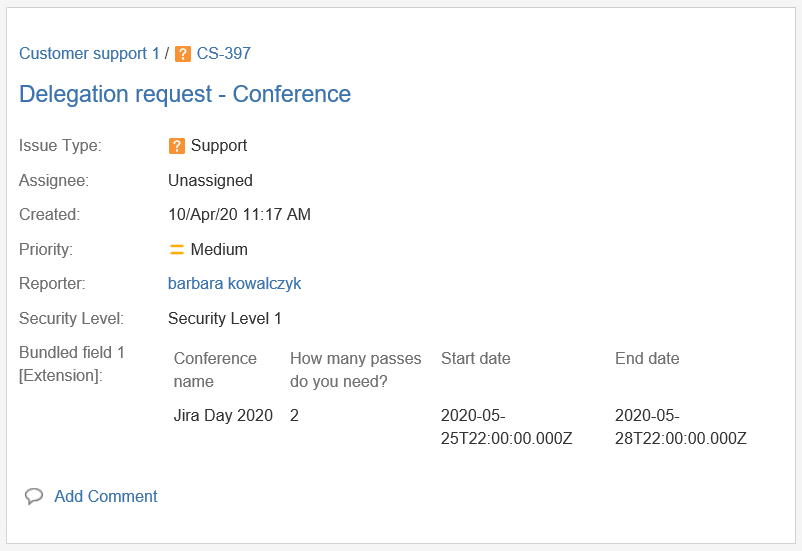
Important points to consider:
- The given workaround is specifically designed for Jira notifications and does not apply to Service Management notification emails.
- The workaround is not suitable for Extension versions 6.10 and above; it is only applicable to earlier versions of the plugin.
I can't enable the app after an update
If the update was completed without problems, attempt to restart your Jira instance. Should the problem persist, contacting the app provider's support team for further guidance is advisable.
For instance, you might encounter an error in your server log, such as when upgrading Jira, installing an add-on, or re-enabling it.
[c.a.p.osgi.factory.OsgiPlugin] Unable to start the plugin container for plugin 'com.intenso.jira.plugins.jsd-extender' org.springframework.beans.factory.BeanDefinitionStoreException: Unexpected exception parsing XML document from URL [bundle://278.0:0/META-INF/spring/plugin-context.xml]; nested exception is java.lang.IllegalStateException: The bundle is uninstalled
[c.a.p.osgi.factory.OsgiPluginInstalledHelper]Cannot determine required plugins, cannot resolve bundle 'com.intenso.jira.plugins.jsd-extender'
[c.a.p.osgi.factory.OsgiPlugin] Detected an error (BundleException) enabling the plugin 'com.intenso.jira.plugins.jsd-extender' : Unresolved constraint in bundle com.intenso.jira.plugins.jsd-extender [194]: Unable to resolve 194.0: missing requirement [194.0] osgi.wiring.package; (osgi.wiring.package=com.atlassian.servicedesk.api.organization)
Commonly, the issue is linked to a corrupted plugin cache, which can occur while upgrading Jira and apps.
To resolve this problem, follow these steps:
- Shut down JIRA
- Delete the following hidden plugin cache directories:
JIRA_HOME/plugins/.bundled-plugins
JIRA_HOME/plugins/.osgi-plugins
- Restart JIRA (the mentioned directories will be recreated during the reboot along with the new plugin cache).
Displaying Bundled Fields in email notifications
To display Bundled Fields in email notifications, you need to include them in the email notification template. Moreover, verify that the email template supports the formatting and styling of the bundled fields to maintain a consistent and easily readable display.
- Navigate to Jira Settings → Issues → Field Configurations
- Select the Field Configuration Scheme you are interested in and click on Configure:
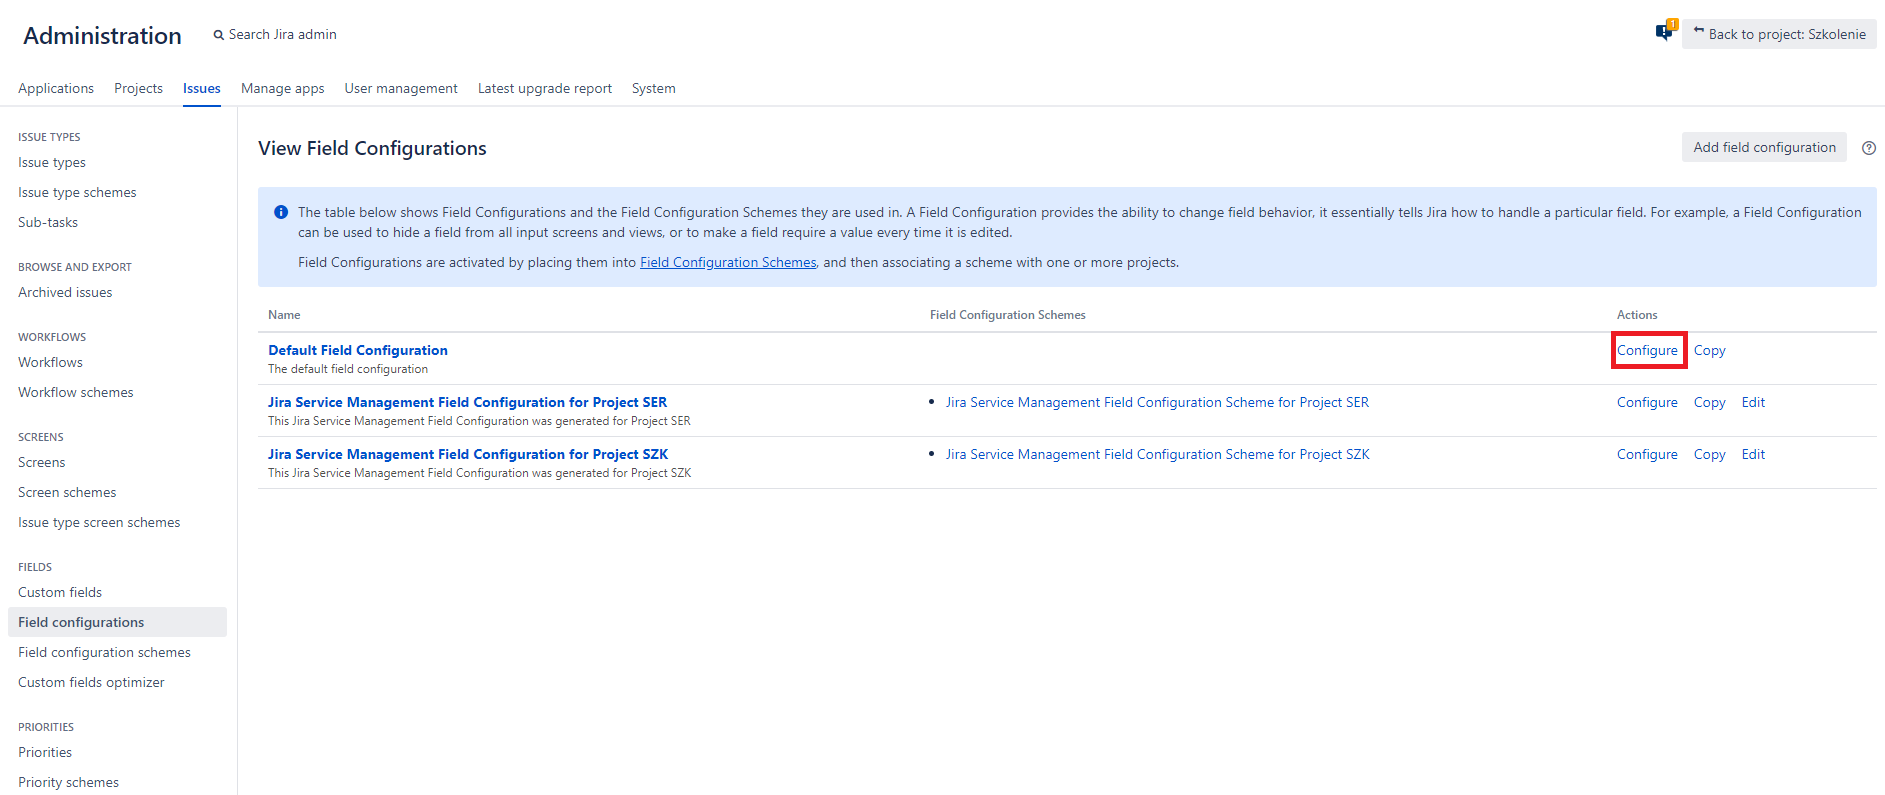
- Choose the Bundled Field you wish to showcase in the email notifications and click on the "renderers" button on the right side.

- Modify the "Default Text Renderer" to the "Bundled Fields Renderer" option, and subsequently, click on the "Update" button
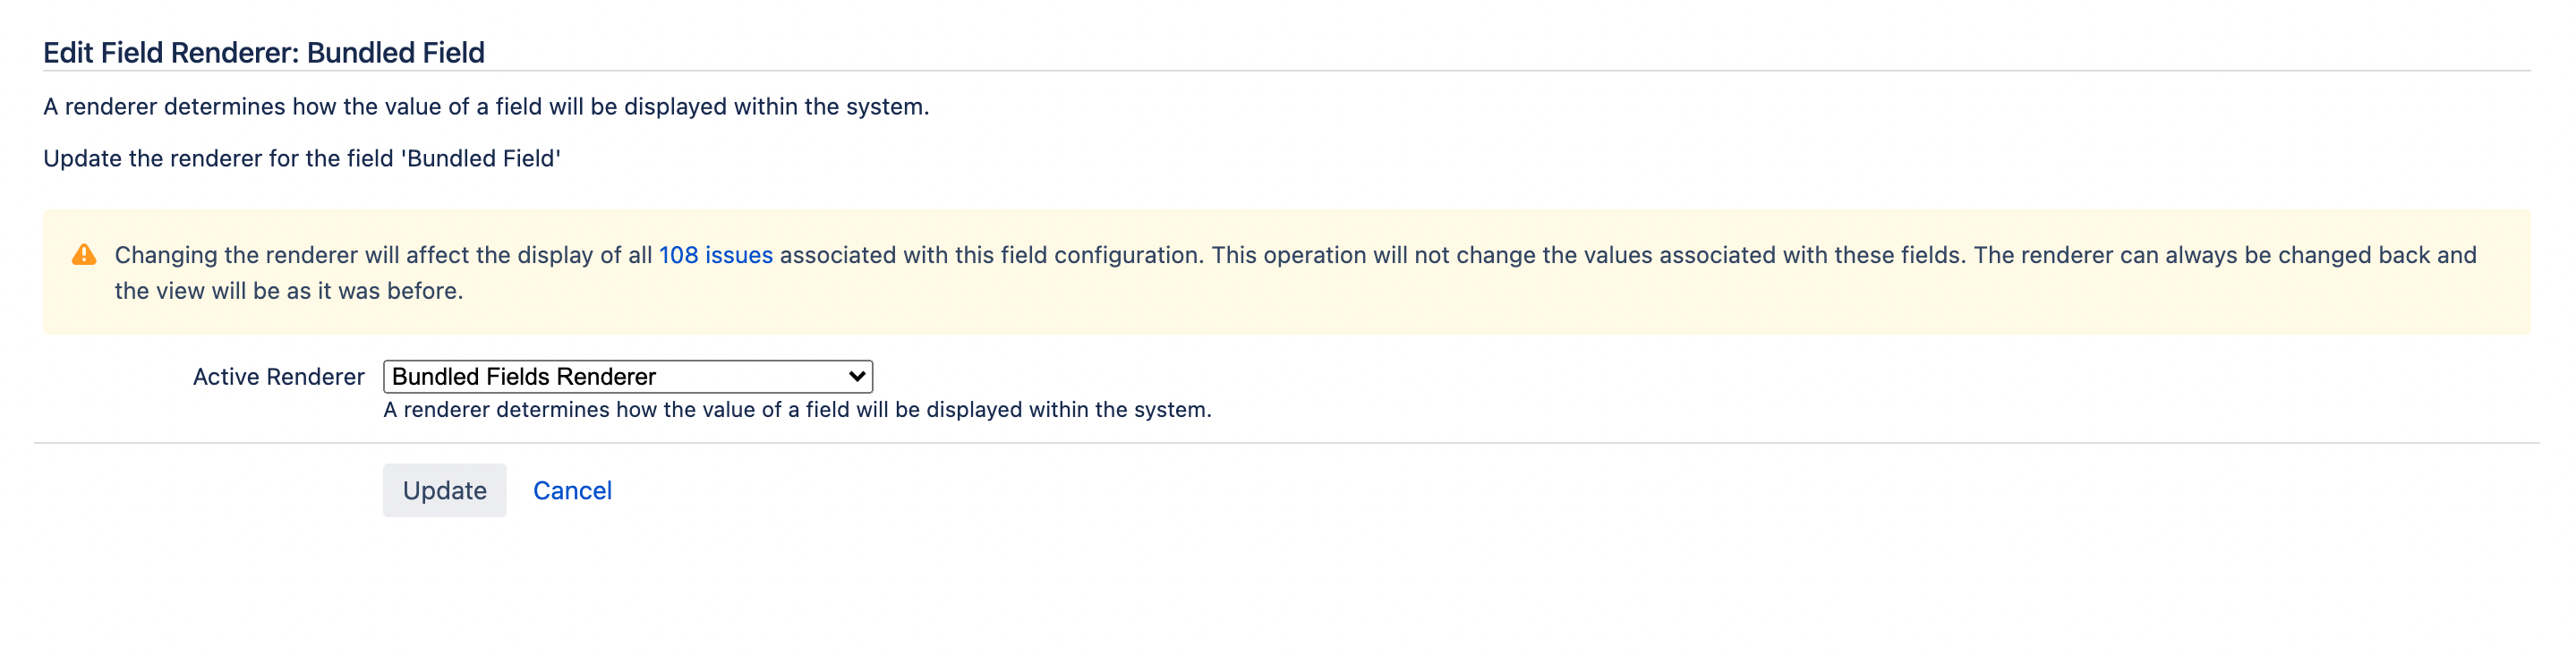
- A prompt requesting confirmation to proceed with the change will appear. Click on the "update" button to confirm your decision.

In the next step, an email notification will accurately present Bundled Fields.
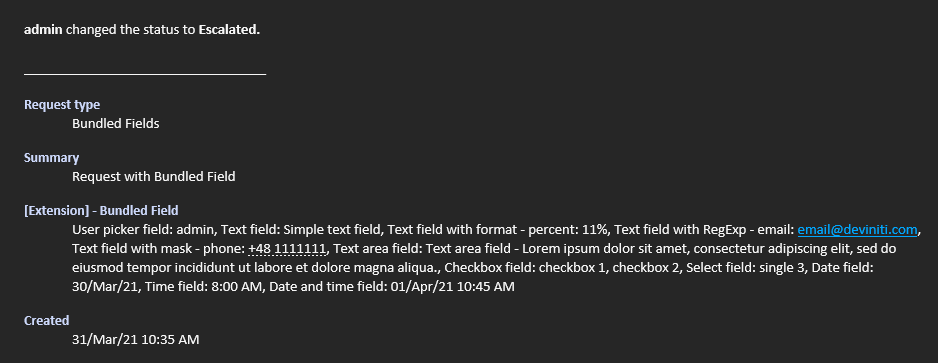
It is essential to remember the necessity of setting up the renderer for every Bundled Field utilized in each project.
How to display Bundled Fields in a Confluence macro?
To display Bundled Fields in email notifications, you need to include them in the email notification template. Moreover, verify that the email template supports the formatting and styling of the bundled fields to maintain a consistent and easily readable display.
- To begin, establish a connection between Jira and Confluence using Application Links.
- Once the connection is established, ensure an existing filter is available in Jira containing the relevant issues, including the bundles. This filter will be used to display the list of issues on a Confluence page.
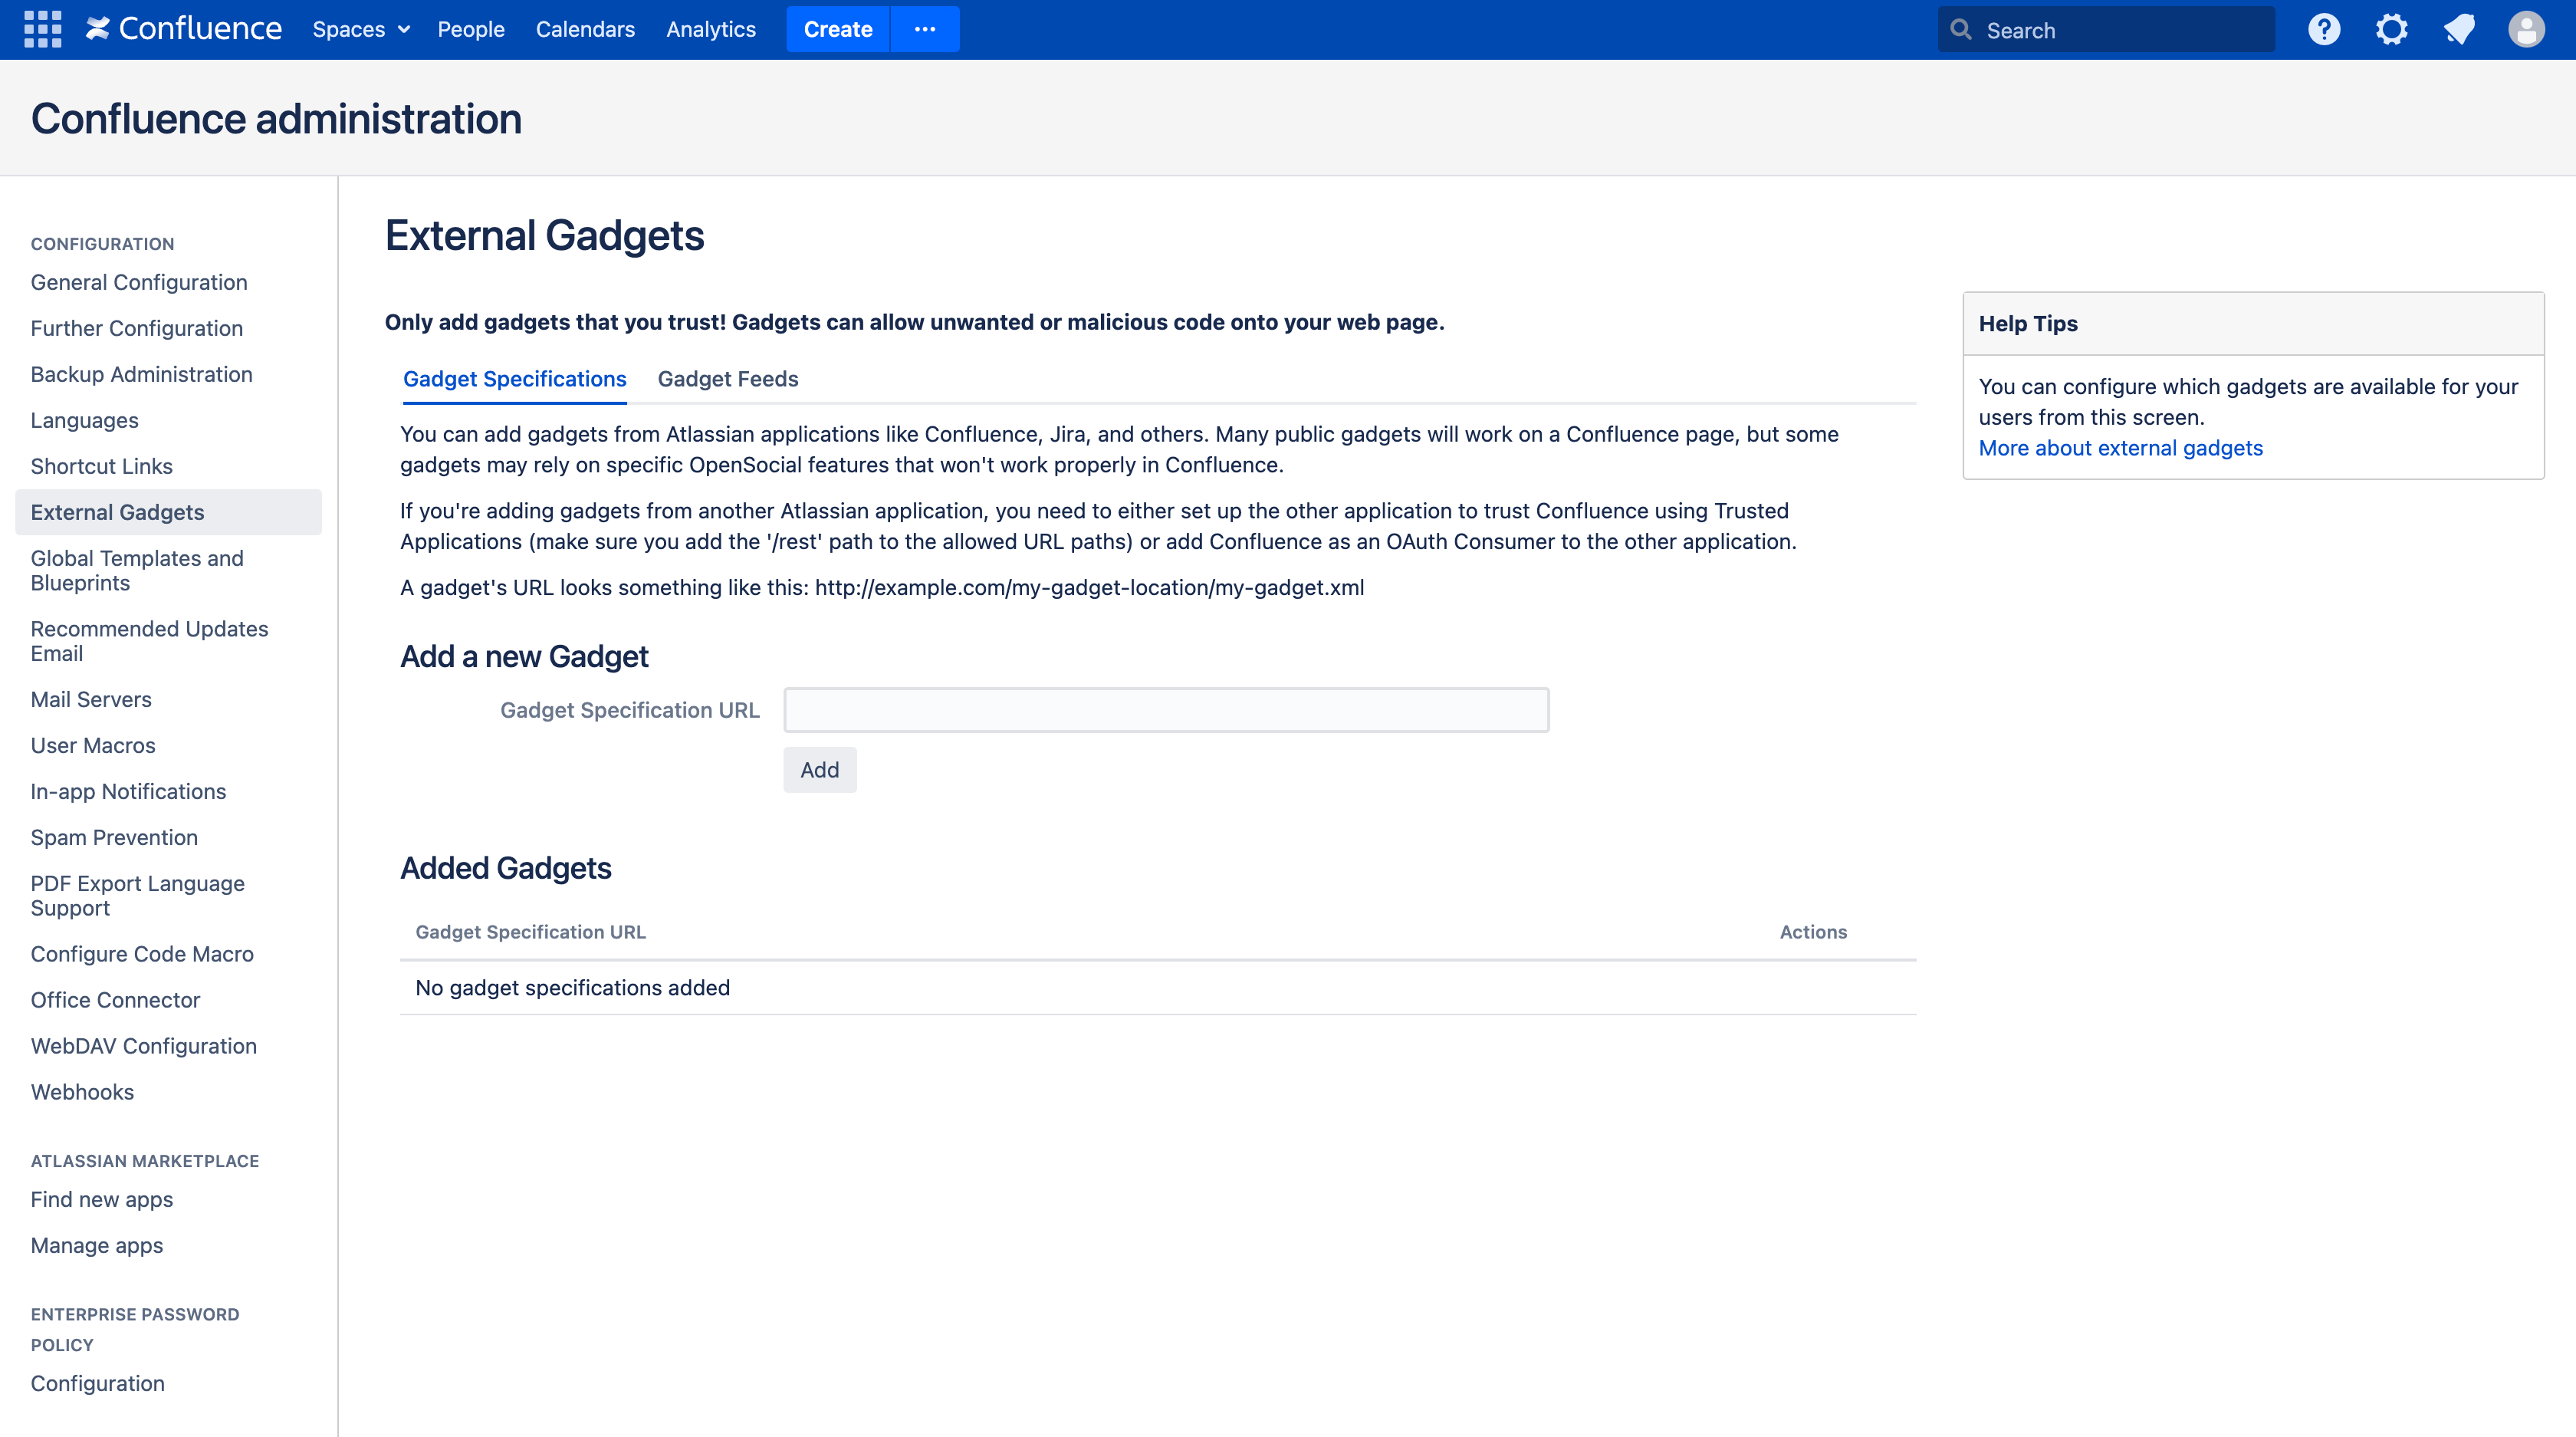
- Following the filter setup, register a new external gadget in Confluence. To accomplish this, access Confluence administration, navigate to General configuration, and locate the External Gadgets section. Within the Gadget Feeds tab, enter the Jira link into the Gadget Feed URL field.
- Once ready, navigate to the desired Confluence space and find the specific page where you wish to display issue data.
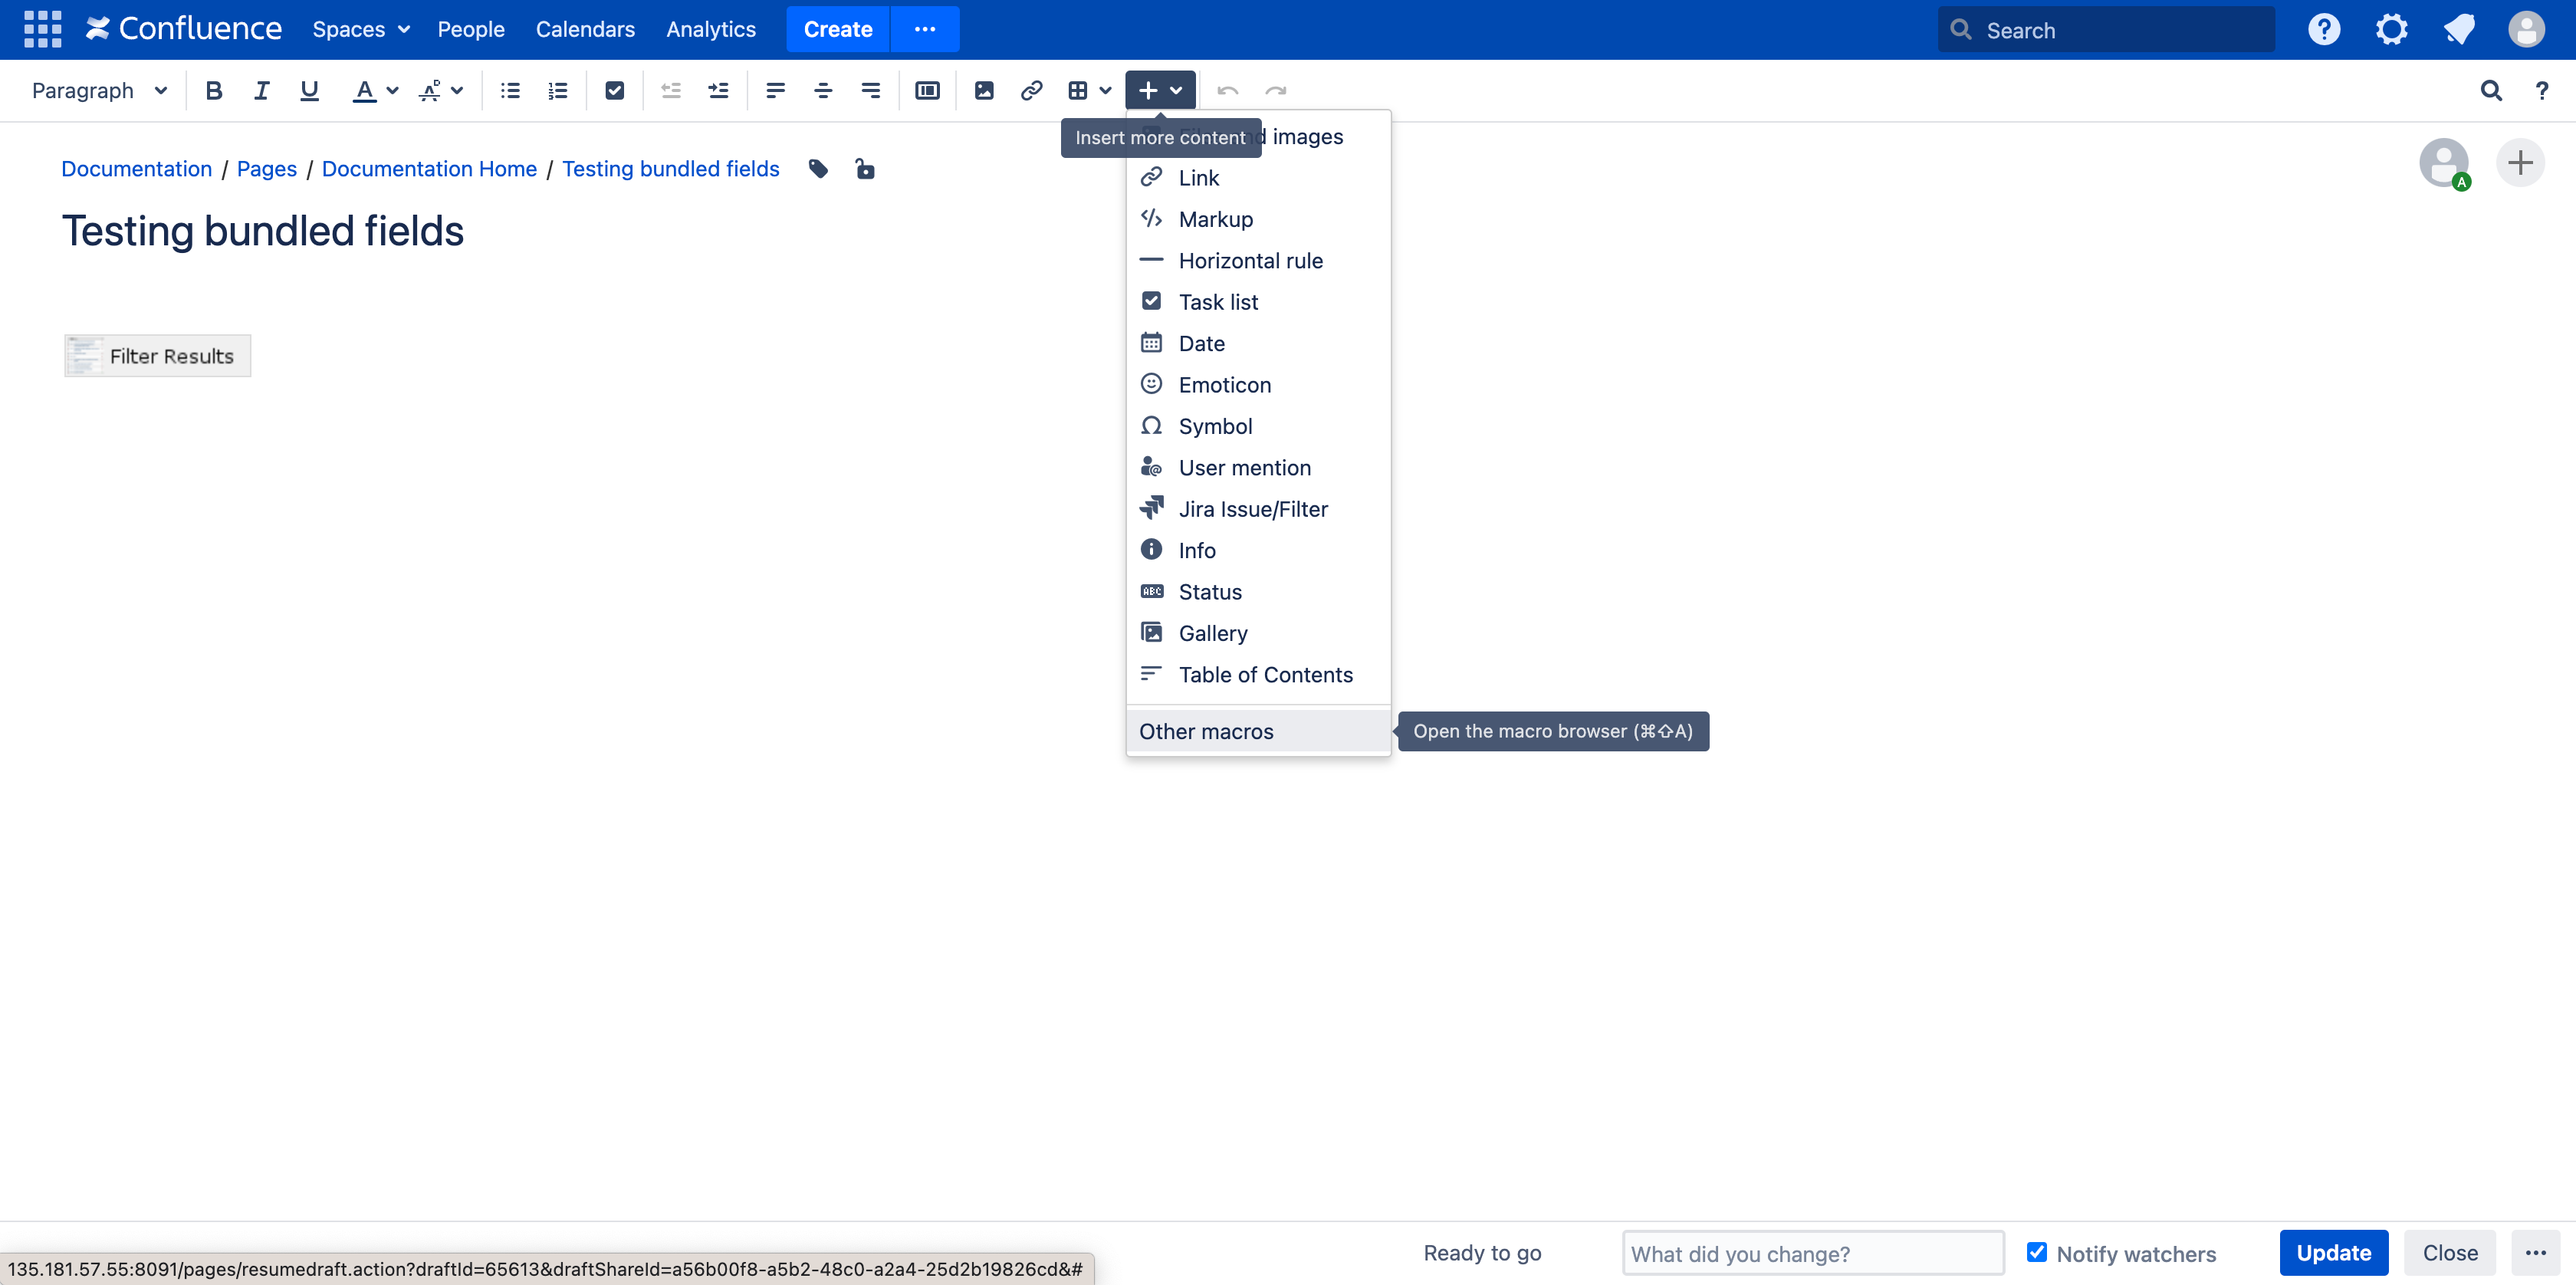
- Click the plus icon to insert a macro, then choose the Other macros option.
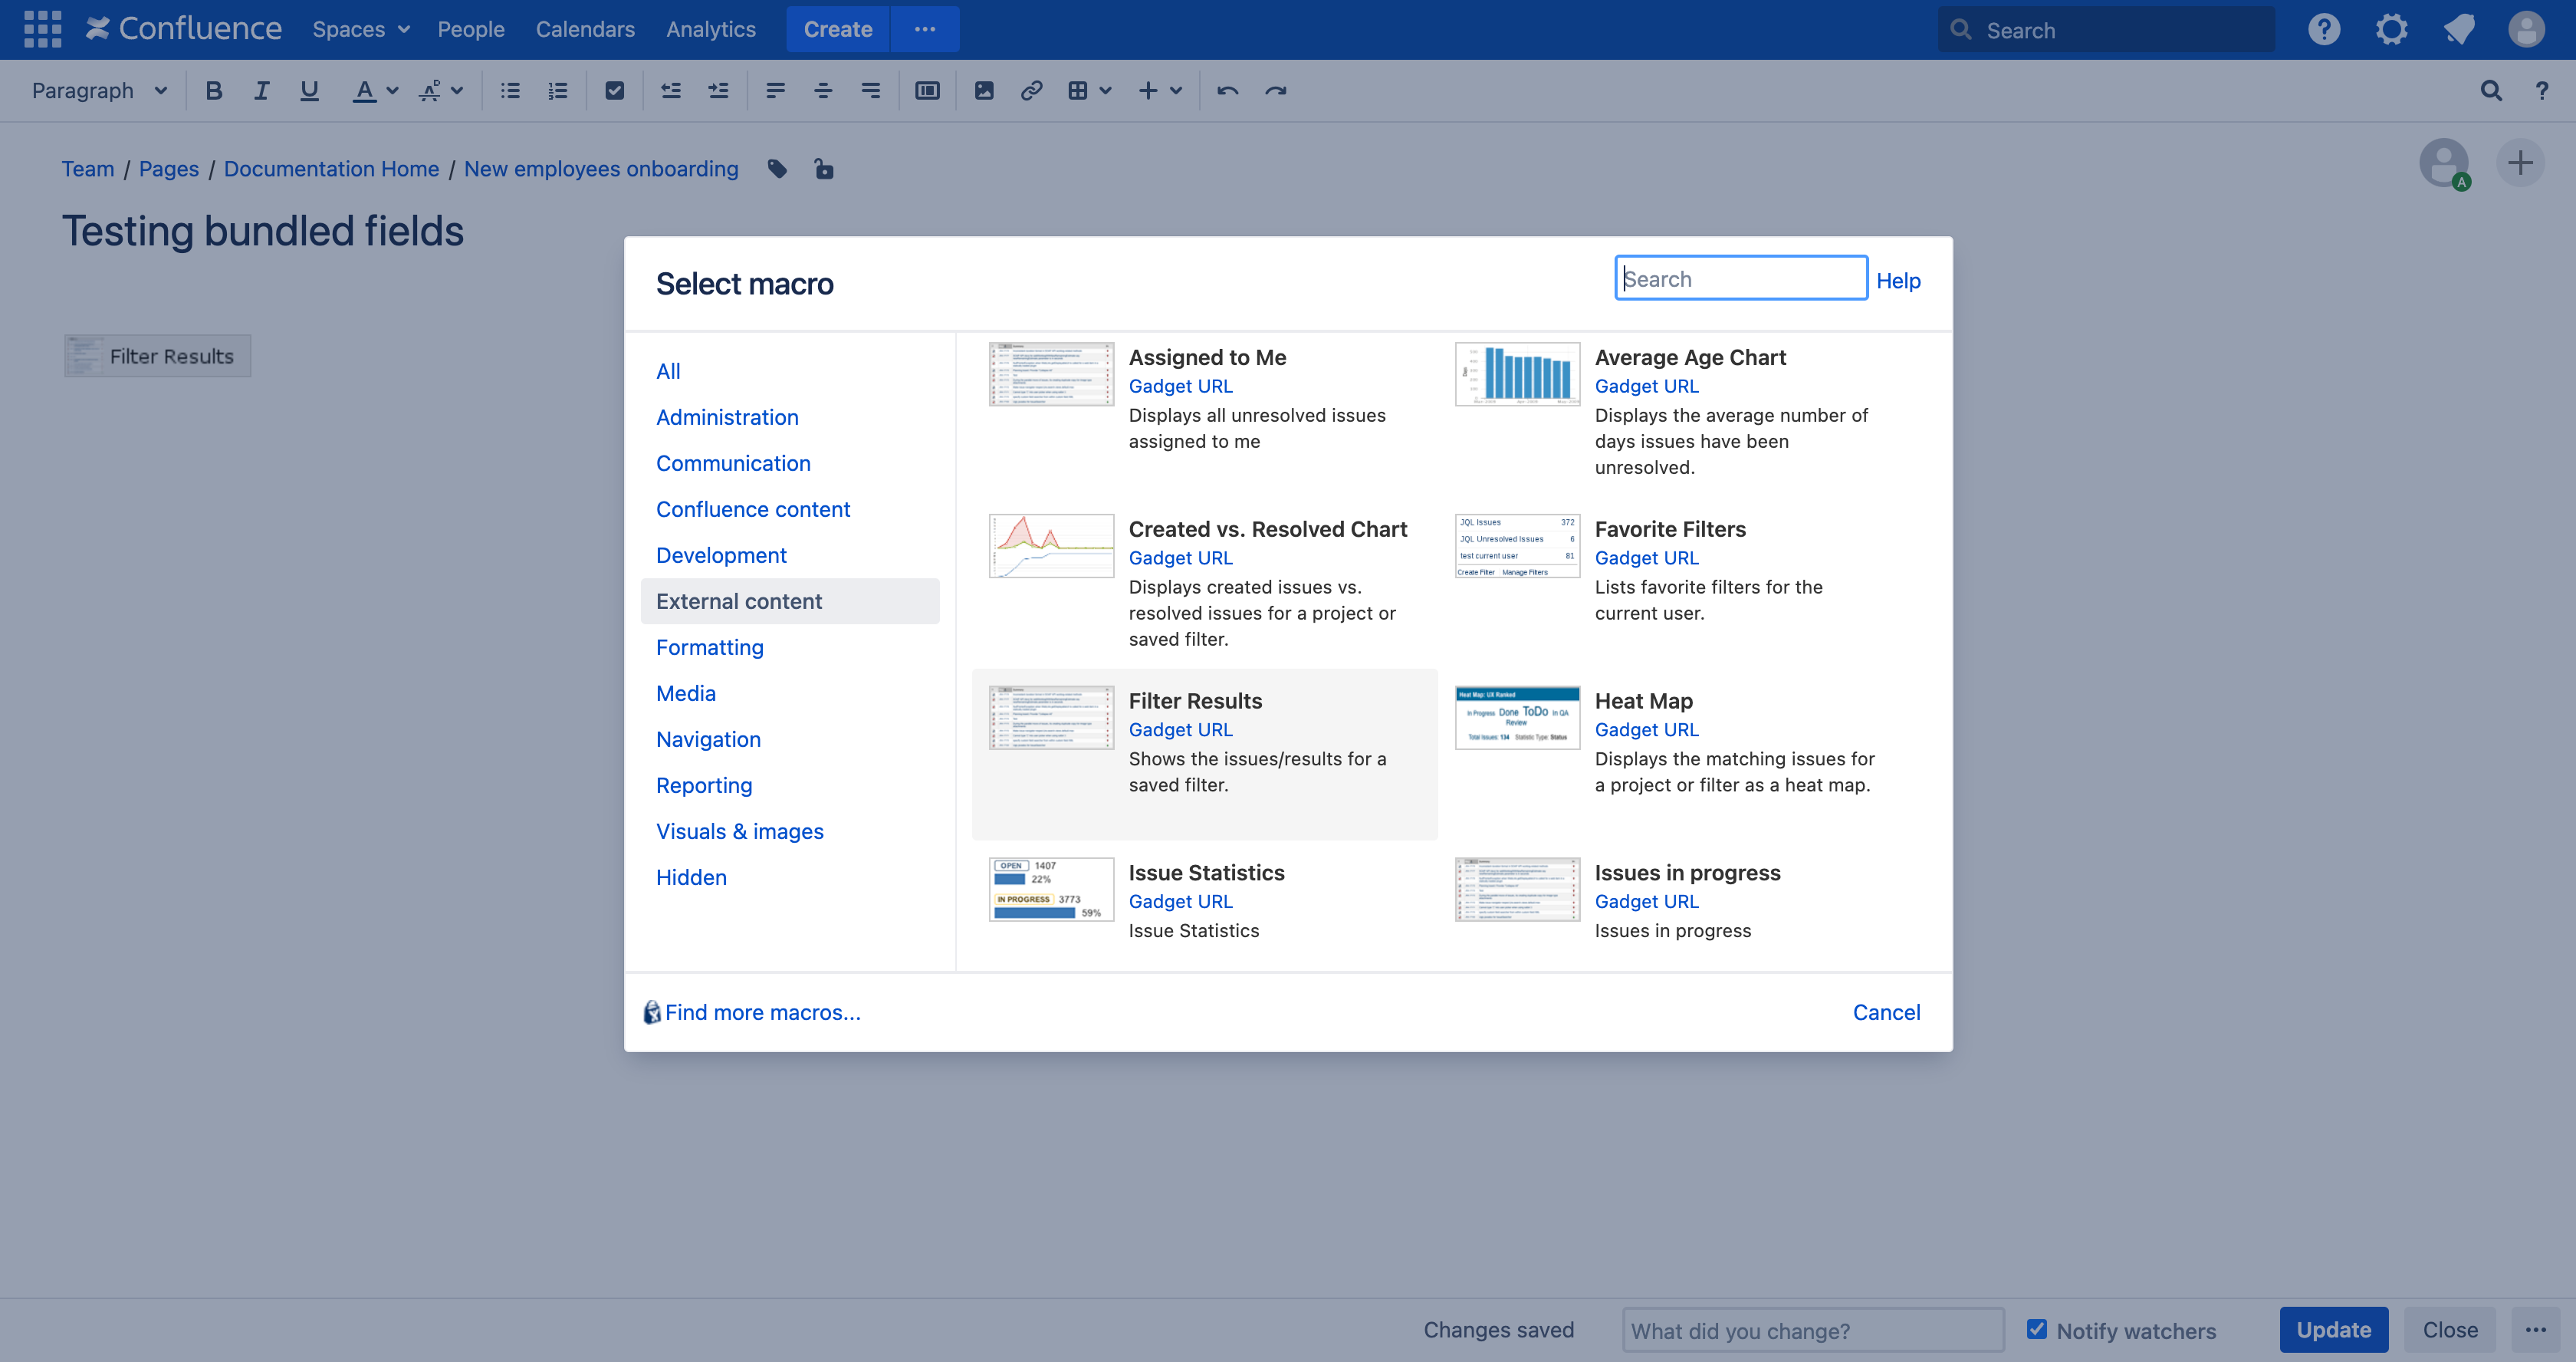
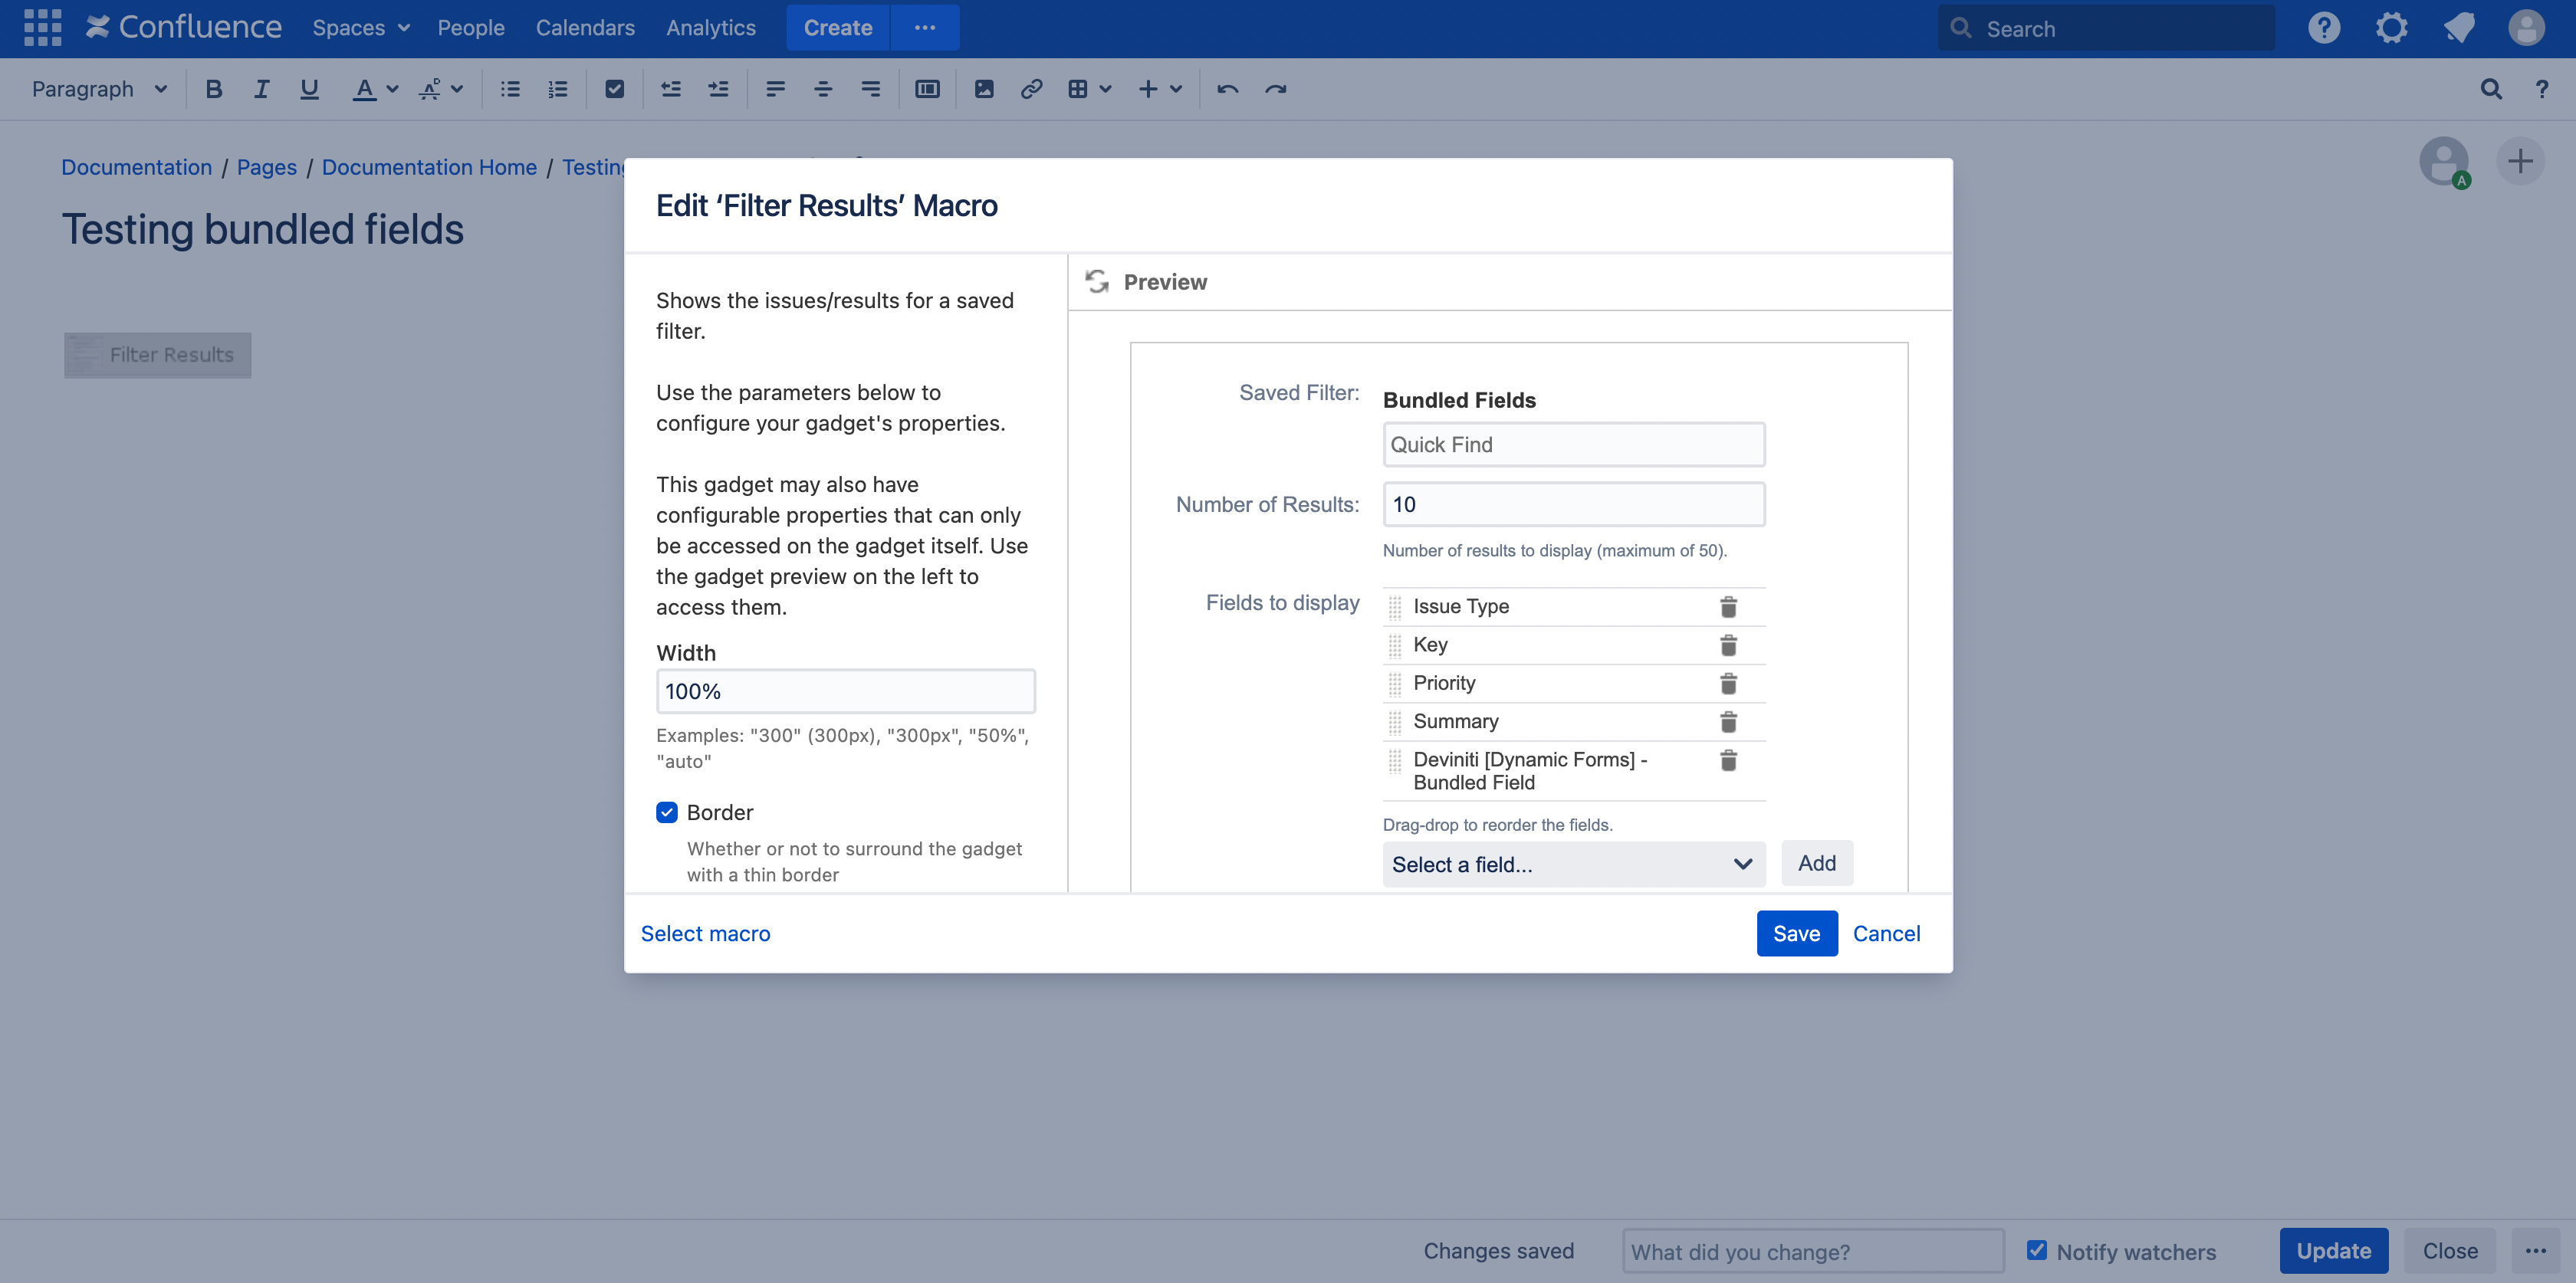
- In the macro settings, go to the External content section and find the Filter Results gadget.
- In the macro configuration, adjust the width to 100% and add the Bundled Fields custom field to the list of displayed fields. After making these changes, save the modifications, and choose 'Add' to insert the macro.
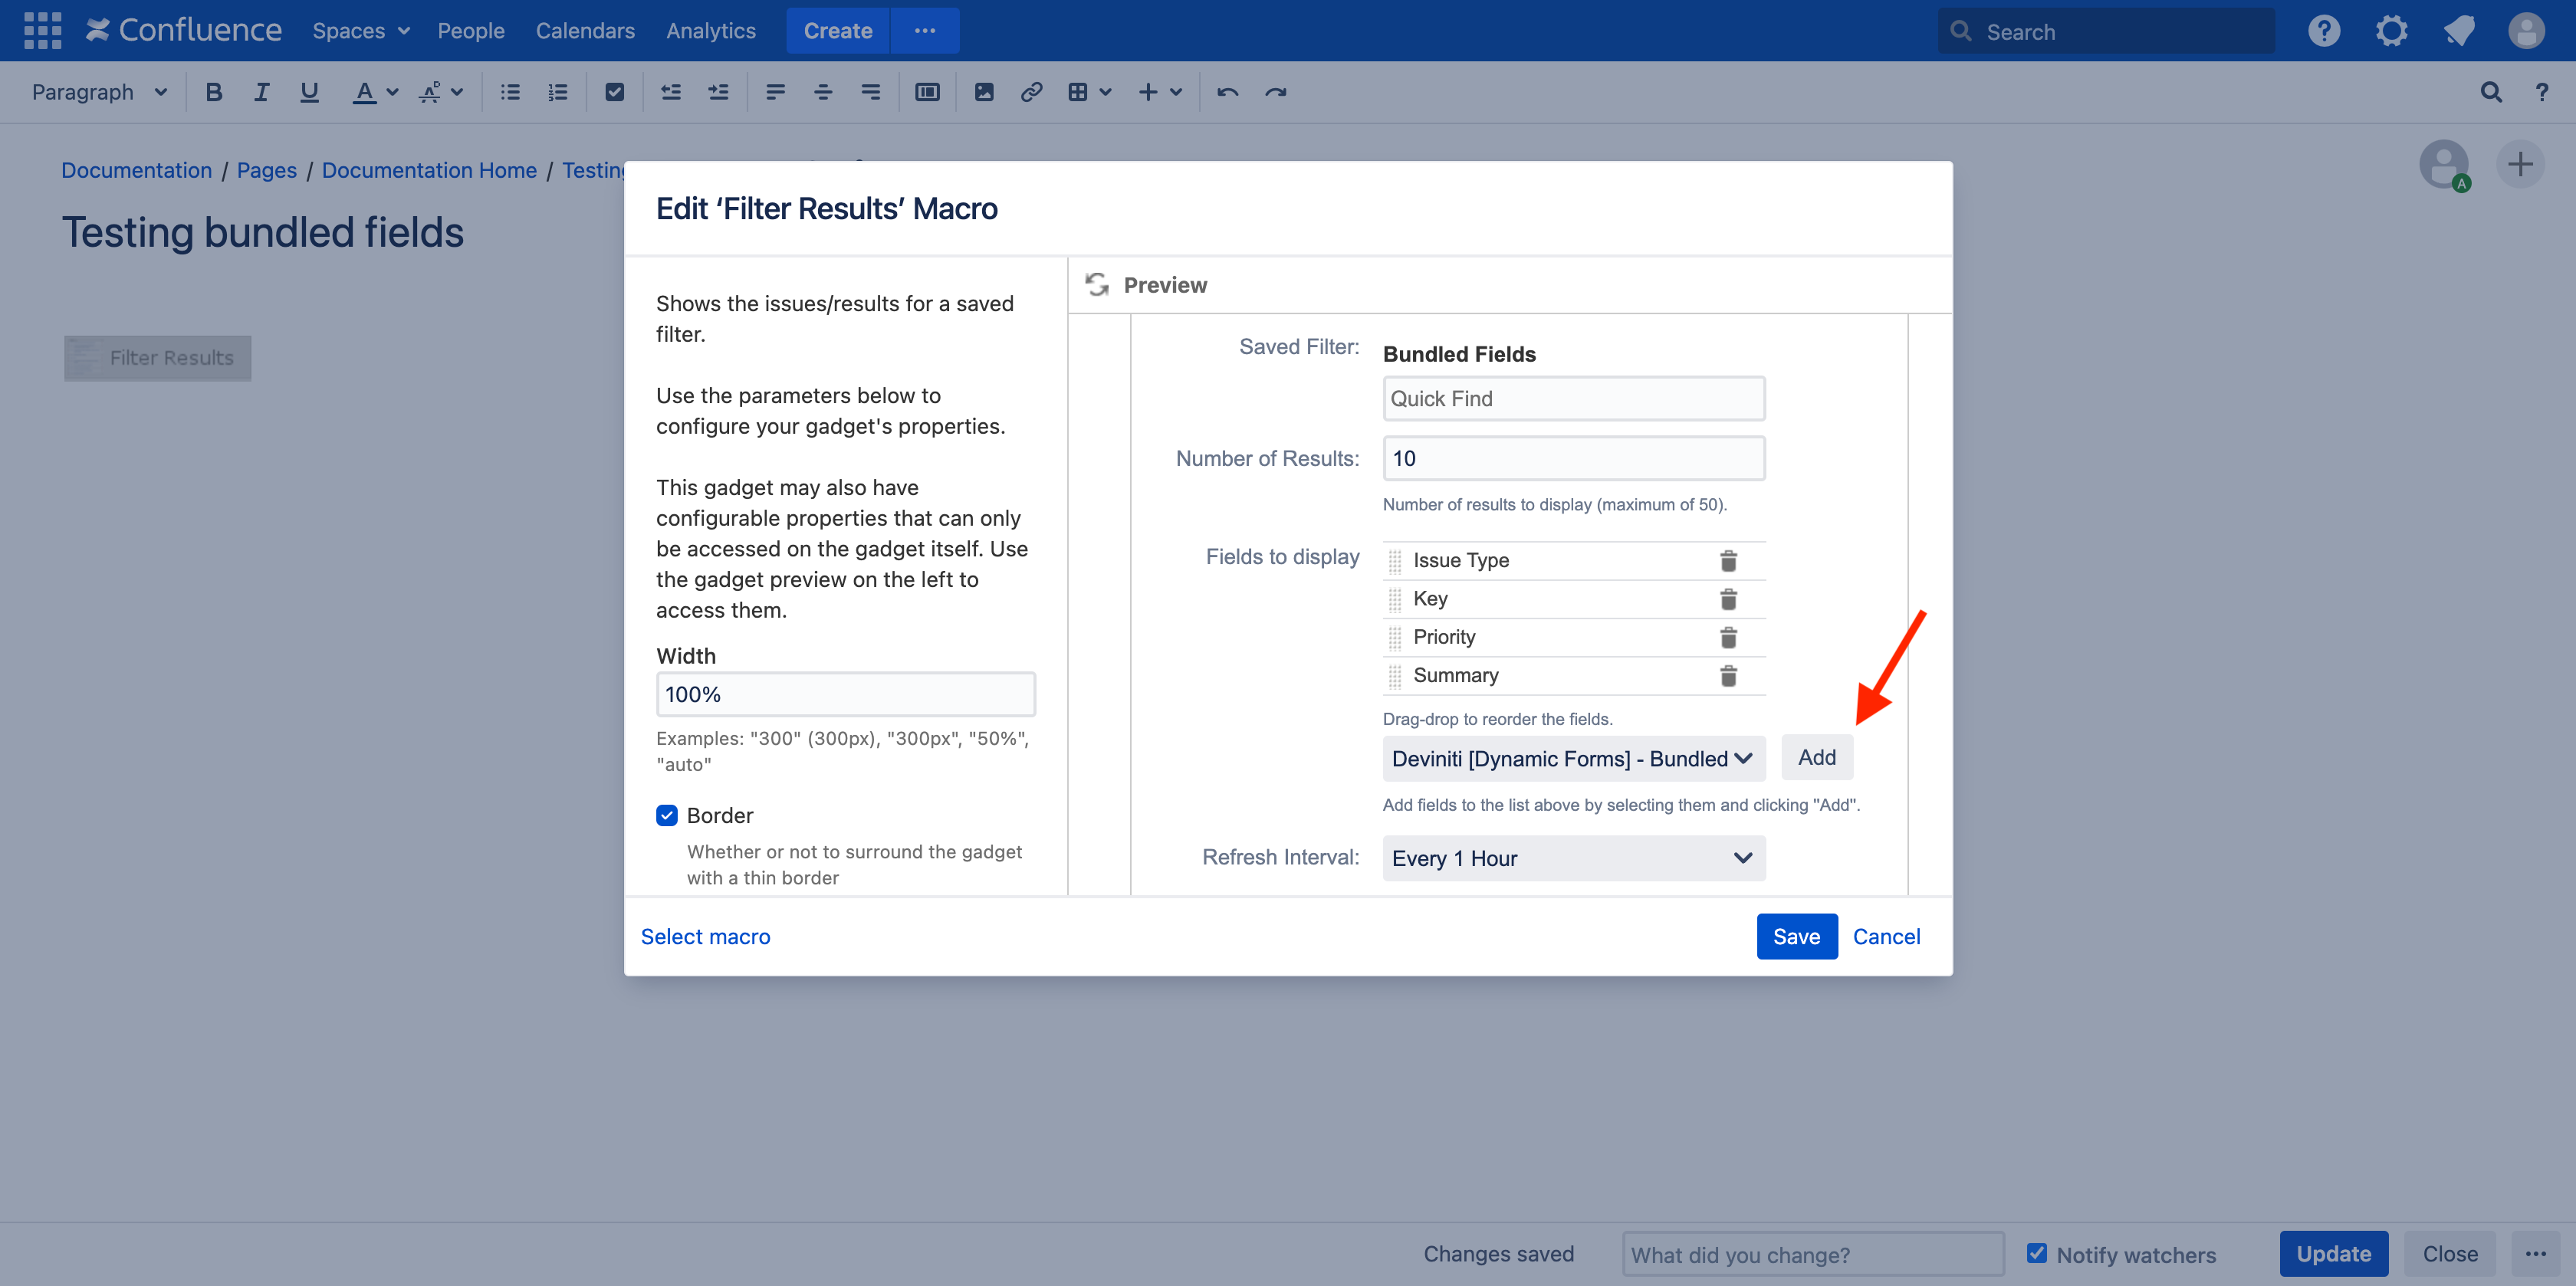
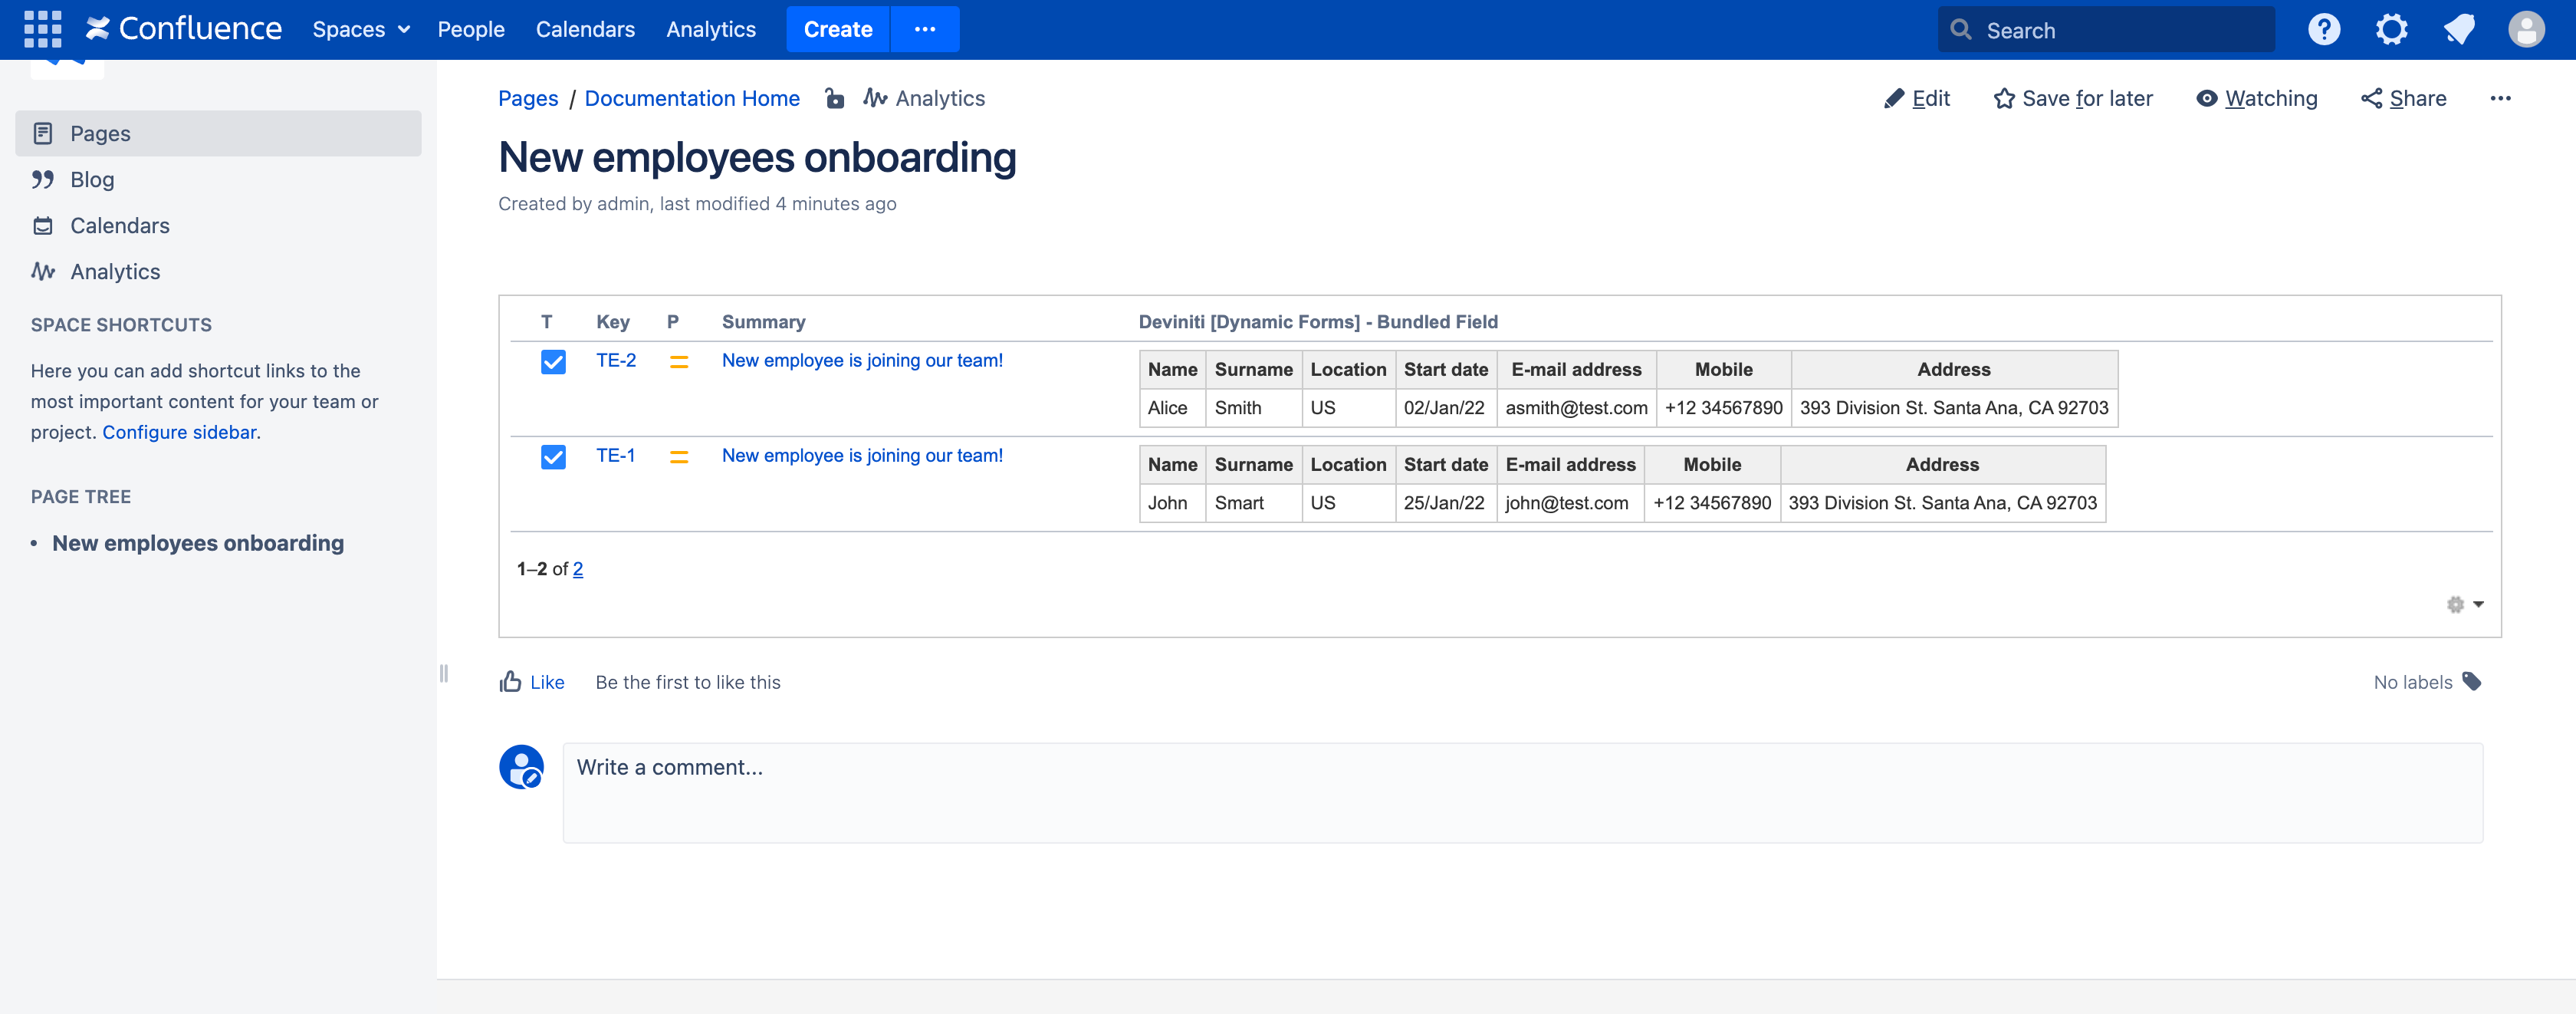
With the described configuration, the Bundled Field will appear in tabular form, showcasing each value in its column.
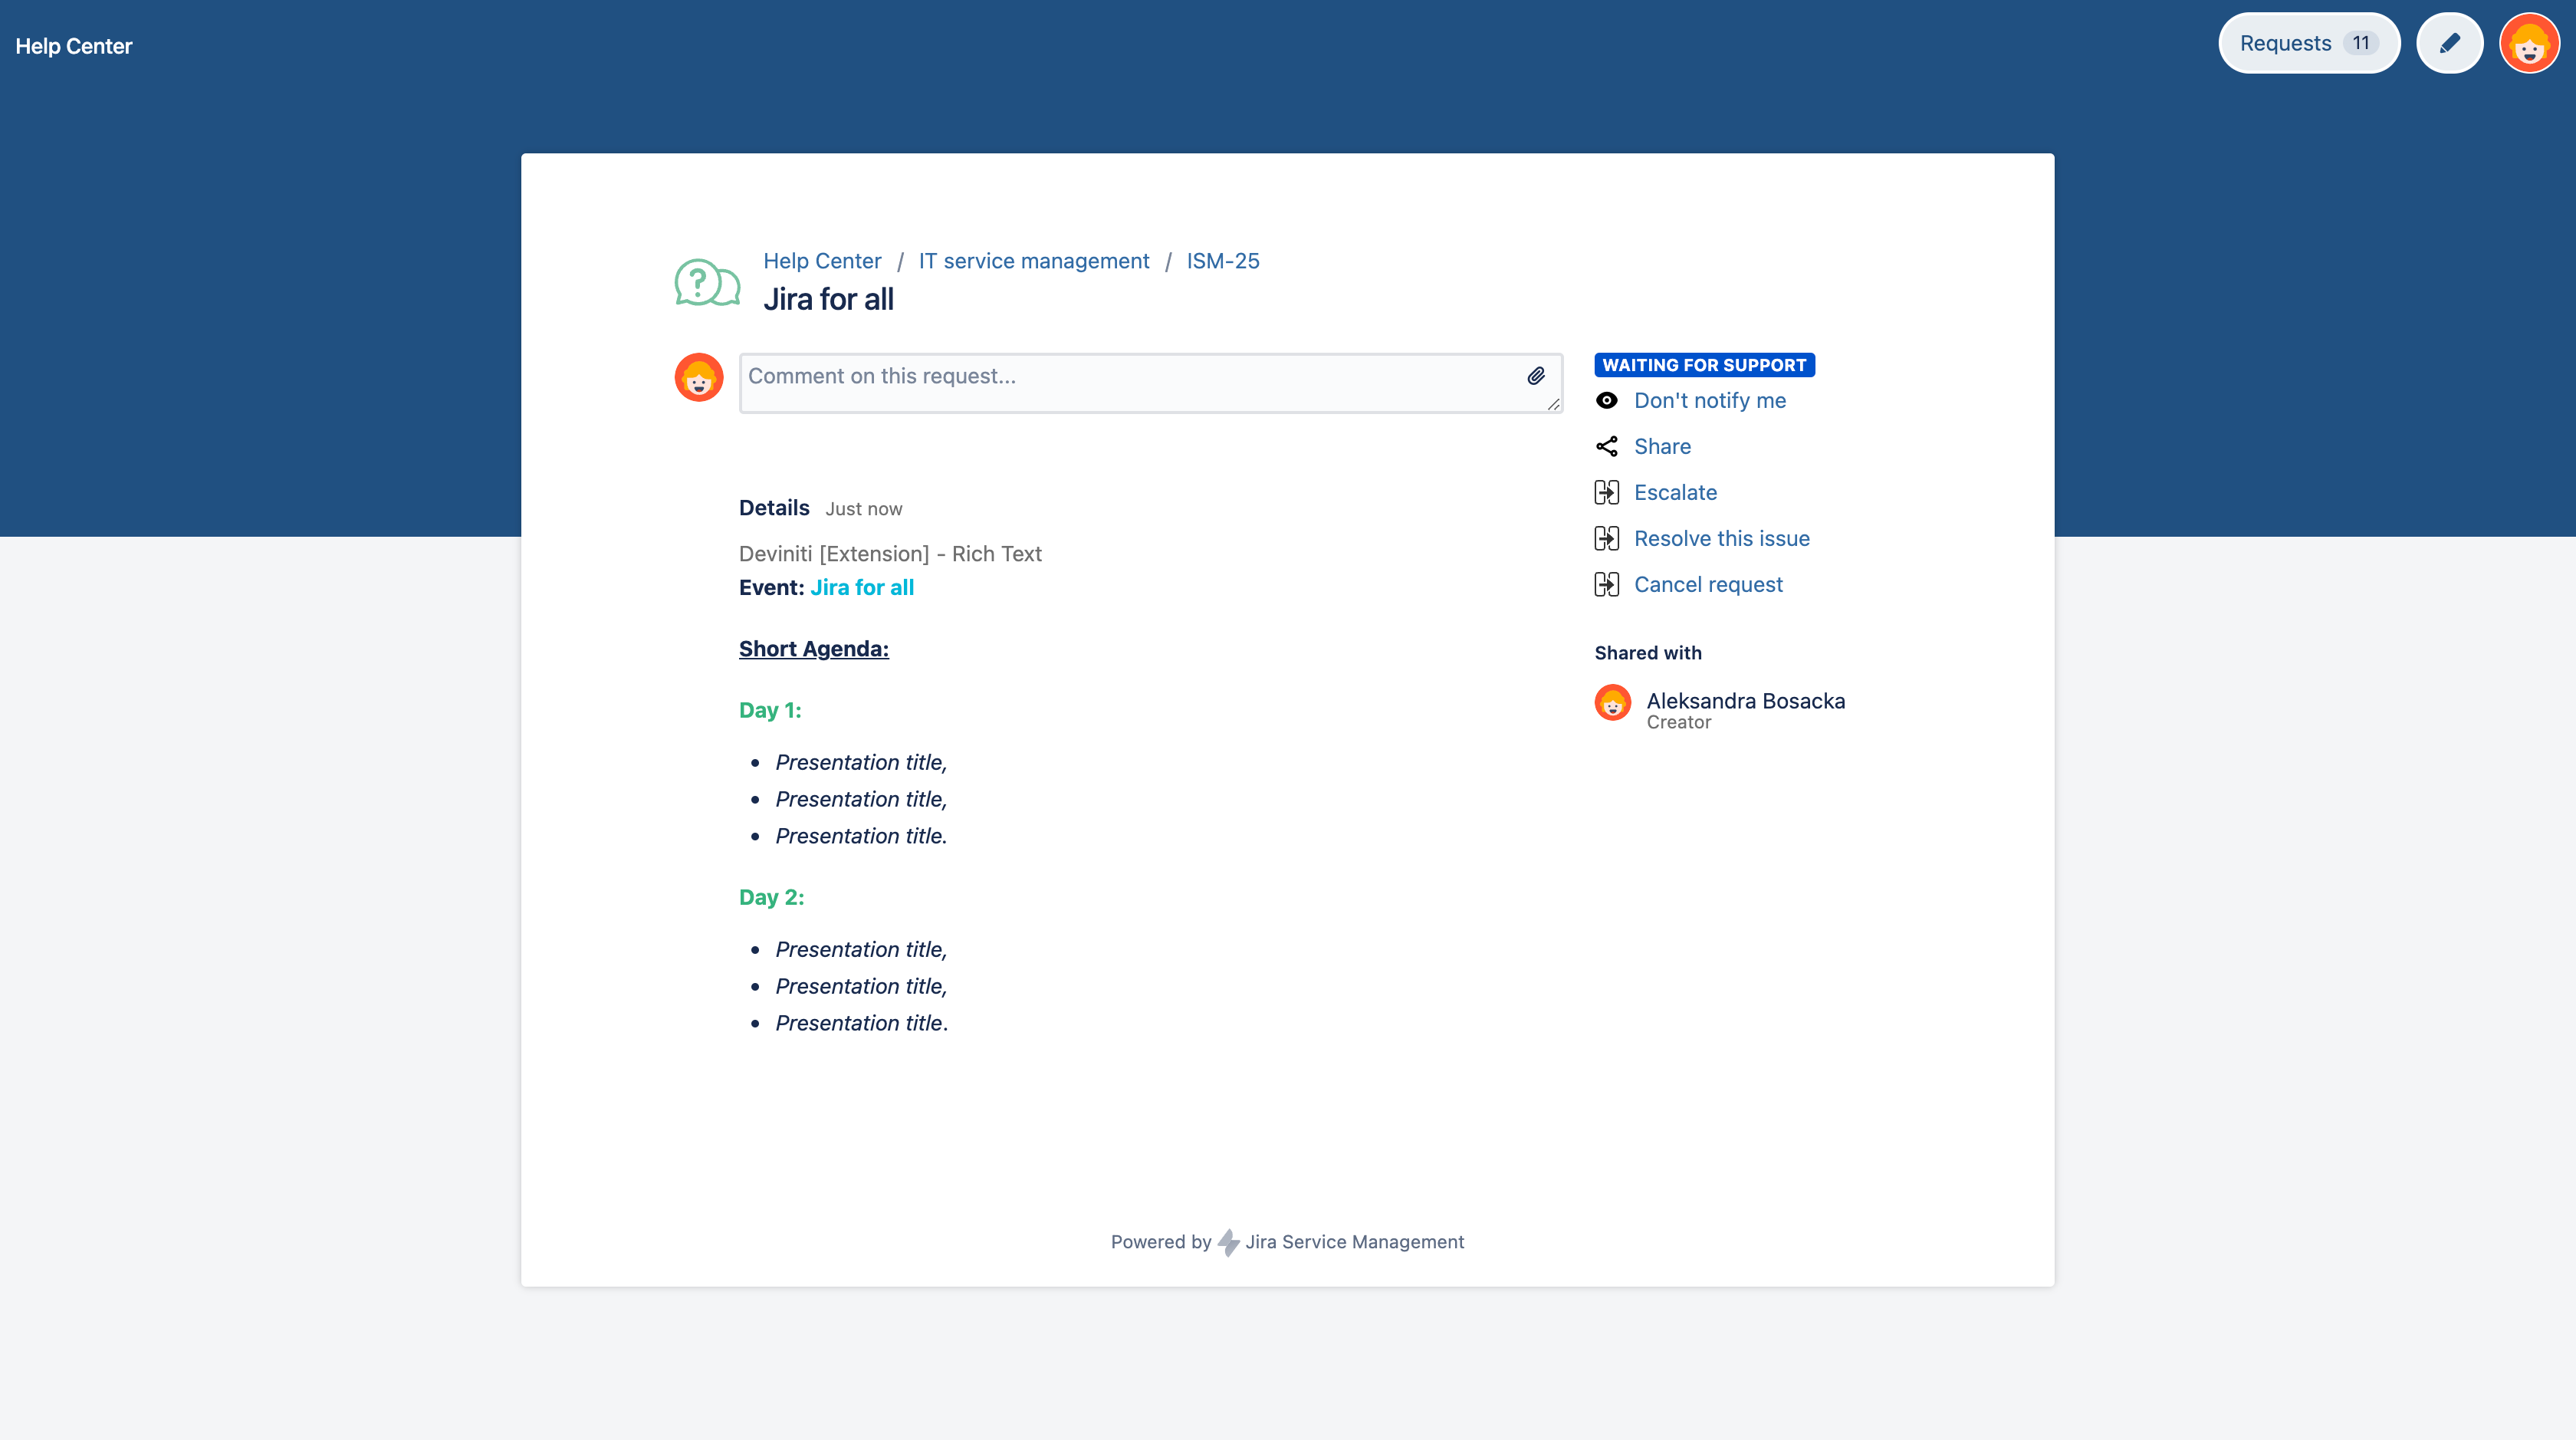
How to display the formatted content in the Rich Text custom field on the request details view
To showcase formatted content within the Rich Text custom field on the request details view, ensuring the correct configuration and mapping of the Rich Text field to the request details display is crucial. Moreover, verifying that users have the appropriate permissions to view the formatted content is essential. By configuring and mapping the Rich Text custom field, you can guarantee that the intended formatted content appears as expected on the request details view.
An issue arises when the Rich Text custom field displays HTML code instead of formatted text.
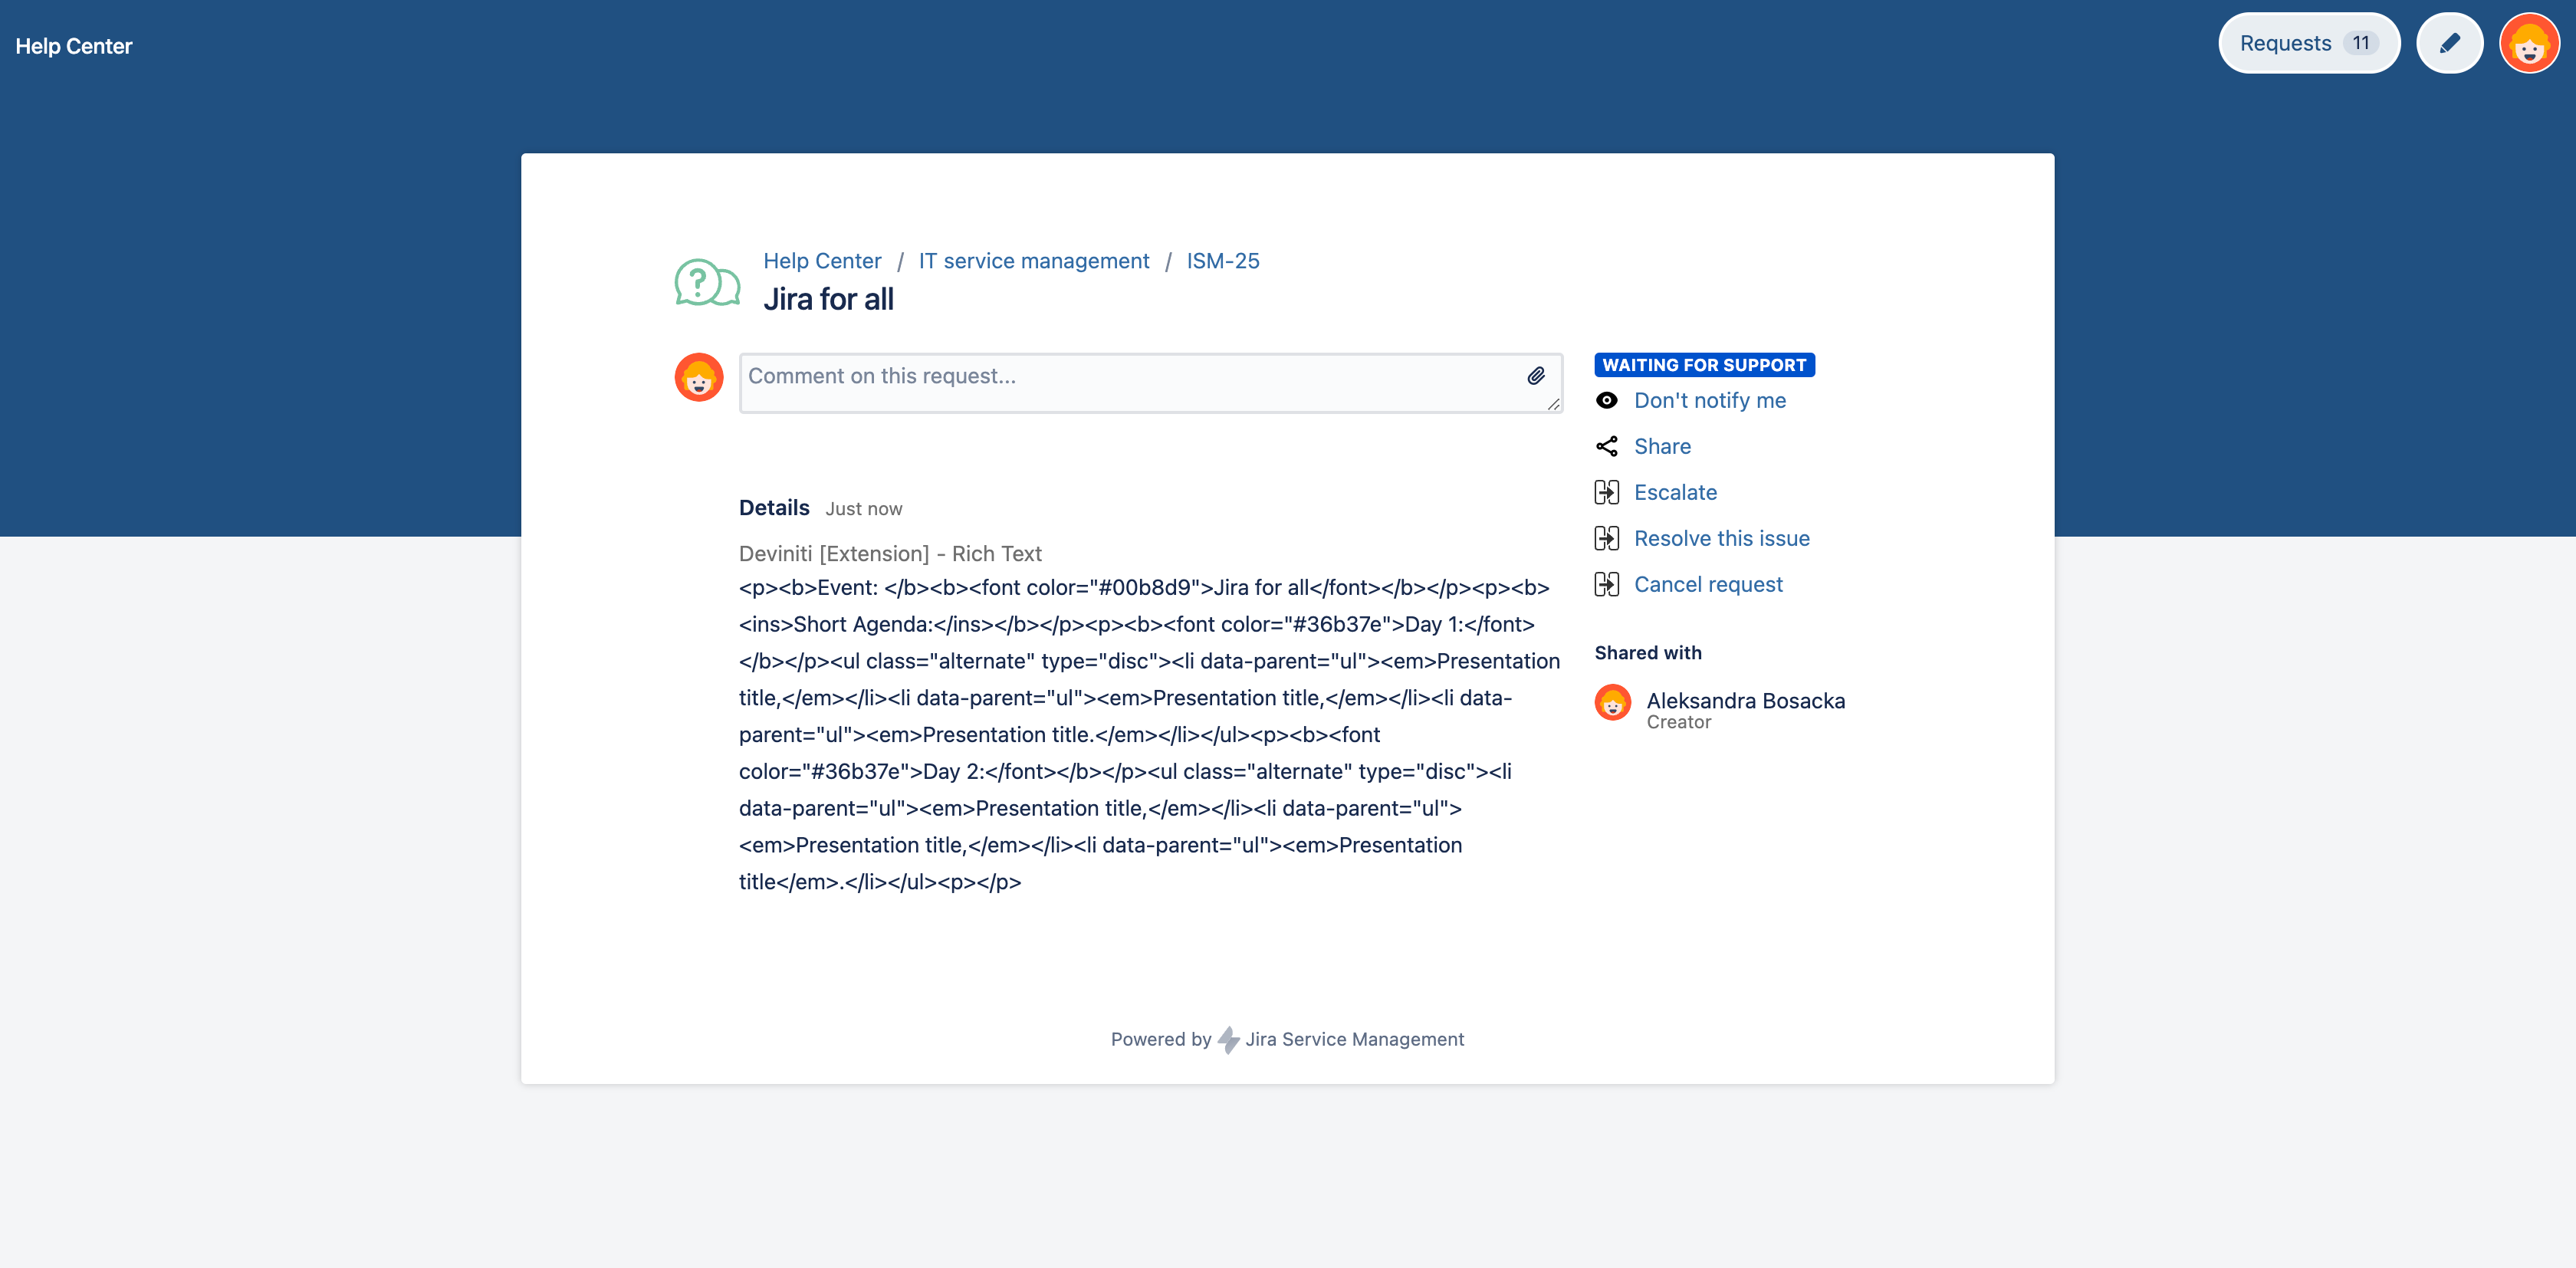
To guarantee that formatted content is correctly displayed on the user's request details and issue view, the project administrator must activate the Rich Text Renderer for the specific field within the configuration of the project settings' fields.
To update the renderer, adhere to the following steps:
- Go to the project settings and access the Fields configuration section.
- Click on the Edit fields button from the Actions dropdown.
- Locate the rich text custom field in the list.
- Click on the Renderers link in the right column.
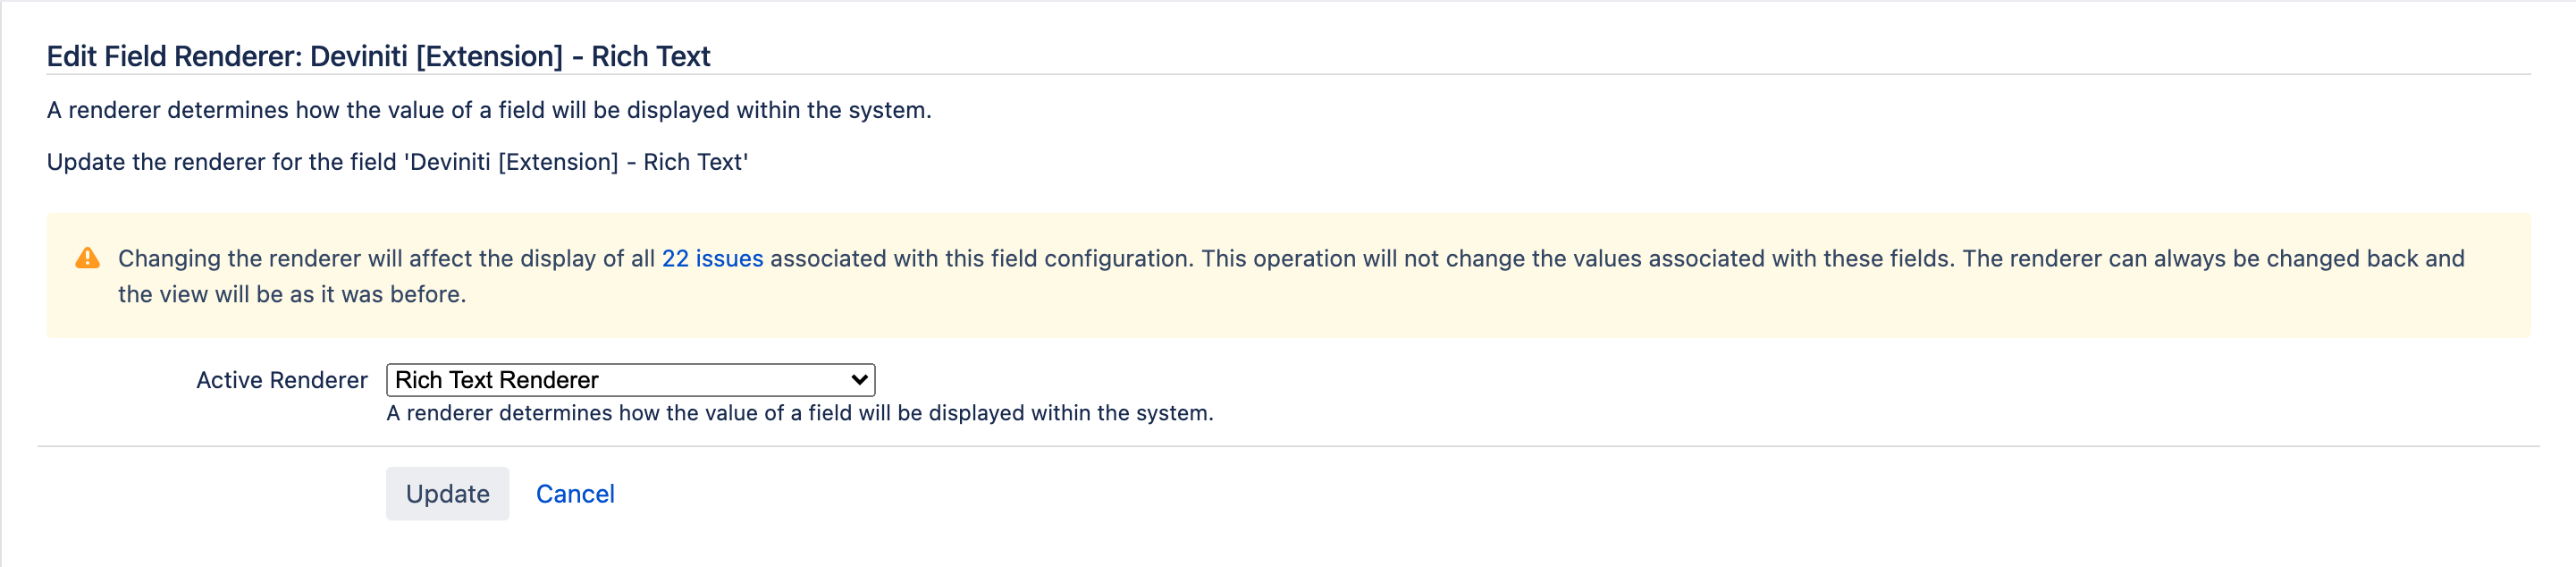
Once the required modifications have been made, validate the changes by clicking the "Update" button on the confirmation page. Subsequently, you can proceed to examine a sample ticket to observe the outcomes. In portal requests, the anticipated presentation of formatted text will be accomplished, replacing the HTML content.
Conclusion
As you can see, the Extension for Jira Service Management - Data Center Version is an indispensable tool for enhancing service desk operations. By exploring the frequently asked questions specific to the Data Center version, we have provided valuable insights into form customization, email display issue troubleshooting, and unique features tailored for Data Center environments.
With this knowledge, you can optimize the Extension's potential within your Data Center setup, elevating your service desk operations to unparalleled efficiency and effectiveness.


