Organize your work in Jira Service Management
15 min
Beginner
By the end of this lesson, you'll be able to:
- Star important queues
- Take bulk actions on work items
- Filter requests by their type
- Identify work items at risk of breaching their service-level agreement
- Link related work items
Navigate your queues
Your service space has multiple queues that sort and organize incoming customer requests.
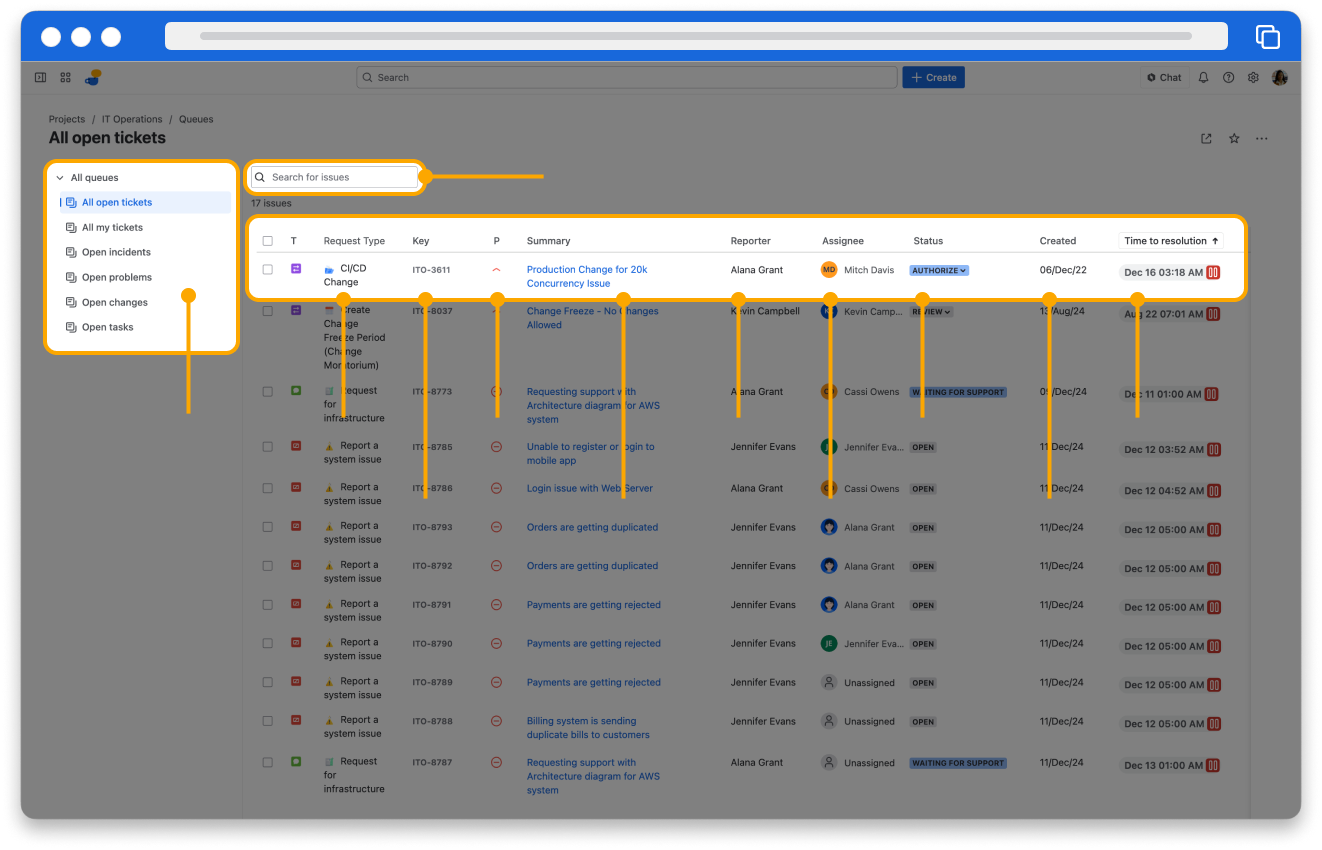
👇 Click the numbered icons below to learn about the information available in a queue.
In Jira Service Management, you can star important spaces, queues, and filters so you can easily find them later.
👇 Click the star for a queue to easily access it.
Bulk update work items
You may need to perform the same action across multiple work items. Instead of repeating the action on each work item, you can save time by performing a bulk action.
👉 For example: You can transition multiple requests at the same time, add comments to multiple requests, assign a user to multiple requests, link a work item to multiple requests, and approve or delete multiple requests
To perform a bulk action:
- From your service space, go to a queue that shows all the requests you’d like to work on.
- Select each request you’d like to include in the bulk action using the checkboxes.
- Select the appropriate action at the top of the queue.
- Follow the steps to complete that particular action.
👇Watch the video below to learn how to complete a bulk action.
Filter work by request type
A request type is a category that defines a related group of work items. Jira Service Management automatically assigns a request type to the work item based on your customer's selections when they submit a request. Along with queues, you can also filter work by request type.
👉 For example: Henry, a software engineer, helps the IT support team with any incidents that customers report. He filters the work in their service space by the Incident request type so he can see only the work items relevant to him.
👇 To filter your work by request type, select the options in the sidebar.
Monitor your SLAs
Your team has service-level agreement (SLA) goals that specify how much time it should take to resolve certain work items. Monitoring the SLAs of your work items will help you stay on top of your work and create a great service experience.
👉 For example: Since incidents can have widespread impact, their time to first response SLA is within one hour.
👇 Here’s an example of the SLAs section of a work item.
Depending on the status of an SLA, you’ll see a different icon and color.
- A clock icon means that the SLA is running.
- If the clock is gray, you haven’t yet breached the SLA.
- If the clock is yellow, the SLA will breach soon.
- If the clock is red, the SLA has breached.
- A pause icon means the SLA has stopped running, like when you’re waiting on a customer’s response.
- If the pause is gray, you haven’t yet breached the SLA.
- If the pause is yellow, the SLA will breach soon.
- If the pause is red, the SLA has breached.
- A red X icon indicates that a past SLA breached.
- 👉 For example: Once the agent responds, the time to first response SLA is no longer relevant. If the agent didn’t meet the time to first response SLA, that SLA will have a red X.
- A green check icon indicates that a past SLA was met.
- 👉 For example: Once an agent triages a request, the time to triage SLA is no longer relevant. If the agent met the time to triage SLA, that SLA will have a green check.
👇Click the tabs below to explore tips for monitoring your SLAs.
You can sort queues by how close they are to breaching an SLA. This helps you understand which requests to prioritize working on.
Customers can’t see any SLAs on their request in the portal. This is an internal metric to help agents prioritize and respond efficiently to requests.
Link related Jira work items
You can link work items in Jira Service Management to track the relationship between different pieces of work. When you link a work item to a request, other agents and teams can view and comment on it.
👉 For example: If a manager submits a request to get all materials for their new hire, you can link the ticket for the facilities team to procure a laptop.
To link a work item:
- Open the work item.
- Click Add, then Linked work item.
- Select the space the work item is in.
- Select a link type.
- Search for the work item or click Create linked work item.
- Select Link.
👇Watch this video to learn how to link work items.
You need permission to link work items in a space. If you can’t, check with your space admin.
Monitor due dates on your calendar
If your space admin enables it, you can view requests on your space calendar. By default, the calendar shows requests that have a value in both the start date and due date fields.
👇Here’s how requests appear on the calendar.
Your space admin can choose different date fields for the calendar. If your requests have both a start date and an end date, but don’t appear on the calendar, check with your admin.